The Complete Guide to Crispy Pizza: All the Ways to Create a Crispier Crust
For many pizza enthusiasts, a crispy, browned crust is one of the most sought-after qualities in a pizza. In this article, we will take a closer look at the concept of crispiness in pizza, explore the factors that influence it, and cover all the methods to achieve a crispier crust, complete with plenty of practical tips
Crispiness in Pizza: Introduction
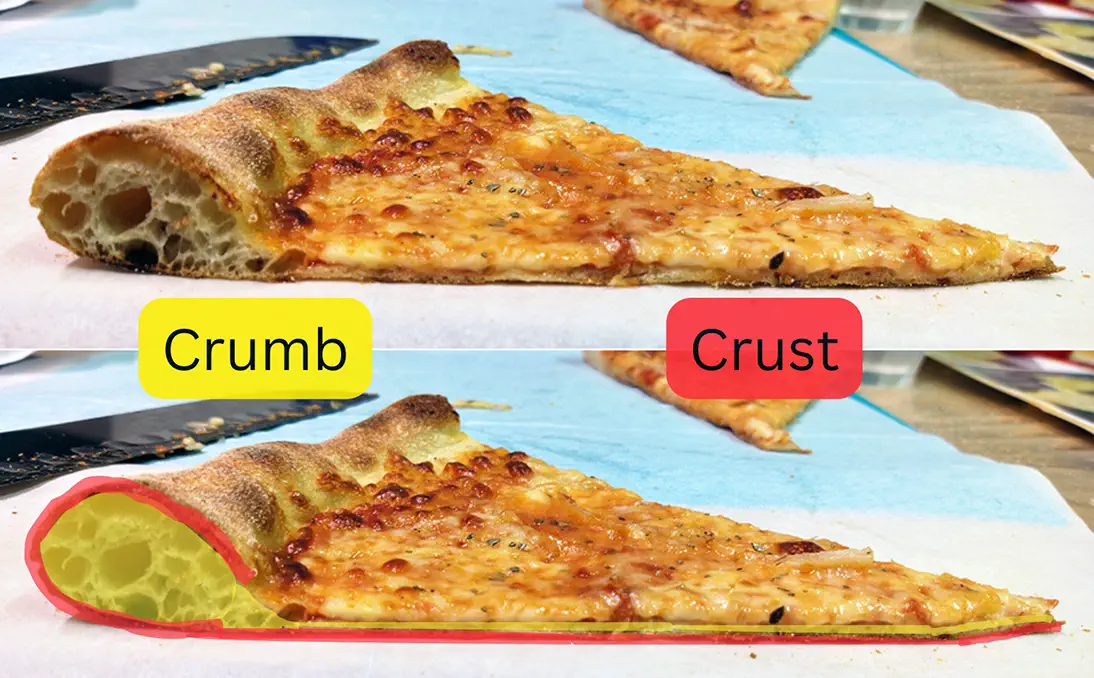
Crust vs. Crumb in Pizza
Before we proceed, it’s important to define some key terms to fully understand the concepts discussed in this article:
Crust: The outer “shell” of the baked product that dries, hardens, and browns during baking. In pizza, this refers to the bottom (base) and the exterior of the rim (cornicione).
Crumb: The inner part of the baked product. In pizza, this includes:
- The soft interior of the rim.
- The interior of the base, located between the hardened, browned bottom and the top layer of the dough, which is covered with sauce and cheese.
The Two Types of Crispiness in Pizza: Outer Crispiness and Full Crispiness
Before diving into how to make a crispy pizza, we first need to address an important question: what does “crispy” in pizza mean?
The dictionary defines crispiness as:
“Pleasantly thin, dry, and easily broken” and “having a pleasantly crisp outer layer.”
When it comes to pizza, crispiness can be categorized into two main types:
1. Outer Crispiness: The edges and bottom develops a hard, crispy shell (crust) of varying thickness, while the crumb remains soft.
2. Full Crispiness (Cracker-Style Crispiness): The entire dough transforms into a hard, dry texture that cracks in the mouth, resembling a cracker. In this case, the dough dries and hardens completely during baking, resulting in a structure with little to no moisture or a soft crumb – mostly a rigid crust throughout.
The methods for achieving each type of crispiness differ, and we’ll cover these in detail later.
The two types of crispiness described above represent the most common goals or “ends of the scale” for pizza crusts. While it’s theoretically possible to achieve a crispiness that falls between outer and full (depending on the crust’s thickness – more on that later), such results are less common and often less desirable. For instance, a crust that’s too thick and tough may fail to provide the ideal eating qualities.
In most cases, the goal is to achieve one of these two crispiness types, and this will be the focus of the discussion moving forward.
Outer Crispiness
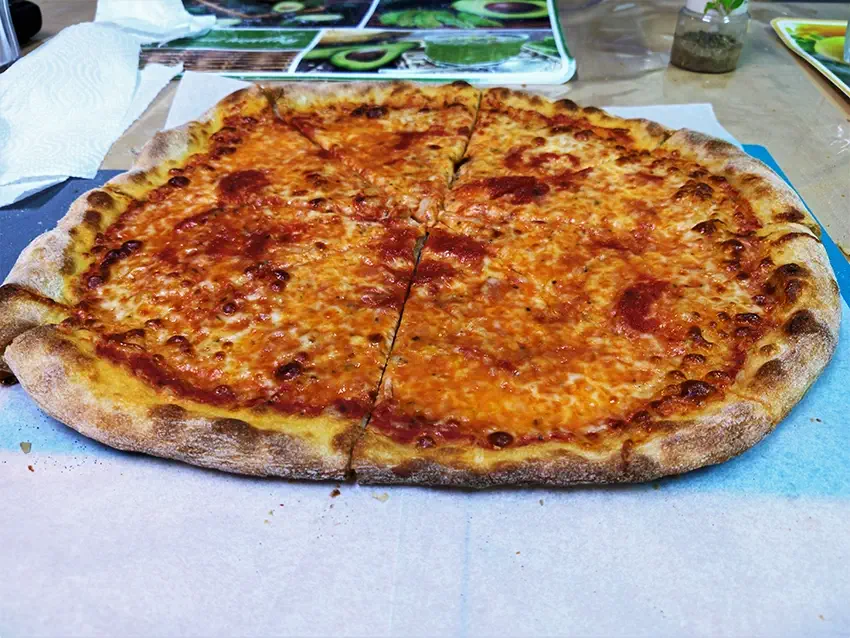
Outer crispiness is defined by a hard, crispy outer layer of crust with varying thickness (which influences the degree of crispiness – more on this later), paired with a soft crumb, particularly in the rim. The bottom of the pizza also develops a browned, firm, and crispy crust that provides structural support.
This type of crispiness is characterized by a satisfying bite that contrasts the crisp exterior with the soft interior.
Achieving this type of crispiness is generally more challenging and requires a combination of skill, knowledge, and precision across multiple factors – dough formulation, preparation, fermentation, and baking.
Full Crispiness
Full crispiness is typically seen in cracker-style pizzas. With this type of crispiness, the goal is to “dry” the dough as much as possible – including the crust and, particularly, the crumb (until the crumb essentially becomes crust). The result is a dough that is hard, dry, and crispy throughout, without any soft crumb remaining.
Generally, full crispiness is “easier” to achieve, as it “only” requires drying out the entire dough.
In practice, when aiming for full crispiness, the dough contains no crumb – it’s essentially just crust from edge to edge.
How Crispiness Develops During Baking
Crispiness in pizza (or any dough) results from the solidification and “drying” of layers within the dough. For a detailed explanation of the crust formation process and how it relates to crispiness, see the following article: From Dough to Pizza: A Deep Dive into the Processes Occurring Inside the Dough During Baking.
I highly recommend reading the above article, especially the sections covering crust formation and the browning of the dough – these processes are crucial for fully understanding the rest of this article.
In short:
- During baking, heat dries the surface of the dough.
- When the surface of the dough reaches 100°C (212°F) – meaning all the moisture has evaporated – the dough begins to solidify, forming a crust. This crust is the crispy “layer” in the dough.
- The thickness of the crust depends on the baking conditions, which we will discuss in the next section.
How Crust Thickness Affects Crispness
The thickness, or “depth” of the crust, directly influences:
- The eating characteristics of the pizza, including its perceived crispiness.
- How long the crispiness lasts after being removed from the oven.
In general, thinner crusts:
- Have a crackly and “brittle” texture with a higher crust-to-crumb ratio, often described as “eggshell crispiness.”
- Lose their crispiness faster.
This is because thinner crusts are more prone to moisture migration – the movement of moisture from areas of higher concentration (the crumb and toppings) to areas of lower concentration (the crust). This causes the crust to become moist and soggy, quickly diminishing its crispiness.
Simply put: thinner crusts absorb moisture more quickly, resulting in crispiness that lasts for a shorter time – sometimes just seconds, as seen with Neapolitan pizza.
An excellent example of a pizza with a very thin crust layer is Neapolitan pizza, baked at high temperatures for up to 90 seconds. This rapid baking process creates a thin, delicate crust. When a Neapolitan pizza comes out of the oven, its rim has a degree of crispiness; however, this crispiness fades completely within 30 seconds, due to moisture migrating into the crust.
In contrast, cracker-style pizzas, featuring full crispiness, have a thick crust layer, where most or all of the dough becomes crust. These pizzas retain their crispiness much longer after baking, due to their thick crust and minimal moisture content. This is similar to crackers, which maintain their texture for extended periods thanks to their exceptionally low moisture content.
On the other hand, thicker crusts:
- Contain more crust and less crumb. In “extreme” cases, like cracker-style pizzas, most or all of the dough becomes crust.
- When there is still crumb in the dough, a thicker crust tends to be tougher and may even become chewy. This happens because the inner layers of the crust retain more moisture than the outer layers, creating varying levels of resistance when bitten, contributing to a somewhat-chewy texture.
- Retain crispiness longer due to their greater “resistance” to moisture migration.
In summary: If the goal is to achieve crispiness that actually lasts after the pizza is removed from the oven, aim for a thicker crust. This can be accomplished by using a lower baking temperature and extending the baking time, a topic we’ll explore in more detail later.
The Relationship Between Crust Formation, Browning, and Crispiness
Crust formation, browning, and crispiness are distinct processes, but they are deeply interconnected. Understanding their relationship is essential before exploring ways to enhance crispiness.
Crust Formation
For a crust to form – and to become crispy – it must dry out. As mentioned earlier, crust formation begins when all the water has evaporated from the surface of the dough, leaving it completely dry. The thickness of the crust depends on the thickness of dry “layers” that form, which directly influences the crust’s crispiness and overall texture.
Crust Browning
Browning occurs through the Maillard reaction and caramelization, which are triggered only when the surface of the dough is dry and its temperature exceeds 140°C (285°F). Browning serves as both a visual and chemical indicator that the crust has formed, hardened, and lost enough moisture to begin crisping.
Generally, the longer the dough’s dry surface is exposed to high enough temperature (above 140°C), the more it will brown, firm up, and develop crispiness.
In Summary: Browning results from exposing a completely dry dough surface to sufficiently high temperatures. The degree of browning typically correlates with increased crispiness: the more the dough browns, the crisper it becomes.
How These Processes Interconnect
Both processes – crust formation and browning – rely on the dough’s surface being dry and free of moisture, and they occur simultaneously during baking.
Browning is a clear indicator that the dough’s surface has reached the necessary temperature and dryness for firming and crispiness. A browned crust signifies a dry crust that is beginning to turn crispy. The deeper and more even the browning, the greater the crispiness.
Conversely, a pale or under-browned crust often indicates insufficient crispiness (and also less flavor).
Crispiness does not always correlate with browning. For example, it is possible for a crust to become crispy without significant browning, under conditions where the surface dries and firms, but temperatures are too low for caramelization or the Maillard reaction. This typically happens during low-temperature, extended baking, such as with crackers, which can be pale yet crispy.
In Summary:
- Browning and crispiness are interlinked processes that occur simultaneously.
- A browned crust is almost always a crispy crust, as browning confirms that the necessary conditions for crispiness have been met.
- While browning is not strictly required for crispiness, in most practical scenarios (like pizza), a browner crust will also be crispier.
Given this relationship, enhancing browning is a key factor in improving crispiness, especially outer crispiness.
In the following sections, we will focus on the elements that influence browning in both the pizza’s rim and its bottom crust, and how these factors contribute to a crispier pizza.
Achieving Full Crispiness (Cracker-Style Pizza): Key Factors
Now that we’ve laid the foundation for understanding crispiness in pizza, let’s see how to achieve full crispiness.
As discussed, full crispiness is achieved when the entire dough – both the base and the rim – solidifies, hardens, and dries completely. To accomplish this, the goal during baking is to remove as much moisture as possible from the dough, resulting in a uniformly crispy texture.
To create full crispiness, three essential conditions must be met:
- Thin Dough: The dough should be rolled or stretched thin, ensuring neither the base nor the rim is too thick. A thin dough allows heat to penetrate more effectively, promoting even drying throughout its entire depth.
- Very Low Dough Hydration: Reducing the water content in the dough is critical. A drier dough is “easier” to dry during baking.
- Low(er) Temperature, Longer Baking: Baking at a relatively low temperature, over a longer duration, ensures the dough has sufficient time to dry completely without over-browning. This allows for gradual and even heat distribution, which is crucial for achieving full crispinesss.
These three factors – thin dough, low hydration, and extended baking at a lower temperature – work together to create the conditions necessary for full crispiness. By enabling the heat to dry the dough evenly and thoroughly, they ensure the entire structure of the pizza takes on a hard, cracker-like texture.
Thin Dough (Base and Rim)
Thin dough is essential for achieving full crispiness in cracker-style pizzas, and this principle applies equally to both the base and the rim.
In general, thicker dough introduces a greater challenge: a larger layer must dry during baking. This makes it more difficult to achieve uniform crispiness throughout the dough’s depth.
The logic is straightforward: thinner dough allows heat to penetrate more efficiently, enabling the entire dough to bake and dry evenly. This thorough drying is crucial for achieving the signature hard, crispy texture of cracker-style pizzas (full crispiness).
When the dough is too thick, it prolongs the baking time required to dry it completely. In such cases, the outer layer often browns excessively before the inner layers have sufficiently dried and solidified. This can create an undesirable texture that is neither full crispiness nor outer crispiness – often too tough on the outside, and/or chewy on the inside.
It’s important to note that the dough doesn’t need to be paper-thin. Excessive thinness can sometimes hinder crispiness, as we’ll explore later. However, avoiding overly thick dough ensures that moisture can be baked out effectively, allowing the entire depth of the dough to dry and crisp up during baking.
Low Dough Hydration
For a comprehensive article on dough hydration and its effects, see The Ultimate Guide to Dough Hydration: What Every Baker Should Know [Impact on Dough, the Baking Process, the Final Product and More] (recommended).
In general, lower dough hydration means the dough contains less moisture (water). With less moisture to bake out, it becomes easier and more efficient to dry the dough, achieving full crispiness.
Simply put, for cracker-style pizzas, where the goal is to dry the entire dough – low hydration facilitates faster and more efficient drying, leading to optimal full crispiness.
This applies specifically to cracker-style pizzas, where the dough is thin and consists entirely of crust without any crumb.
For standard pizzas with crumb layers of varying thickness, low hydration does not enhance crispiness. This is because the crust “seals” the crumb during baking, preventing significant moisture loss within the crumb. As a result, the crumb’s moisture level remains mostly unchanged. For more information on this phenomena, see the article linked above.
For cracker-style pizzas, dough hydration typically ranges from 25-45%. Lower hydration allows the dough to bake out more moisture, turning what would be crumb into crust, and creating full crispiness.
Very low dough hydration creates a stiff, elastic dough that often requires significant effort to shape into a pizza base, typically using a rolling pin. To address this, it is common to add fat the dough, which act as a dough softener and tenderizer, making the dough more extensible, and also contributing to the signature biscuity-cracker texture. This is why cracker-style pizzas usually incorporate a substantial amount of oil or fat, typically ranging from 5-10% in baker’s percentage.
Furthermore, low hydration limits gluten development because there isn’t enough water for the flour to form gluten bonds. This limited gluten formation is desired for cracker-style doughs, as it creates a more crumbly texture and prevents excessive chewiness.
Low(er) Temperature, Longer Baking
To achieve full crispiness, it is crucial to bake the dough at relatively low temperatures and for a longer duration compared to other types of pizza.
Baking at lower temperatures allows heat to gradually penetrate the dough, enabling a “deeper” crust formation. This is essential when aiming for full crispiness, as it ensures the entire dough dries evenly throughout.
If the dough is baked at too high a temperature, the following issues may occur:
- The crust will harden too quickly, trapping moisture inside the dough and preventing or delaying complete drying.
- The outer crust will dry and harden before the interior has had enough time to fully dry.
In general, baking time is determined by the baking temperature. Simply put: the lower the temperature, the longer the baking time, and vice versa (higher temperature = shorter baking time).
All else being equal, a longer baking time will result in a thicker crust, which is crucial for achieving full crispiness. For this reason, the key to full crispiness is not just the baking time, but the baking temperature – from which the appropriate baking time is derived.
For example, when baking at 300°C (570°F), extending the baking time may lead to a thicker crust; However, if the conditions for achieving full crispiness aren’t met (such as insufficient moisture loss or uneven drying), the crust will not be thick enough, and full crispiness will not be achieved.
For cracker-style pizzas and achieving full crispiness, typical baking temperatures range from 220-260°C (430-500°F), with baking times of 10-15 minutes.
While baking temperature and times may vary based on dough type and desired results, the fundamental principle remains the same: to achieve full crispiness, the dough must be baked at a lower temperature for a longer period.
Drying the Dough Pre-Baking (Curing)
Another technique for achieving full crispiness is drying the dough before baking, a process often referred to as curing. Curing is particularly effective for creating cracker-style pizzas and maximizing their crispiness.
The curing process involves rolling the dough into a pizza base after (or during) fermentation, and then leaving the rolled dough completely exposed to air to dry it out.
The exposed dough can be left in the fridge or at room temperature.
Drying the dough before baking causes its outer layer to lose moisture and form a dry “skin.” During baking, this dry layer responds more effectively to heat, drying and browning faster due to its lower moisture content. This contributes to crispiness and creates unique eating characteristics.
Additionally, the dry and stiff structure helps reduce the formation of bubbles during baking, as it physically prevents them from forming. This results in a flat dough of uniform thickness, with equal crispiness at every point.
A significant advantage of this technique is that it allows for “loading” the pizza with toppings, including those with high moisture content, while still achieving impressive crispiness. This contrasts with uncured doughs, in which, as we will see later, moisture from the toppings can negatively affect crispiness.
Achieving Outer Crispiness: Key Factors (Also Relevant for Full Crispiness)
All of the factors listed below, both together and individually, affect the outer crispiness of the pizza, and adjusting them will help you achieve a crispier pizza.
Each factor has a different degree of influence on crispiness; some have a greater impact, while others have less. Some factors are more challenging to implement, while others are easy and straightforward. Ultimately, the goal is to provide you with an understanding of all the factors that affect crispiness, enabling you to make adjustments based on your work processes and desired results.
The following sections are divided into four categories:
- Oven spring and its effect on outer crispiness
- Factors related to dough composition/formula (‘recipe’)
- Factors related to the work process
- Baking-related factors
Note: All of the factors below, unless otherwise noted, will also contribute to achieving full crispiness.
Oven Spring: The Foundation for Outer Crispiness
Oven spring is the stage in baking where the dough physically “puffs up,” gains volume, and becomes airy. You can read more about oven spring in the article From Dough to Pizza: A Deep Dive into the Processes Occurring Inside the Dough During Baking (section ‘Oven Spring’).
Outer crispiness is directly related to oven spring. In short, the greater the oven spring, the more open and airy the crumb structure will be, with larger “air bubbles”.
These air bubbles form a thermal “insulation layer,” making it harder for heat to penetrate the center of the dough, and causing it to concentrate mainly on its outer part (the crust).
Simply put, the greater the oven spring and the airier the crumb becomes during baking, the more heat will be concentrated in the crust, which will brown, firm up, and become crispier.
In summary: greater oven spring will create greater outer crispiness. In general, any factor that contributes to greater oven spring, will also indirectly contribute to outer crispiness.
Factors Affecting Oven Spring
The factors that influence the degree of oven spring are many, with the main ones being:
- Dough Hydration: The higher the dough hydration, the greater the potential for oven spring. More water in the dough creates more steam during baking, which helps expand the dough and increase oven spring.
- The Degree of Extensibility and Elasticity of the Flour and Dough: A dough that is too elastic (resisting) will limit oven spring, while a dough that is too extensible (stretchy) will stretch and gain volume until the gluten cannot withstand the load and collapse. The optimal balance is key for maximum oven spring.
- Baking Temperature: The higher the baking temperature, the greater the potential for oven spring. A hot oven causes the dough to rapidly expand, allowing for a quick(er) rise.
- Optimal Fermentation: If the dough is either under or over-fermented, this will inevitably have a negative effect on oven spring.
- The Amount of Sauce, Cheese, and Toppings: Excessive toppings can prevent the dough from expanding fully, limiting oven spring. The more “weight” there is on the dough, the more oven spring will be restricted, as the toppings can hinder the dough’s ability to puff up and form air bubbles in the crust.
Next, we will discuss the relevant factors in the context of crispiness.
Factors Related to Dough Formula/Recipe
The following factors are related to either the composition of the dough (dough formula) or the impact of different dough ingredients on the degree of crispiness of the final result.
Higher Dough Hydration (for Outer Crispiness Only)
You can read more about how dough hydration affects outer crispiness in the article The Ultimate Guide to Dough Hydration: What Every Baker Should Know [Impact on Dough, the Baking Process, the Final Product and More] (section ‘The Effect of Hydration on Browning and Crispiness’).
In short: When aiming for outer crispiness (and outer crispiness only – this section is not relevant for full crispiness), higher hydration will result in a crispier pizza.
This is due to the more open and “airy” structure of the dough during baking, which allows more heat to concentrate in the crust, accelerating its drying, solidification, and browning, thereby – increasing crispiness.
In summary: Higher hydration causes more oven spring, which contributes to outer crispiness.
The Type of Flour Used
The type of flour used can significantly impact the degree of browning and crispiness of the pizza. Flour has three main properties that can affect the degree of browning and crispiness:
- The protein content of the flour.
- The enzymatic activity in the flour.
- The extensibility and elasticity properties of the flour.
The Protein Content of the Flour
A significant portion of the browning in the dough results from the Maillard reaction, which is a chemical interaction between amino acids (derived from the proteins [gluten] that are broken down during fermentation) and sugars.
In theory (and in practice), a higher protein content in the flour increases the potential for the protein (gluten) to be broken down into amino acids during fermentation, thereby, enhancing the browning potential through the Maillard reaction.
In summary: Flour with higher protein content will generally provide greater browning and crispiness potential.
It is important to note that this is merely potential. Flour with a higher protein content does not necessarily guarantee a crispier result; this also depends on factors such as the quality of the fermentation and the extent to which the gluten is broken down into amino acids. However, all things being equal, dough made with flour containing higher protein content will brown more/faster during baking, and will usually be crispier.
Enzymatic Activity in Flour
Enzymatic activity in flour and its effect on baking are discussed in detail in the article The Ultimate Guide to Pizza Flour: Characteristics, Differences, and Choosing the Ideal Flour (section ‘The Impact of Enzymatic Activity in Flour on Browning’).
In short, enzymatic activity in flour refers to the action of amylase enzymes, which break down the starches in flour into simple sugars. These sugars then participate in the caramelization and Maillard reaction processes.
The higher the enzymatic activity in the flour, the more amylase enzymes it contains, resulting in more starch being broken down into sugars during fermentation and baking.
Generally, lower enzymatic activity in flour leads to less browning during baking, while higher enzymatic activity results in more browning.
For example, Italian flours have very low enzymatic activity. Therefore, if the goal is browning and crispiness, most Italian flours are not ideal when baking at temperatures up to 300°C (570°F). On the other hand, bread flours, which typically have high enzymatic activity, are better suited for achieving crispiness.
To increase the enzymatic activity in flour and enhance browning potential, diastatic malt powder can be added to the dough – more on that later.
Extensibility and Elasticity Properties of Flour
This section is less practical but still important to note: the extensibility and elasticity properties of flour can affect browning and crispiness potential.
In general, the more extensible the flour is, the more it can “stretch” during baking. This results in a more open and “airy” structure during baking (more oven spring), allowing more heat to concentrate in the crust, which accelerates and increases crispiness.
Sugar in the Dough
Sugar is essential for both the Maillard reaction and caramelization to occur; Therefore, adding any form of sugar to the dough will accelerate browning, and consequently, contribute to increased crispiness.
Typically, incorporating sugar at a level of 1-3% (based on baker’s percentages) can significantly enhance browning.
In addition to its direct impact on the crust’s browning, sugar also affects the crumb. In short, sugar is hygroscopic, meaning it “binds” to water molecules and retains them in the dough, leading to a softer and “moister” crumb.
In summary: Adding sugar to the dough accelerates browning and contributes to outer crispiness.
For more information on the effects of sugar on dough, see the article Sugar in Pizza Dough Explained: How It Affects Dough [Why & When to Use It].
Using Diastatic Malt Powder
You can learn more about diastatic malt powder and its effects on dough in the article Diastatic Malt Powder in Pizza Dough: What It Is, What It Does, and How to Use It for Better Pizza.
In short, diastatic malt powder contains active alpha-amylase enzymes, which increases the dough’s enzymatic activity (breakdown of starch into simple sugars), leading to enhanced browning.
Additionally, the accelerated breakdown of starch also creates more food for the yeast, allowing it to produce more gas. This may result in greater oven spring and a more airy crumb structure, thus – diastatic malt powder can indirectly contribute to improved outer crispiness.
Typically, the recommended amount of diastatic malt powder ranges from 0.1% to 1.5% (in baker’s percentages). The exact amount depends on several factors discussed in the article linked above.
In summary: Adding diastatic malt powder to the dough accelerates browning and contributes to outer crispiness. Diastatic malt powder is a “secret” ingredient that significantly impacts the browning of the dough. When fermented and baked properly, even small amounts can substantially enhance browning.
Using Fat in the Dough
Fat (such as oil, butter, or shortening) acts as a dough softener. You can learn about the many effects of fat on dough in the article Fat and Oil in Pizza Dough Explained: Why to Use It and How It Affects the Dough [Texture, Flavor & More].
In short, fat has a “softening” effect on the gluten structure, resulting in a less chewy, more tender, and melt-in-the-mouth texture. Additionally, because fat is hydrophobic (repels water), it slightly helps retain moisture in the dough during baking.
When it comes to outer crispiness, adding fat to the dough has several key effects:
- Fat can help achieve greater oven spring by making the dough more extensible.
- Adding fat to the dough results in a more tender crumb, which enhances the contrast between the crispy crust and the soft crumb.
- Fat may slightly soften the crust (although this typically doesn’t significantly affect crispiness).
- Fat helps prevent moisture migration after baking, which can help maintain crispiness for a longer time.
- Fat can delay the evaporation of moisture from the crust during baking, delaying its solidification and browning. However, in standard pizza dough containing no more than 10% fat, this effect is marginal and often not noticeable.
For full crispiness, especially in cracker-style pizzas, which tend to have higher fat content, fat serves two main purposes:
- It makes the dough more extensible, making it easier to roll out into a pizza base.
- Fat is key to the crumbly, biscuit-like texture of cracker-style pizzas. Without it, the texture shifts to a hard, brittle crisp, offering a less enjoyable eating experience compared to the satisfying biscuity crunch that fat provides.
In summary, the main effect of fat is that it softens the dough, affecting its eating characteristics. However, this softening can actually emphasize crispiness:
- For outer crispiness: It creates a greater contrast between the crispy crust and soft crumb, intensifying the perception of crispiness when eating. For standard pizzas, 1-5% fat is usually sufficient.
- For full crispiness: Fat contributes to a crumbly, cracker-like texture.
In summary: While fat doesn’t directly affect crispiness, it plays a crucial role in the overall texture of the pizza, helping to highlight the existing crispiness.
The Acidity (pH) of the Dough and Using a Preferment or Sourdough
The Maillard reaction – the primary process responsible for browning in dough – occurs most effectively in a neutral to slightly alkaline environment, with a pH range of 7 to 9.
The more acidic the dough, the slower the Maillard reaction, resulting in less browning (all other factors being equal).
Preferments like Biga and Poolish, and also sourdough, Increase the dough’s acidity (lower its pH). Sourdough brings the pH to around 3.5, while Biga and Poolish fall between 4.5 and 5.0. In contrast, direct dough, which doesn’t contain a preferment, has a pH range of 5.0 to 6.0.
Therefore, using a preferment creates a more acidic environment, which leads to slower browning during baking. The higher the amount of preferment, the greater the impact on browning.
In summary: using a preferment may result in slower browning and reduced crispiness.
To counteract this effect, you can do one of the following:
- Extend the Baking Time: Dough made with a preferment will naturally brown more slowly. To achieve the same level of browning and crispiness as direct dough (with all other factors equal), you’ll need to bake it longer.
- Add Sugar to the Dough: Incorporating sugar (or diastatic malt powder) into the dough helps “compensate” for the slower browning process caused by the higher acidity.
Factors Related to the Work Process
The following factors are primarily tied to the process and techniques used when working with the dough.
Optimal Fermentation
Baking the dough at its optimal fermentation point – when it is neither over nor under-fermented – has a direct and profound impact on crispiness.
From a practical perspective, achieving optimal fermentation is the single most important factor for crispiness, taking precedence over all other variables.
This is due to two main reasons related to the fermentation and ripening processes:
1. Residual Sugar in the Dough: The degree of rise and ripening during fermentation determines the amount of residual sugar in the dough – simple sugars broken down from the starch in the flour – that are essential to caramelization and the Maillard reaction.
- Under-Fermented Dough: When the dough is under-fermented, insufficient starch is broken down, leaving too little residual sugar for proper browning.
- Over-Fermented Dough: When the dough is over-fermented, yeast consumes too much of the residual sugar, leading to a similar deficit.
In both cases, the impaired browning reduces crispiness.
2. Effect on Oven Spring: Properly fermented dough develops sufficient gases from yeast activity and becomes extensible due to protease enzyme activity, which breaks down gluten to soften the dough. These factors – adequate gas production and softened gluten – are critical for achieving optimal oven spring.
- Under-Fermented Dough: Too elastic and lacking sufficient gases, limiting oven spring.
- Over-Fermented Dough: Though it may have enough gases, the gluten structure becomes overly weak due to excessive breakdown, also limiting oven spring.
In both cases, reduced oven spring negatively impacts browning and crispiness.
In summary: Achieving maximum crispiness starts with baking the dough at its optimal fermentation point. To do this, I recommend using PizzaBlab’s dough and yeast calculator to determine the ideal yeast quantity for your specific fermentation conditions, and reading these articles for further guidance:
- How to Cold Ferment Pizza Dough: Guide to Cold Fermentation (2 Methods)
- A Practical Guide to Room Temperature Pizza Dough Fermentation
This principle applies not only to the pizza rim, but also to the base. As we’ll see later, the base also “rises” during baking, and greater oven spring in the base results in better browning and crispiness of the pizza’s bottom.
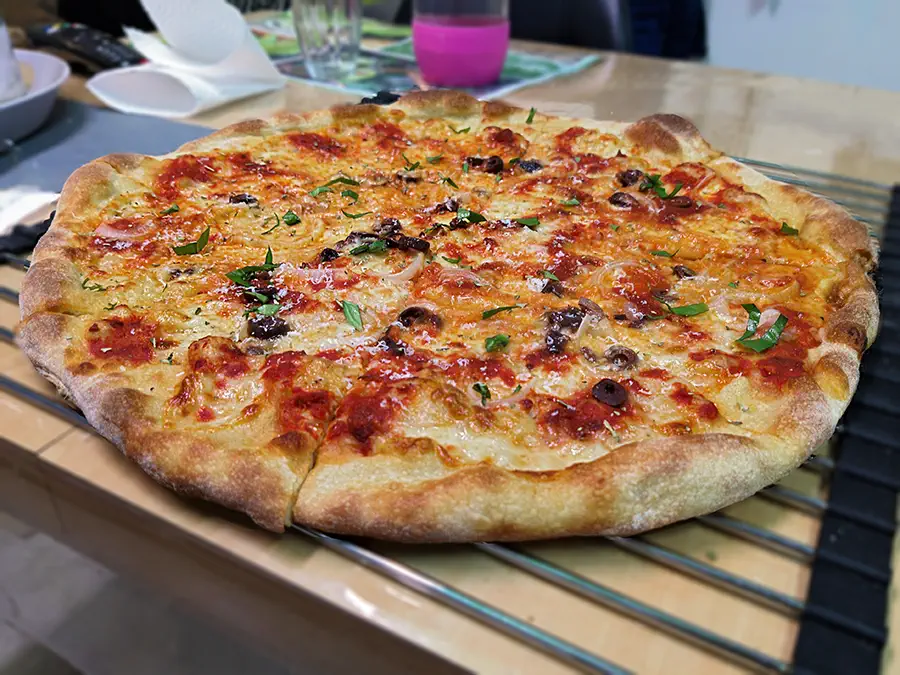
The Thickness of the Rim (for Browning and Crispiness of the Rim)
In this and the following sections, “rim” refers to the raised perimeter of the pizza, also known as the “cornicione” or “edges.”
This concept may initially seem tricky, but is actually quite simple: the thicker the rim, meaning it contains more dough, the greater the potential for outer crispiness.
Here’s why: all things being equal, a thicker crust can expand more during baking (oven spring), forming an airier structure. This increased airiness leads to the heat concentrating in the crust, accelerating browning and crisping. The result is a crust with a crispy outer layer, and a soft, airy crumb at its center.
Additionally, the thicker the rim, the higher the crust-to-crumb ratio, making the outer crispiness more noticeable – yielding a satisfying bite that is both crispy and soft.
Conversely, a flatter rim reduces the crust-to-crumb ratio, resulting in more crust than crumb. This shifts the eating characteristics toward full crispiness rather than outer crispiness.
For example, let’s compare two pizzas with identical crust layers (in terms of crispiness, browning, and thickness) but different rim thicknesses: one with a thin, flat rim, and the other with a thick, puffy rim:
- Thick Rim: Offers a greater contrast between the crust and crumb, with a thicker, airy crumb. The outer crispiness is pronounced, delivering a bite that is crispy on the outside and soft on the inside.
- Thin Rim: Provides less contrast between crust and crumb, often resulting in a rim that is fully crisp with minimal or no softness. The bite is more uniformly crunchy, leaning toward full crispiness.
This doesn’t mean the rim should be excessively thick, but it does need enough “substance” to create a contrast between the crispy crust and soft crumb. Without this balance, the result will lean toward full crispiness, lacking the desired outer crispiness.
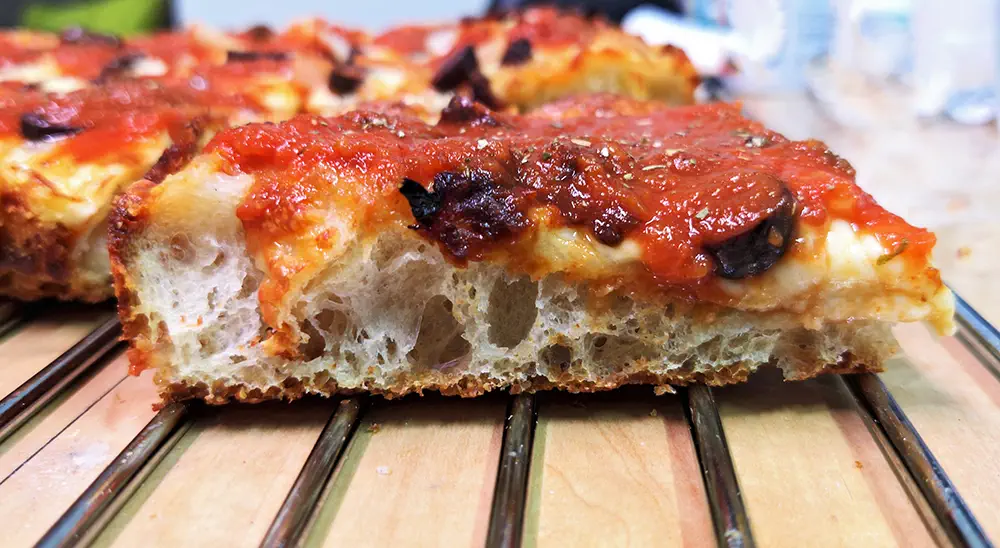
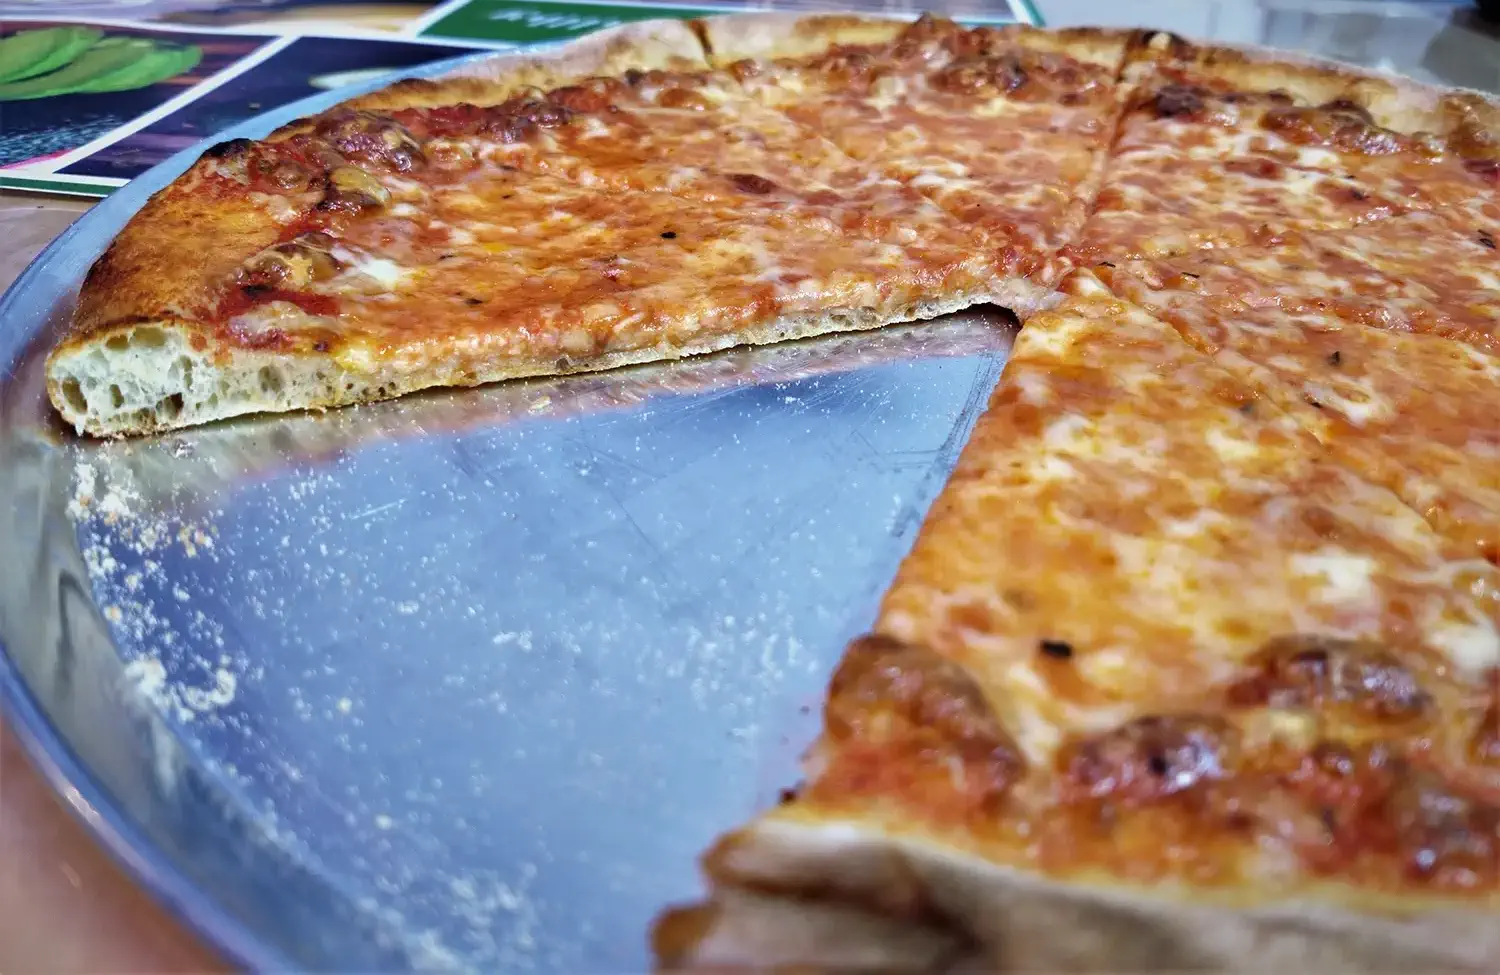
The picture below illustrates this concept. The part of the rim closest to the camera, which contained less dough, shows characteristics of full crispiness – a hard, crunchy bite with no internal softness. In contrast, the thicker parts of the rim display outer crispiness – a combination of a crunchy exterior and a soft, airy interior.
In summary: The thicker the pizza rim, and the more dough it has, the easier it is to achieve outer crispiness. A thinner rim, on the other hand, tends to create full crispiness, moving away from the crispy-soft contrast.
The Thickness of the Base (For Browning and Crispiness of the Pizza’s Bottom)
The thickness of the dough at the pizza base plays a critical role in determining how well the bottom browns and crisps during baking. This principle aligns with the concept discussed in the previous section regarding the rim.
This section focuses on achieving outer crispiness – a crispy yet somewhat tender bite in the base. It is less applicable to cracker-style pizzas or situations where the goal is full crispiness (e.g., significantly drying the entire depth of the dough to minimize moisture by the end of baking).
All else being equal, a thicker pizza base – meaning it contains more dough – has greater potential for oven spring, even if the dough is only a few millimeters thick. This creates a more “airy” structure in the base, that influences browning and crispiness.
The rationale is the same: a thicker, airier dough creates an insulating layer that slows heat transfer through the base. As a result, heat concentrates on the outer (bottom) portion of the base, enhancing browning and crispiness.
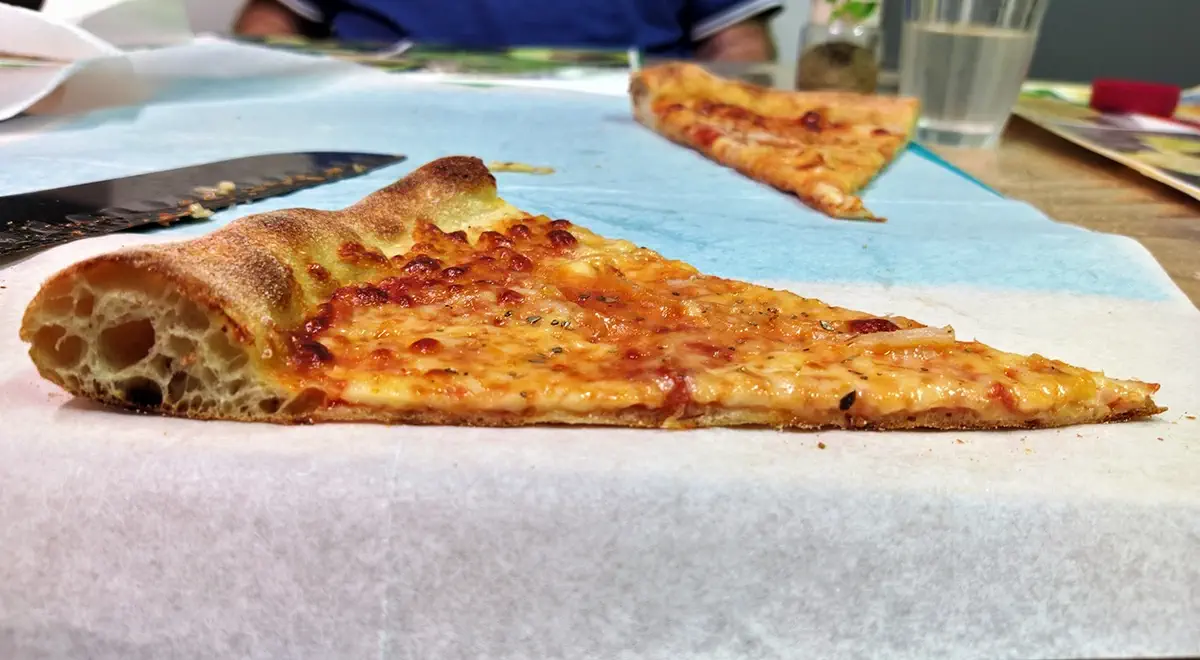
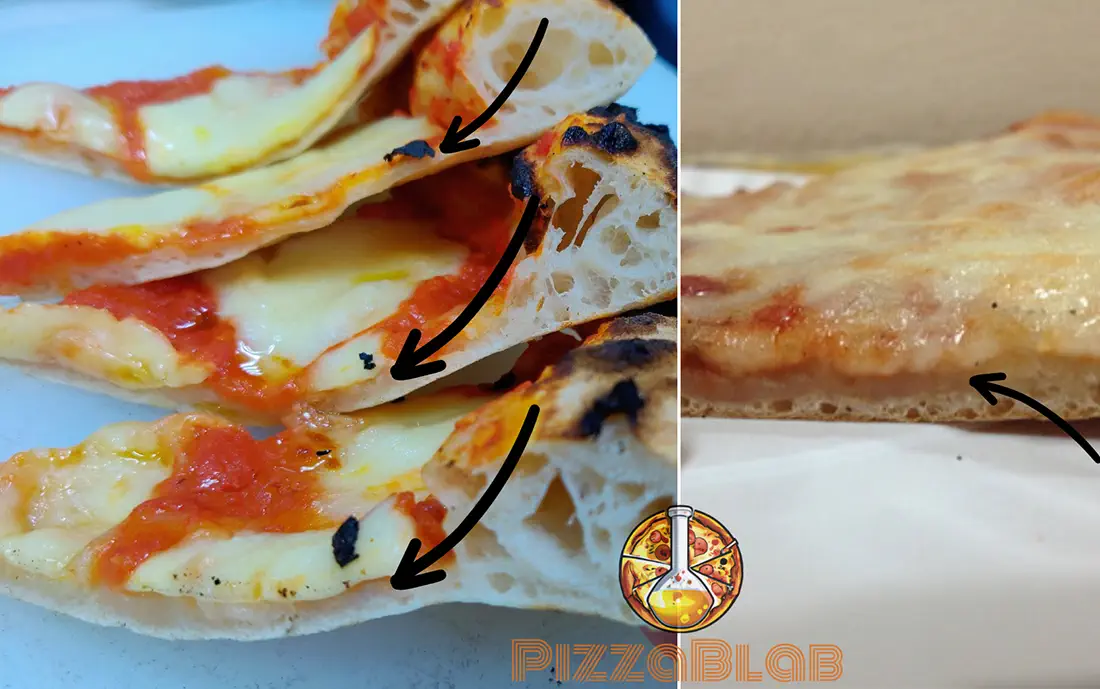
“Thicker” does not mean an excessively thick base, like Pizza Hut’s pan pizza. Even a few millimeters of difference in thickness can significantly impact the browning and crispiness of the pizza base. For example, as shown in the picture below, “air bubbles” form in the base even when it is relatively thin, contributing to outer crispiness.
All things being equal, the thicker the pizza base and the more dough it contains, the result will be:
- Concentration of Heat on the Bottom: More heat will be concentrated on the bottom, causing it to brown more and become crispier.
- A Thicker Crust Layer: With more heat focused on the bottom and increased dough in the base, the “crust” layer can potentially be thicker, contributing to a longer-lasting crispiness after baking.
- A larger crust-to-crumb ratio, enhancing the perceived crispiness of the base.
Conversely, the thinner the pizza base is:
- Rapid Loss of Crispiness After Baking (Moisture Migration): The thinner the base, the more susceptible it is to moisture migration from the sauce and toppings, leading to a faster loss of crispiness.
- Wetting of the Dough During Baking by Sauce and Toppings: If the dough is too thin, moisture from the sauce and toppings may accumulate, slowing down crust formation.
- Imperfect Heat Transfer: With thin dough lacking an internal “insulation layer” of air, heat will pass directly through the dough to the sauce and cheese above it, leading to reduced browning and crispiness.
- Inefficient Baking: Points 2 and 3 combined can cause the dough to bake inefficiently, affecting not just browning and crispiness, but overall quality. When heat passes through the dough and the dough becomes too wet, a thin layer of unbaked dough (known as a “gum line”) may form between the sauce and dough, as the heat struggles to bake this moisture-laden area.
These issues are particularly relevant when aiming for outer crispiness. For cracker-style pizzas, which have low dough hydration and are baked at lower temperatures for longer periods, the dough bakes and dries more efficiently. Therefore, these issues are less likely, even with thin dough.
In summary: A thicker pizza base, even slightly, helps achieve a crispier pizza base that retains its crispiness for longer.
Thick pan pizzas, such as al taglio Romana, Sicilian pizza, or Detroit style pizza, are great examples of the principles described here. They feature a thick, airy crumb with a very crispy bottom, offering a unique eating characteristics – a delightful contrast between softness and crispness.
The Stretching Technique/Method of the Dough (Hand Stretching vs. Using a Rolling Pin)
This section also follows the principle of dough airiness, and primarily applies to the pizza base.
When you use a rolling pin or another method that flattens the dough uniformly (like a dough sheeter), you essentially deflate the air bubbles within the dough.
This “compression” leads to a denser, less airy inner structure, which affects heat transfer, and the dough’s ability to crisp up effectively.
Without these air bubbles to act as an insulation layer, the heat transfer during baking becomes less efficient, and the resulting crispiness – especially on the pizza base – can be compromised.
To preserve the airiness and achieve the best crispiness, whether outer or full, follow one of these two principles:
- Hand Stretching the Dough: Using a rolling pin applies even pressure to flatten the dough, deflating the air cells. However, hand stretching avoids this issue by allowing the air cells to remain intact, preserving the dough’s natural airiness. Unlike when using a rolling pin, when hand stretching, it is almost impossible to fully deflate the air cells in the base.
- Additional Fermentation After Rolling: If rolling out the dough is necessary, allow it to “rest” for at least 10 minutes after rolling. This “fermentation” period allows the air cells to re-expand, helping to achieve a browner and crispier pizza base when baked.
The Amount of Sauce, Cheese, and Toppings
The less the pizza base is “loaded” with sauce, cheese, and toppings, the greater its potential for crispiness. This is due to two main factors:
- Weight: The more weight added to the base, the less oven spring there will be, which directly affects crispiness.
- Moisture: Sauce, cheese, and toppings release moisture during baking. Some of this moisture penetrates the dough, making it wet and delaying its drying, thus impacting crust formation and crispiness.
Key factors affecting crispiness include:
1. Too Watery Tomato Sauce: Thin or watery sauce can cause the dough to absorb excess moisture, affecting browning and crispiness.
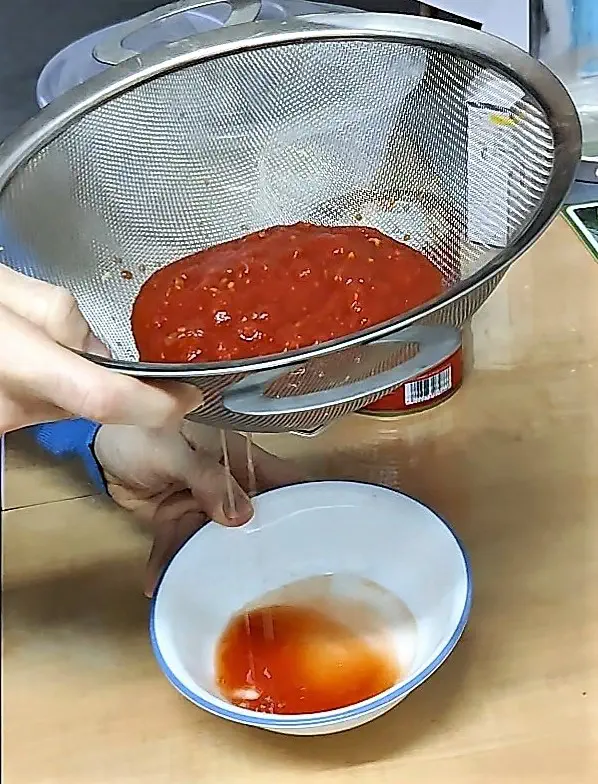
To prevent this, you can thicken the sauce by adding tomato paste, cooking it for a few minutes to evaporate excess moisture, or straining it through a sieve (see picture below).
2. Using Fresh Mozzarella without Straining It: Fresh mozzarella has a high moisture content, which is released into the dough during baking, potentially creating a wet puddle.
To avoid this, strain fresh mozzarella before use: Cut the balls into the desired shape (e.g. strips/cubes), and place in a strainer for a couple of hours to drain the excess liquid. It is recommended to cover the strainer to prevent the top of the mozzarella from forming a dry skin.
3. High-Moisture Toppings: toppings with high moisture content like peppers, mushrooms, and tomatoes release a lot of moisture during baking, which can wet the dough.
To prevent high-moisture toppings from wetting the dough, pre-cook them to evaporate some of the moisture before adding them to the pizza.
High-fat toppings like sausages or fatty cheeses may also have a “wetting” effect on the dough, but in a different way than water, as the fat doesn’t evaporate during baking, and interacts with the dough differently.
4. Too Many Toppings: Overloading the pizza, especially with high-moisture toppings, can weigh down and dampen the dough, impacting crispiness.
In summary: To maximize crispiness, avoid using overly thin sauce and overloading the pizza with toppings, especially those with high moisture content. If using high-moisture toppings, it’s best to pre-cook them to reduce excess moisture before adding them to the pizza.
Brushing the Dough Base with a Thin Layer of Oil to Prevent Moisture Transfer
This section is closely related to the previous one; It’s a simple trick that helps prevent moisture from the sauce, cheese, and toppings from transferring to the pizza base.
Simply brush a thin layer of oil onto the surface of the base. The oil layer should be minimal – just enough to make the dough surface slightly shiny. Avoid using more oil than necessary.
Since oil is hygroscopic (water-repellent), it creates a barrier that reduces the transfer of moisture from the sauce, cheese, and toppings to the dough during baking.
This method is particularly useful when using a thin sauce, a large amount of high-moisture toppings, or when the pizza base is very thin.
In summary: Applying a thin layer of oil to the pizza base helps minimize moisture transfer to the dough, thus maximizing crispiness.
Baking-Related Factors
The following factors relate to the baking stage of pizza. While they primarily apply to baking in a home oven, they are also relevant to general pizza baking and extend beyond just increasing crispiness.
Some of the sections below are covered in greater detail in the article How to Bake Pizza in a Home Oven: Everything You Need to Know [A Practical Guide], which I highly recommend reading.
Placing the Pizza on a Cooling Surface After Removing It from the Oven
This section likely offers the greatest “benefit-cost ratio” of all the factors discussed in this article. Its application is straightforward, and its impact on crispiness is significant.
At the end of baking, a considerable amount of steam escapes from the dough, particularly from the bottom. This happens because the sauce, and especially the cheese (which has melted and released fat), create a “buffer” that prevents moisture from escaping through the top of the pizza.
As a result, the main exit path for steam is through the bottom.
If, after removing the pizza from the oven, we place it directly on a flat, sealed surface, the steam – escaping in large quantities – will accumulate under the pizza, wetting it. This wetness will ruin the crispiness we worked hard to achieve, turning the base into a soggy mess.
To prevent this, it is essential to place the pizza on an elevated surface after removing it from the oven. This allows the steam to disperse, preventing its accumulation and direct contact with the pizza base.
Any surface that raises the pizza even slightly will suffice – even a few centimeters (or millimeters) – as long as it creates enough space for the steam to escape.
It is recommended to let the pizza rest on this elevated surface for at least a minute, preferably longer, before transferring it to a tray or serving dish (it’s too hot to enjoy immediately anyway).
For maximum crispiness, you can cut the pizza into slices and return it to the cooling surface. This helps retain the crispiness of the bottom throughout your pizza meal.
In summary: To preserve the crispiness we worked hard to achieve, it is crucial to place the pizza on an elevated surface that allows steam to escape from the bottom, for at least a few minutes.
Covering the Pizza or Placing It in a Sealed Box
To maintain maximum crispiness, avoid covering the pizza or placing it in a sealed box or container, as this traps escaping steam and causes it to be absorbed into the crust.
This is especially important when placing a freshly baked pizza directly into a pizza box – this will quickly lead to a soggy crust that has lost all trace of crispiness.
if you must use a pizza box and want to preserve the crispiness of the crust, follow these steps:
- Before transferring the pizza to the box, place it on a cooling surface for at least one minute. This allows most of the steam to escape, reducing its accumulation inside the box.
- Use a box with ventilation holes, and ensure they are open.
In Summary: For maximum crispiness, avoid transferring the pizza to a sealed container or box immediately after baking.
Using the Right Baking Surface
The baking surface plays a crucial role in the baking, browning, and crispiness of the pizza base.
The baking surface is the primary factor influencing the pizza base’s bake, and using the right surface is key to achieving a well-browned, crispy bottom. For a deeper understanding of baking surfaces and how to choose the right one, see the article Pizza Steel vs. Stone: The Ultimate Guide to Baking Surfaces [Properties, Differences, Uses & More].
In general, to achieve a crispy bottom, avoid using a standard oven sheet. A steel surface is ideal, though a standard pizza stone will also work well.
In summary: without the right baking surface, achieving a properly browned and crispy pizza base is challenging, if not impossible.
Preheating the Oven and Baking Surface
Preheating the oven and baking surface is essential for achieving a properly baked pizza in general, and especially when aiming for crispiness.
Proper preheating ensures the pizza is exposed to adequate heat from the moment it enters the oven, both from above and below. Since pizza bakes quickly, the initial heat “burst” is critical, particularly for achieving crispiness.
In summary: Always preheat the oven and baking surface before placing the pizza inside. Typically, preheating for about 30 minutes is sufficient.
Longer Baking Time at Lower Temperature (Creating a Thicker Crust)
As previously discussed, baking time, which is determined by the baking temperature, directly affects both the crispiness of the pizza and how long that crispiness lasts after the pizza is removed from the oven.
In general, with all else being equal:
- The lower the baking temperature, the longer the baking time (since crust formation is slower).
- The longer the baking time, the thicker the crust layer becomes (due to additional drying of layers in the dough).
A thicker crust layer results in:
- Increased crispiness – for both outer and full crispiness.
- Crispiness that lasts for longer after the pizza is removed from the oven.
In simple terms:
- A longer baking time results in a thicker crust, which increases crispiness and helps it last longer after baking.
- A shorter baking time produces a thinner crust, causing the crispiness to fade more quickly once removed from the oven.
It’s important to note that baking time is determined by the baking temperature. When baking at a specific temperature, there is a limit to how much the baking time can be extended. For instance, when baking a Neapolitan pizza at around 450°C (840°F), even a slight extension of the baking time could cause the crust to burn before it thickens. Similarly, at lower temperatures, extending the baking time without adjusting the temperature may lead to uneven baking, or other undesirable outcomes.
In summary: To achieve a noticeably crispier crust that maintains its crispiness longer, extend the baking time, which typically involves baking at a lower temperature.
This applies to both outer crispiness, where the thickness of the crust plays a crucial role in how long the pizza remains crispy after being removed from the oven, and full crispiness, where the heat needs to penetrate the dough’s depth to dry it evenly.
Reheating (Entire Pizza or Individual Slices)
Reheating or “re-baking” an entire pizza or individual slices, is another effective technique to enhance crispiness.
Simply allow the pizza to cool slightly after removing it from the oven, letting most of the post-bake moisture evaporate. Once it has cooled for a few minutes, return it to the oven for a quick “bake” of about one to three minutes. You can use either the original baking temperature or a lower one.
During this reheating process, the heat focuses on the crust (both the rim and bottom), causing it to dry out further, and become crispier.
In summary: Reheating an entire pizza or individual slices gives it an instant crispiness boost.
This is a common practice in pizzerias that sell individual slices, such as many New York pizza shops. When an order is placed, a slice is taken from a pre-baked pizza and reheated in the oven, which is why reheated slices often have an exceptionally crispy crust.
For Pan Pizzas: Removing the Pizza from the Pan and Baking Directly on the Baking Surface (To Brown and Crisp the Bottom)
This technique is for pan pizzas that are baked on a baking surface (stone or steel), in cases when the bottom hasn’t browned enough or when you want to enhance its browning and crispiness.
Simply remove the pizza from the pan and place it directly on the baking surface for a brief bake, typically 2-3 minutes. Check the bottom every 10-20 seconds, as browning can happen quickly.
In summary: If the bottom of your pan pizza hasn’t browned to your liking, removing it from the pan and transferring it directly to the baking surface for a brief bake can help finish browning.
Using the Broiler to Finish Browning
Using the broiler (a.k.a. grill mode) provides a “heat blast” from above, accelerating the drying and browning of the pizza rim and increasing its crispiness.
Using the broiler is most effective towards the end of baking, after the dough has fully set, when all that remains is a final boost of browning. It is not recommended to use the broiler throughout the entire baking process.
Since the broiler radiates direct, intense heat onto the top of the pizza, the rim may brown very quickly once activated. Therefore, it is crucial to keep a close eye on the pizza – the difference between ideal browning and burnt pizza can be mere seconds.
Additionally, using the broiler will inevitably radiate intense heat onto the sauce, cheese, and toppings as well. Thus, it’s advisable to use the broiler in a controlled manner to prevent these ingredients from drying out too much or burning.
In summary: The broiler is especially useful towards the end of baking – the last 1-2 minutes – when you want to give the pizza a top “heat blast” for a final burst of heat, ensuring optimal browning and crispiness.
Using Convection Mode to Finish Browning
Convection mode, also known as “fan-forced” mode, uses hot air circulation to bake the pizza. You can read more about the role of convection in baking in the article How Pizza is Baked: Understanding the Thermodynamics of Pizza Baking.
In short, convection mode involves a fan at the back of the oven, paired with a heating element. The fan circulates the hot air radiated by the heating element, creating forced convection – a circulation of hot air that effectively bakes the pizza.
This differs from conventional/standard baking mode, which relies on heat radiated from the top and bottom heating elements.
Because convection mode continuously exposes the pizza to hot air, it causes the dough, sauce, cheese, and toppings to dry faster. This can lead to quicker browning and increased crispiness.
However, convection mode can be a double-edged sword when baking pizza:
- Drying the dough too quickly can limit oven spring, affecting the crumb texture.
- Over-drying the dough may result in a thick and tough crust.
- Convection also dries the sauce, cheese, and toppings faster. While this can be beneficial for high-moisture toppings, it may cause excessive drying or over-browning of the sauce and cheese.
To make the most of convection mode, it’s best to switch to it during the last few minutes of baking, similar to using the broiler. This can enhance crispiness, and create more uniform browning in the crust.
Be sure to monitor the pizza closely after activating convection mode, as it can significantly accelerate browning, especially toward the end of baking when the crust has already dried out.
In summary: Convection mode can be used toward the end of baking to speed up browning or create more uniform browning. It is also particularly useful when you want to intentionally dry out the dough, cheese, or toppings, but care should be taken to avoid excessive drying.
Enjoy the content on PizzaBlab? Help me keep the oven running!