The Practical Guide to Baking Professional Pizza in a Home Oven: Settings, Temperature & Technique
Baking professional-quality pizza in a home oven isn’t about the oven itself – it’s about mastering thermodynamics. While a home oven can’t reach 500°C/900°F, you can achieve incredible results by using the right technique and tools. This guide breaks down the science of home baking to help you get a crispy, well-browned crust every time
Baking Pizza in a Home Oven: Introduction
In theory, baking pizza seems straightforward: turn on the oven, place the pizza inside, bake for the recommended time and voilà – a freshly baked pizza!
In reality, though, there are subtle yet crucial factors that can greatly influence how your pizza bakes and, ultimately, its quality. This article will explore these details to help you achieve the best results.
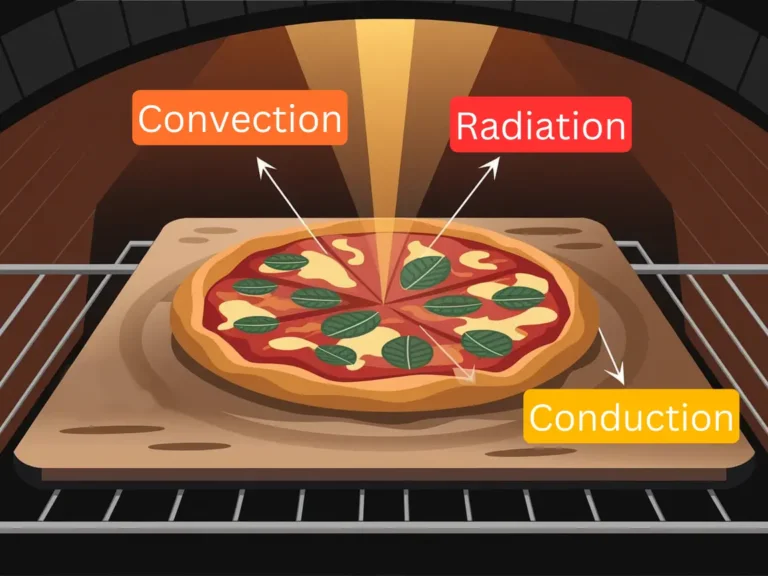
Before diving into the practical steps, I highly recommend reading Pizza Baking Thermodynamics: Understanding Heat Transfer (Conduction, Radiation & Convection), which explains the theoretical and physical principles of baking pizza. This background will provide a solid foundation for understanding the tips and techniques outlined below.
Also, be sure to read your oven’s user manual. It offers valuable insights into the functions of your specific oven and how to use them effectively.
Oven Settings and Modes for Pizza Explained
Below is an overview of the basic baking and cooking settings commonly found in modern home ovens, along with their symbols and uses.
While the symbols may differ slightly between brands and models, their general design and functionality are consistent across most manufacturers.
For precise information about the symbols on your specific oven, consult the user manual that came with it.

Top and Bottom Heat (Conventional/Baking Setting)
This is the standard or conventional baking and cooking setting. In this setting, both the top and bottom heating elements are activated, providing even heat distribution from both directions.
The top-and-bottom heat setting is ideal for most baking and cooking tasks, including baking pizza.
Bottom Heat Only
In this setting, only the bottom heating element is activated, providing heat exclusively from the bottom of the oven.
This setting is useful when you need to minimize radiant (“direct”) heat exposure to the top of your food.
Note for Gas Oven Users: Most gas ovens only have a bottom burner, meaning they lack a dedicated heat source from above.
Convection (Fan-Forced) Setting
Understanding the Convection Setting
Most modern ovens feature a convection setting designed to cook or bake food using hot air.
In this setting, two main components are activated:
- A rear heating element located at the back of the oven.
- A fan positioned directly in front of this heating element.
The upper and lower heating elements are inactive when using the convection setting.
This setting operates through forced convection, where the fan circulates heat from the rear heating element throughout the oven chamber. This creates a steady flow of hot air, ensuring a consistently uniform temperature. Instead of relying on radiation (direct heat from the heating elements or oven walls), convection setting focuses on evenly distributed hot air.
The result is faster and more even baking or cooking, as the constant air circulation surrounds the food and heats it uniformly. This contrasts with conventional baking, where heat from the upper and lower elements may not reach all parts of the food evenly.
Using the convection setting typically shortens baking times by about 25% compared to traditional top-and-bottom heat settings, all things being equal.
Accelerated Drying of Food When Using Convection
Using convection has another significant impact on food – it accelerates drying.
The constant circulation of hot air within the oven chamber causes food to dry and brown faster than it would with conventional baking, which relies on top and bottom heat.
As hot air contacts the food, it draws out moisture; the more air exposure, the faster this drying occurs. In addition, drier surface promotes the Maillard reaction, leading to quicker and more intense browning.
In conventional baking, the air remains relatively still (or rises naturally toward the oven ceiling due to natural convection), which results in slower drying and browning compared to conventional baking setting.
Therefore, convection setting is ideal when you want to dry the surface of food and achieve a crispy, caramelized exterior.
Air fryers or appliances with an ‘air fry’ function operate on the same principle as convection, crisping food by circulating hot air. The convection setting in home ovens works the same way, drying and browning food through continuous air movement (forced convection).
In simpler terms, home oven ‘convection setting ‘ is essentially ‘air frying’.
For instance, the convection setting is particularly effective for browning or creating a crust on meat or vegetables, whether used throughout the entire cooking time or activated in the final minutes to dry the outer layer and enhance crispiness.
For pizza, using convection promotes faster browning and drying of the crust or toppings.
Conveyor ovens, commonly used by pizza chains like Domino’s, Pizza Hut, and Papa John’s, typically bake through convection alone. These ovens “inject” hot air onto the pizza as it moves along a conveyor belt, effectively cooking and drying the pizza, particularly the toppings, which often contain a lot of moisture. Since moisture is the number one enemy of delivery (DELCO) pizza, conveyor ovens are well-suited for this purpose.
However, since the convection setting dries out food, its use isn’t always recommended, and can sometimes have unintended negative effects. It’s important to ensure that convection is appropriate for the type of food being prepared and the results you’re aiming for.
For instance, convection mode works great for making French fries or potato wedges (crispy on the outside, soft on the inside, provided they are pre-cooked), creating a crispy crust on meat or chicken, or baking certain types of cookies. However, it is not ideal for baking most types of cakes or bread, as we’ll discuss in more detail later on.
Using Convection Setting to Cook or Bake on Multiple Levels/Racks
A significant advantage of using convection mode is the ability to bake or cook on multiple levels or oven racks simultaneously.
In conventional baking mode (top and bottom heat), heat is radiated from the heating elements and the oven walls. When two trays of food are placed in the oven, the top tray “blocks” heat from above, while the bottom tray blocks heat from below. This results in uneven heat distribution, with the top tray receiving heat from above and the bottom tray primarily receiving heat from below.
Convection mode solves this “issue” by evenly and continuously circulating hot air throughout the entire oven chamber, ensuring that food on all levels receives heat uniformly.
As a result, the convection setting is highly effective for baking or cooking food on multiple levels at once. However, it’s important to remember that the circulating hot air can cause food to dry out. Therefore, make sure that using convection mode on multiple levels does not compromise the quality of your food (i.e., lead to too much drying or browning).
Top and Bottom Heat + Fan Setting
In this setting, the upper and lower heating elements are activated along with the fan, creating a flow of hot air throughout the oven (forced convection).
Unlike “standard” convection mode, the rear heating element is not used in this setting.
Bottom Heat + Fan (“Pizza Setting”)
In this setting, only the bottom heating element operates, along with the fan, which circulates hot air throughout the oven (forced convection). The rear heating element is inactive in this setting.
Some ovens refer to this setting as “pizza setting.” More detailed information about pizza setting will be provided later in this article.
Broiler / Grill (Intense Top Heat Only)
You’ll find detailed information on broiler/grill setting later in this article.
In short, using the broiler setting activates the upper heating element at full power, delivering an intense “heat blast” to the top of the food.
Some ovens feature two broiler settings:
- Full broiler: Typically represented by two parallel zigzag lines or a single long one.
- Partial broiler: Often indicated by a shorter zigzag line.
The full broiler activates the entire width of the heating element, making it suitable for roasting or browning large areas, such as a pizza or casserole.
The part broiler, on the other hand, uses only a portion of the heating element, focusing heat on the center and saving energy when browning smaller portions.
For baking pizza, it’s best to use the full broiler at the maximum temperature setting for optimal results.
Broiler + Fan Setting
In this mode, the broiler operates in combination with the fan (the rear heating element remains inactive). This setting helps to brown food more evenly by combining radiant heat from the broiler with the circulation of hot air created by the fan.
‘Rapid/Quick Preheat’ Setting
Some ovens, particularly newer models, feature a rapid/quick preheating function.
This function activates all the heating elements (top, bottom, and rear), along with the fan, to quickly heat the oven, shortening the preheating time. If your oven has this function, it is highly recommended to use it to preheat the oven.
The rapid preheating setting is typically indicated by arrows pointing to the right or up, as shown in the picture below.
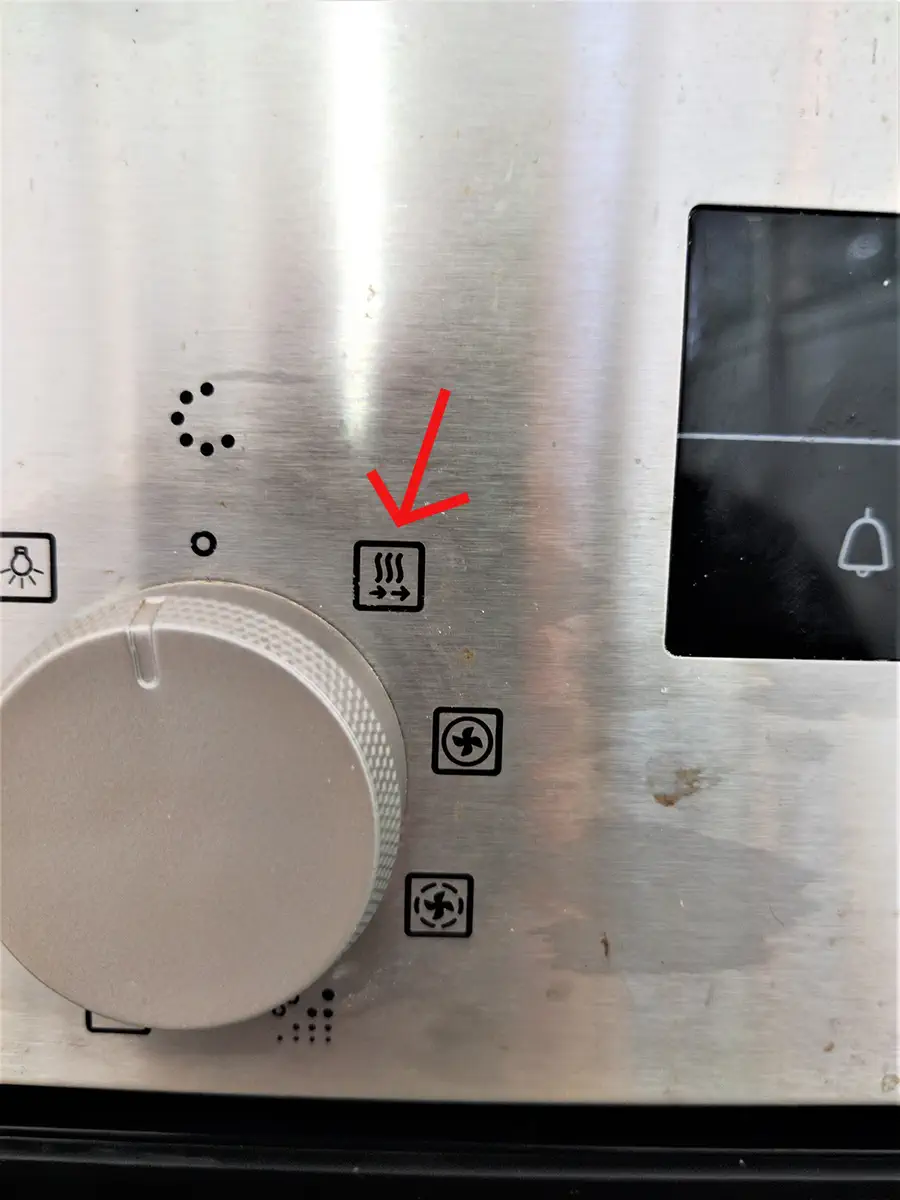
In most models, the oven will beep when it reaches the set temperature, signaling that it is properly heated. However, it’s still a good idea to verify the temperature with an IR thermometer.
Before placing the pizza in the oven, remember to switch to conventional setting (top and bottom heat). The rapid preheat function should not be used for baking, as it is not suitable for cooking food.
It’s worth noting that the rapid preheating function does not consume more electricity; instead, it allows the oven to heat up faster by activating all the heating elements at once. This results in the same total energy usage but reduces the time needed to reach the desired temperature (all other things being equal).
Which Setting Should You Use to Bake Pizza?
Best Oven Setting for Pizza: Top & Bottom Heat
In most cases, the best setting for baking pizza in a home oven is the conventional setting, which uses top and bottom heat.
This setting provides the most balanced baking environment, which is the most important factor in a successful bake.
Why Top and Bottom Heat is Best:
- Balanced Heat Transfer: Because heat comes from both above and below, the pizza cooks evenly on both sides at the same time. This prevents one side from finishing long before the other.
- Proper Crumb and Rise: Settings that focus only on top heat (like the broiler) bake the top too fast. This causes the crust to “set” prematurely, which can lead to:
- Limited oven spring: The dough cannot rise fully if the crust hardens too quickly.
- Gummy crumb: The crust traps too much moisture inside because it sets before the interior can bake through.
- Uneven results: You end up with a browned top but a pale, undercooked bottom.
- Avoids Under-Baking the Top: Settings that focus only on the bottom (like the “pizza setting”) lack sufficient heat from above. This results in a crispy base but an undercooked, pale top.
- Prevents Drying Out: Unlike the convection (fan) setting, the conventional setting does not blow air across the pizza. This prevents the crust from drying out and keeps the toppings from becoming rubbery.
Note for Gas Oven Users
If your gas oven only has a bottom burner, you lack a direct top heat source.
To compensate, bake the pizza on a higher rack to utilize the heat that gathers at the top of the oven (since heat always rises).
Alternatively, you can use the broiler for the final minute of baking to finish the browning on top (discussed in the next sections).
When to Use the Convection (Fan-Forced) Setting
For baking pizza (and bread), using convection for the entire bake time is generally not recommended. This is due to two main issues:
- Premature Crust Formation (Browning Too Quickly): The drying effect of convection can cause the outside of the dough to set and brown too quickly, which limits oven spring and the volume of the final baked product. While this effect is less significant for pizza, it is a major concern for bread. Once the crust forms and begins to brown, the dough can no longer expand, leading to less volume.
- Trapped Moisture and Uneven Baking: Once the crust forms, moisture in the dough is “trapped” inside, making it harder to escape. This also impedes heat from penetrating the dough’s interior. As a result, the inside of the dough may not bake properly and could remain undercooked.
To achieve the best results for pizza, it’s generally best to avoid using the convection setting for the entire baking process. If you choose to use convection, it’s best to do so only after the dough has fully set, rather than at the beginning of the bake.
This is why steam is often used in bread baking: it creates a humid environment that delays crust formation, allowing to maximize oven spring.
On the other hand, convection mode is generally unsuitable for baking cakes, as the early formation of a crust or drying of the top layer prevents heat from reaching the interior, potentially resulting in uneven or incomplete baking.
Beyond its effect on the dough, using convection may also cause the sauce, cheese, and toppings to dry out faster than desired. Therefore, when baking pizza (or baking in general), it’s important to use convection mode with caution – it’s not always beneficial.
My recommendation is to start with conventional baking setting (top and bottom heat) and, if necessary, switch to convection only towards the end of baking.
Here are situations where using convection at the end of baking can be beneficial:
- To achieve VERY even browning of the dough.
- To dry out the cheese or toppings of excess moisture.
I do not recommend using convection mode for the entire baking time, as it may result in a very dry pizza – especially with longer baking times (over 5-6 minutes).
However, experimentation is key. Every oven is different, so it’s possible that starting with convection mode from the beginning could yield good results for your pizza.
Using the Broiler or Grill to Finish Your Pizza
The broiler setting activates the upper heating element at full power, creating a strong, focused heat source that radiates directly onto the food below.
Using the broiler is especially useful for giving your pizza a strong “heat blast,” particularly towards the end of the baking process, when you want to finish browning the crust.
It is recommended to use the broiler setting only towards the end of baking, in the last minute or two. Using it too early can result in uneven baking and cause the dough and cheese to dry out too quickly.
When using the broiler, set the temperature to maximum.
If you use the broiler at the end of baking, stay in front of the oven and monitor the pizza closely. Just half a minute with the broiler on can make the difference between a perfectly browned pizza, and a burnt one.
If necessary, you can lift the pizza with a pizza peel and move it closer to the oven’s ceiling and broiler; this will speed up the browning process even further.
Why You Should Generally Avoid the “Pizza Setting”
Some ovens feature a preset ‘pizza setting,’ which is marketed (with emphasis on ‘marketed’) as being specifically designed for baking pizza.
In pizza setting, the oven typically operates as follows:
- Only the bottom heating element is on, with the top heating element turned off.
- The fan turns on (without activating the rear heating element).
The idea behind pizza setting is that the bottom heating element heats the baking surface, while the fan circulates hot air to bake the top of the pizza (through forced convection).
In theory, this sounds good – the bottom heat bakes the pizza’s base, while the fan helps cook the top and toppings. However, in practice, this method is often less than ideal and is often ineffective for baking pizza.
First, and as discussed earlier, relying on forced convection for the entire baking process can dry out the pizza, and is generally not recommended.
Second, the logic behind pizza setting is flawed. Using only the bottom heating element does not increase the temperature of the baking surface or improve the baking of the bottom of the pizza, compared to conventional baking setting.
Moreover, the heat transferred to the pizza’s bottom primarily comes from the preheated oven and baking surface, rather than from heat stored by the baking surface during baking. So, if the surface is preheated properly (as it should be), pizza mode is largely ineffective and could even negatively affect the baking of the pizza’s top.
In my opinion, the “pizza setting” is a marketing gimmick rather than a thoughtfully designed feature. The name sounds appealing (“Pizza setting”), but it just doesn’t meet the practical needs of pizza baking. This is why I recommend avoiding using the pizza setting for baking pizza.
Managing Heat: Temperature, Timing, and Positioning
What Temperature Should You Bake Pizza at in a Home Oven?
Pizza is a dish that requires a “heat blast”, and should be baked at a high temperature for a relatively short period, typically around 10 minutes for standard types of pizza (more on this later).
For most pizzas, aim to bake at the highest temperature your oven can reach. In home ovens, the maximum temperature typically ranges from 250°C to 300°C (480°F to 570°F):
- If your oven reaches 250°C, bake at 250°C.
- If your oven reaches 275°C, bake at 275°C.
- If your oven reaches 300°C, bake at 300°C.
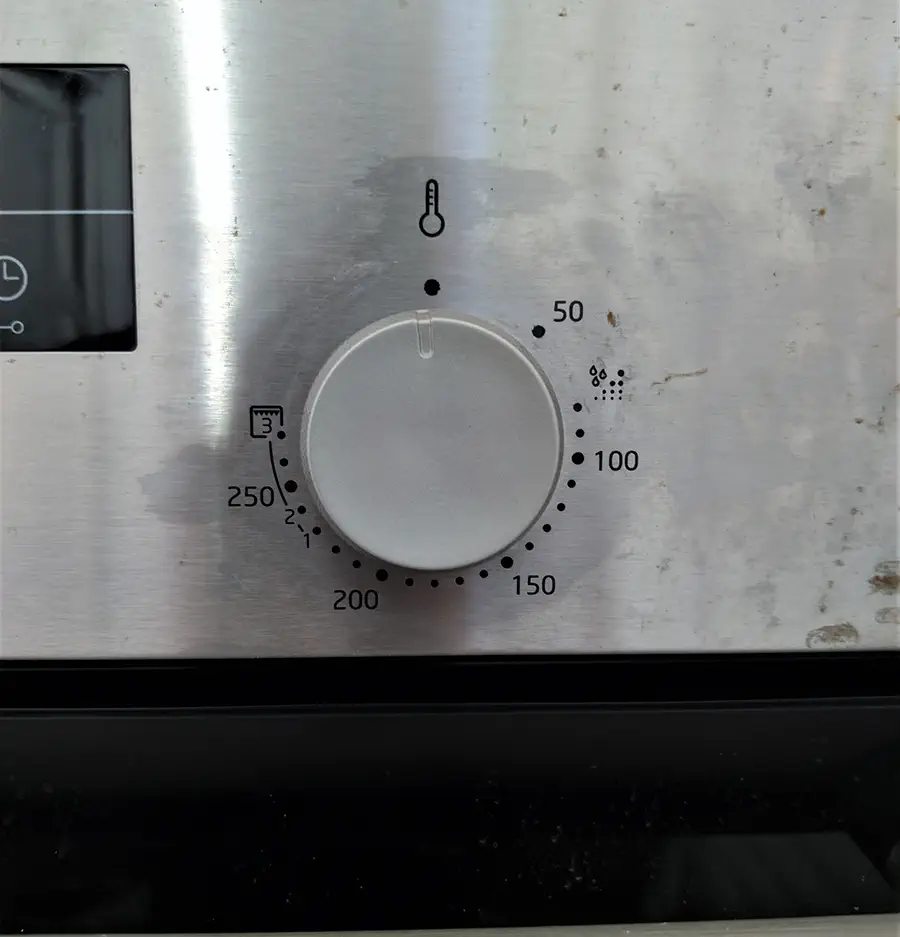
Be aware that some ovens do not clearly indicate their maximum temperature on the dial. For instance, the scale may stop at 250°C, even if the oven can actually reach 275°C. This is particularly common in Bosch and Siemens ovens.
This is important because many people mistakenly believe their oven’s maximum temperature is 250°C, assuming that the dial setting above 250°C is only for broiler setting. As a result, they may bake pizzas at 250°C, unaware that the oven can go higher! Always turn the dial all the way up to ensure you’re using the maximum temperature available.
In addition to the general recommendation to bake pizza at the highest temperature your oven can reach, some types of pizzas are baked at lower temperatures, while others require higher temperatures.
Below is a list of common types of pizza and their typical baking temperatures (recipes for these can be found on the PizzaBlab pizza recipes page):
- New York Style Pizza: Baked at a temperature between 280-330°C (540-630°F).
- Neapolitan Pizza: Baked at about 450°C (850°F) for up to 90 seconds (this is the only pizza that cannot be made in a home oven).
- Chicago Deep Dish: Baked at about 230°C (440°F).
- Cracker Style Pizzas: Baked at a temperature between 220-260°C (430-500°F), but can also be baked at a higher temperature of up to 280°C (530°F).
- Various Commercial or Chain Pizzas: Such as American-style pizzas or the Milanese Spontini pizza, are baked at a temperature between 250-270°C (480-520°F).
- Pan Pizzas: Such as bar or tavern-style pizzas, are baked at a temperature between 260-280°C (500-530°F).
In pizzerias that make non-Neapolitan pizzas and use deck ovens (rather than conveyor ovens), the baking temperature usually ranges from 260-330°C (500-630°F), depending on the type of pizza and the desired characteristics.
However, despite appearing to be the same temperature, the difference between these ovens and home ovens is significant, primarily due to their construction – quality of materials, baking chamber, heating elements, insulation, etc. – which allows for much more efficient heat transfer and retention compared to home ovens.
Beyond the pizzas mentioned above, as a rule, always bake pizza at the maximum temperature your oven can reach.
Many recipes online recommend baking pizza at temperatures up to 220°C (430°F) or even 180°C (360°F). This is far too low for baking pizza, even for deep dish or cracker-style pizzas. These recipes are often created by people who don’t know pizza (or baking), and I highly recommend avoiding them.
Rack Positioning: How to Balance Top and Bottom Heat
The position of the pizza in the oven – specifically, the location of the rack (top, middle, or bottom) – can significantly impact how the pizza bakes.
In general, the higher the rack, the closer the pizza will be to the top heat source (the top heating element and the oven ceiling). As a result, the top of the pizza will receive more intense heat.
This principle allows us to “control” the baking of the top of the pizza:
- Placing the pizza higher will allow the top to bake faster.
- Placing the pizza lower will allow the top to bake more slowly or in a more controlled manner.
For example, if you notice that the top of the pizza is not browning enough, you can try moving the pizza higher to “speed up” the baking and browning of the top. Conversely, if the top is overbaked or browned too much, you can move the pizza lower to slow down the baking of the top. In this way, you can achieve a better balance in baking.
It is important to note that every oven works differently, so finding the optimal position for your oven and baking method will require some trial and error.
My recommendation is to start with the middle rack and make adjustments from there. Is the top getting too much heat? Lower the pizza. Is the top not getting enough heat? Raise the pizza.
Never Place the Pizza or Baking Surface Directly on the Oven Floor!
I have often see recommendations to place the baking surface (or even the pizza itself) directly on the oven floor. Don’t do this!
Firstly, from a practical standpoint, it is completely unnecessary and offers no benefits. The oven floor will not cause the baking surface to reach a higher temperature, nor will it transfer heat to the bottom of the pizza more quickly.
Secondly, placing the pizza or baking surface on the oven floor has negative consequences: it may damage the oven’s enamel layer, harm the lower heating element, cause uneven heat distribution, and block heat from the lower heating element, creating an uneven baking environment.
If you check your oven’s user manual, you’ll find a clear warning against placing food or cookware directly on the oven floor when operating at temperatures above 50°C (120°F).
Note for Gas Oven Users
Since gas ovens typically only have a bottom burner, you lack a direct top heat source.
To compensate, bake the pizza on a higher rack to utilize the heat that gathers at the top of the oven (since heat always rises).
How Long to Bake Pizza in a Home Oven?
The baking time for pizza depends on several factors, including:
- Baking temperature
- Dough formula
- Type of pizza
- Desired result
- Specific oven used
- Position of the pizza in the oven
For most pizzas, baking times typically range between 6 and 12 minutes.
In general, lower baking temperatures mean longer baking times. For example, achieving properly baked dough with the same level of browning on the top and bottom will take more time at 270°C (520°F) than at 300°C (570°F).
Baking time and temperature also influence the texture of the pizza crust:
- Longer baking at lower temperatures results in a drier, crispier crust.
- Shorter baking at higher temperatures produces a moister, softer crust.
Neapolitan pizza is an “extreme” example of this, baking at about 450°C (850°F) for up to 90 seconds, which creates its signature soft and tender crust. Conversely, cracker-style pizzas bake at lower temperatures, between 220°C and 260°C (430–500°F), for 10 minutes or more, resulting in their dry, cracker-like texture. New York-style pizza strikes a balance, baking at 280°C to 330°C (540–625°F) for 5 to 8 minutes, “balancing” tenderness and crispiness.
The composition of the dough, or dough formula, also influences baking time. Ingredients like sugar or malt powder accelerate crust browning, reducing baking time. Similarly, the type of flour matters – flours with lower enzymatic activity take longer to brown properly.
The type of pizza and the desired result also play a role in determining baking time. Each pizza style and outcome will require specific adjustments, as outlined in the examples above.
The baking environment, including the oven and the pizza’s position within it, is another critical factor. Variations in ovens and baking setups can lead to differences in baking duration.
Ultimately, the key takeaway about baking time is that it’s more about achieving the desired level of browning and doneness, than sticking to a specific time. Bake until the dough, cheese, and toppings are cooked and browned to your preference – this might take 5 minutes or 12 minutes, depending on the above variables.
Rather than focusing on the clock, pay close attention to the pizza as it bakes, particularly toward the end. Remove it from the oven when it looks perfect to you, regardless of how much time has passed.
Preheating the Oven and Baking Surface
Preheating the oven is a crucial step when making pizza.
Proper preheating allows both the baking surface and oven walls to absorb heat, which is then transferred to the pizza as soon as it’s placed inside. If the oven isn’t fully preheated or hasn’t reached the desired temperature (discussed in the next section), the pizza won’t receive enough heat, and the final result will be compromised.
For optimal results, allow at least 20 minutes to “saturate” the oven and baking surface with heat. The exact preheating time depends on your oven and the type of baking surface you’re using, with thicker surfaces typically requiring more time to heat up. We’ll cover baking surfaces in greater detail in the next section.
To ensure the baking surface has reached temperature, use an infrared thermometer for an accurate temperature reading.
Reheating the Oven Between Pizzas
If you are baking multiple pizzas in a row, keep in mind that the baking surface will need a “recovery” period between pizzas. The surface temperature inevitably drops after each bake due to heat transfer to the pizza.
To ensure proper baking, it’s recommended (and often necessary) to allow the surface to re-absorb heat between bakes. The reheating time will vary depending on your oven and the baking surface used.
Timing the Oven Heat Cycles for Launching the Pizza Into the Oven
While this section may sound a bit technical, understanding how a home oven operates can help get the best results when baking pizza.
In general, a home oven works with a thermostat that regulates the temperature inside the baking chamber. The heating elements are activated when the temperature is below the set threshold, and turn off once the desired temperature is reached. This on-and-off cycle continues to maintain a relatively stable temperature, despite natural fluctuations.
Now, how does this relate to baking pizza?
When baking pizza, we typically want to use the highest possible temperature. However, once the oven reaches that maximum temperature, the thermostat turns off the heating elements. For pizza, which requires a significant “heat blast” and bakes quickly, this can be problematic.
“For instance, if you place your pizza in the oven at the end of an off-cycle (when the heating elements are off and about to turn on), the oven chamber and baking surface are typically at their lowest temperature. Once the elements turn back on, it can take 3-4 minutes for the temperature to climb back to its peak. During this time, the lower-than-optimal temperature can affect how the pizza bakes.
For most foods, this drop in temperature may not be as critical, but for pizza, those 3-4 minutes can make a significant difference – potentially resulting in a pizza that’s under-browned or too dry.
To avoid this, it’s best to time placing your pizza in the oven when the heating elements are still on, or just before they turn off. This ensures the oven and the baking surface are as hot as possible when the pizza goes in.
If the oven chamber has reached the set temperature and the thermostat has turned off the heating elements, this typically means the baking surface is also very close to that temperature. This happens because the baking surface absorbs heat from the oven chamber; As long as the surface continues to absorb heat, it lowers the overall temperature in the oven, causing the heating elements to remain on. Only when the surface becomes saturated with heat (or nearly saturated) can the air temperature in the oven chamber reach the set temperature, which causes the thermostat to turn off the heating elements.
It’s important to note that the thermostat measures the air temperature at the specific location where it is installed, so there may still be temperature differences, especially if there is a large or thick surface that takes longer to heat up.
However, once the heating elements turn off, it’s a good indication that the baking surface has reached a temperature very close to the set point.
How to Tell if the Heating Elements Are On or Off
Most ovens display a thermometer symbol on the screen (see picture below):
- When the symbol is visible, it indicates that the heating elements are active.
- When it disappears, it means the heating elements have turned off.
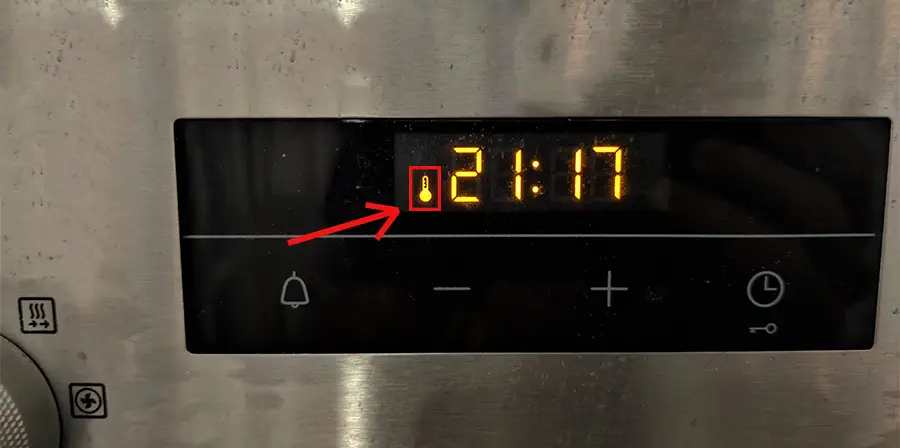
This symbol can help determine if the oven has reached the set temperature. If you’ve preheated the oven and are unsure whether it’s fully heated, the absence of the thermometer symbol means the heating elements have stopped working and the oven has reached the set temperature.
How to Time When to Place the Pizza in the Oven
In general, after the oven has reached its maximum temperature, the heating elements will cycle on and off in intervals of about 5 minutes – 5 minutes with the heating elements off, followed by about 5 minutes with them on (this can vary between ovens).
To “catch” the optimal timing for placing the pizza in the oven and starting the bake when the temperature is at its highest, you can:
- Wait patiently until the heating elements turn back on.
- Alternatively, you can manually “reset” the oven by turning it off, opening the door for about 20 seconds, then closing the door and turning the oven back on. This will cause the temperature in the oven to drop, prompting the thermostat to activate the heating elements again.
Although opening the door will result in some heat loss, turning the heating elements back on will compensate for this loss, as heat will now radiate more intensely from the top heating element and the oven ceiling to the pizza.
Once the heating elements have turned back on, wait another minute or two to allow the baking surface to regain any lost heat. This should be the ideal time to place the pizza in the oven. Of course, this can vary between ovens.
Choosing and Preparing Your Baking Surface
Using a Baking Surface (Stone or Steel)
For detailed information on pizza baking surfaces, including their characteristics and differences, see the following article: Pizza Stone vs Steel: The Complete Baking Surfaces Guide
The baking surface is key to achieving a perfectly baked pizza base. To ensure your base is not just cooked but also brown and crispy, using a good baking surface is essential.
A good baking surface significantly impacts the quality of the pizza, especially the base – no one enjoys a pale or underbaked crust.
What makes a ‘good’ baking surface? Broadly speaking, any surface thick enough to store heat, and conductive enough to transfer that heat to the pizza base. For home oven baking, the ideal surface is typically a baking steel, though a sufficiently thick cordierite stone can also perform well, though not as effectively as steel.
For best results, the baking surface should be preheated along with the oven and allowed to reach the set temperature. Additionally, if you are baking more than one pizza, remember to allow the surface to “recover” between bakes and reabsorb heat.
Even when baking pan pizzas (see the next section), it’s recommended to place the pan directly on the baking surface. This promotes more efficient heat transfer from the surface to the pan and from the pan to the bottom of the pizza.
Contrary to popular belief, placing the baking surface on a low rack in the oven will not cause it to heat up faster. The surface will reach the same temperature during preheating, whether it’s on the highest or lowest rack.
In fact, in most cases, the opposite is true: the top of the oven is usually hotter due to natural convection. Therefore, placing the baking surface on a higher rack may cause it to reach a higher temperature (however, in practice, this effect is often negligible).
Using an Inverted Oven Tray as a Pizza Baking Surface
If you don’t have a pizza stone or baking steel, an inverted baking sheet can serve as a suitable alternative. Simply use the standard baking sheet that came with your oven, placing it upside down – this makes it easier to transfer the pizza onto and off the surface.
However, keep in mind that baking on a baking sheet isn’t ideal. The thin aluminum (around 0.5 mm or 0.02″) can’t retain any heat, which will inevitably affect how the bottom is baked. While it’s a better option than nothing, don’t expect the best results.
When to Use a Pizza Screen vs. Baking Directly on Stone

The use of a pizza screen or disc is primarily intended to simplify and streamline the process of transferring pizza to the oven.
By placing the dough directly on the screen after stretching, dressing the pizza, and placing it (with the screen) straight into the oven, you eliminate the need for a pizza peel. This makes a pizza screen an excellent option for those looking to make the transfer process easier and more convenient.
In addition to a pizza screen, another option for simplifying the transfer is using parchment paper, which we will discuss in the next section.
A pizza screen or disc can also allow you to bake the pizza directly on the oven rack, without a baking surface. While this is possible, it is less recommended.
Pizza screens are an affordable and useful tool for transferring pizza, but it’s important to note that they have some drawbacks.
When baking pizza on a screen, the screen creates a “buffer” between the pizza and the baking surface. This means the pizza relies more on radiation than conduction for heat transfer, as the dough and screen are slightly elevated and don’t come into direct contact with the baking surface.
As a result, valuable heat that the pizza would receive from the baking surface is lost. For this reason, it’s not recommended to bake a pizza on a screen for the entire duration of the baking process.
Best Practices for Using a Pizza Screen
If you decide to use a pizza screen, it’s best to use it only for transferring the pizza into the oven, and then remove it once the dough has set sufficiently (usually after about two minutes of baking).
This method lets you enjoy the convenience of the screen for the initial transfer, and then finish baking the pizza directly on the baking surface for optimal results.
Here’s how to do it:
- Dress the stretched pizza base on the screen.
- Place the pizza in the oven with the screen.
- After about two minutes, or when the dough has set and the screen can be removed without distorting the dough, take out the screen and place the pizza directly on the baking surface to finish baking.
Using a Pizza Screen to Control Bottom Browning
Another effective use of a screen is when you want to slow down the baking of the pizza’s bottom.
By placing the screen under the pizza toward the end of baking, you allow the top of the pizza to continue browning without the bottom becoming overly browned.
For example, if the bottom of the pizza is fully baked but the top still needs more time, you can slide the pizza screen underneath. This will help ‘delay’ the bottom’s baking, giving the top more time to finish, and allowing you to better control the degree of browning on the bottom.
Pizza Screen Maintenance and Limitations
It’s important to note that a pizza screen requires regular maintenance and has limitations in its use.
First, ensure the screen is free of dough and food residue; otherwise, dough may stick to the screen or the leftover particles.
It’s also a good idea to oil or season the screen before use to help prevent sticking during baking.
Second, a pizza screen isn’t suitable for all types of pizza or dough. For example, highly extensible or soft doughs may “leak” through the holes in the screen. Therefore, a screen doesn’t work so well for high-hydration doughs.
Using Parchment Paper for Baking Pizza
Using parchment paper is another convenient way to transfer pizza into the oven. Similar to a pizza screen, you prepare the pizza on the parchment and then use a pizza peel or large tray to slide it into the oven.
The video below demonstrates how to transfer the pizza into the oven using parchment paper (towards the end of the video).
But does parchment paper affect the baking and browning of the pizza’s bottom, like a screen does?
To answer this, I conducted an experiment to see if using parchment paper impacts how the bottom of the pizza bakes.
In the experiment, I baked half of the pizza directly on a steel, and the other half on parchment paper. The total baking time was 6 minutes, with the parchment paper being removed after 2 minutes. The side under the parchment baked for 2 minutes on the paper, then 4 minutes directly on the steel.
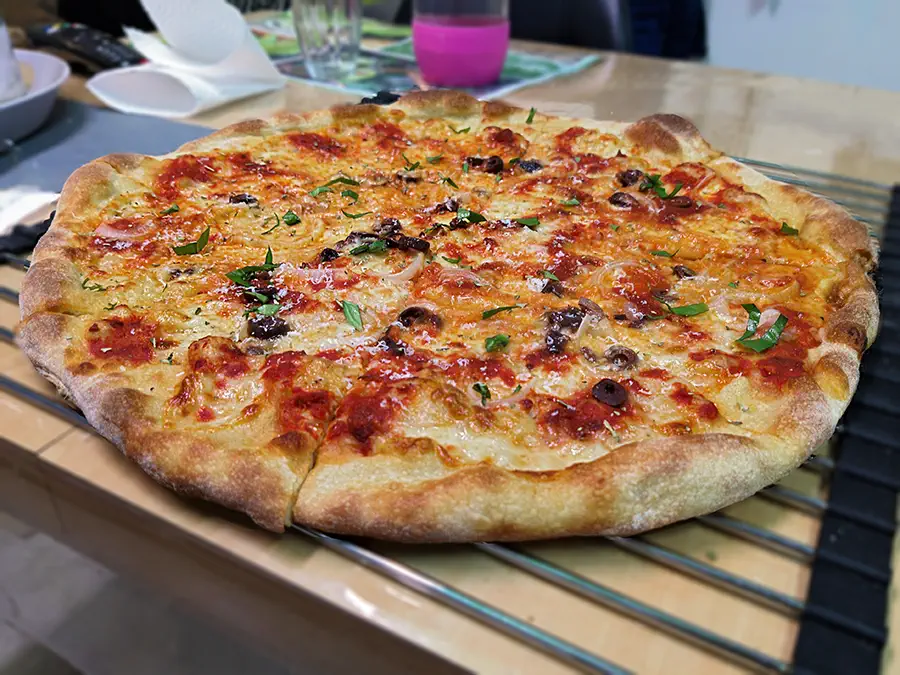
The red line in the picture below shows the separation between the halves baked with and without parchment paper, with the red arrow pointing to the side baked directly on the steel (no parchment paper).
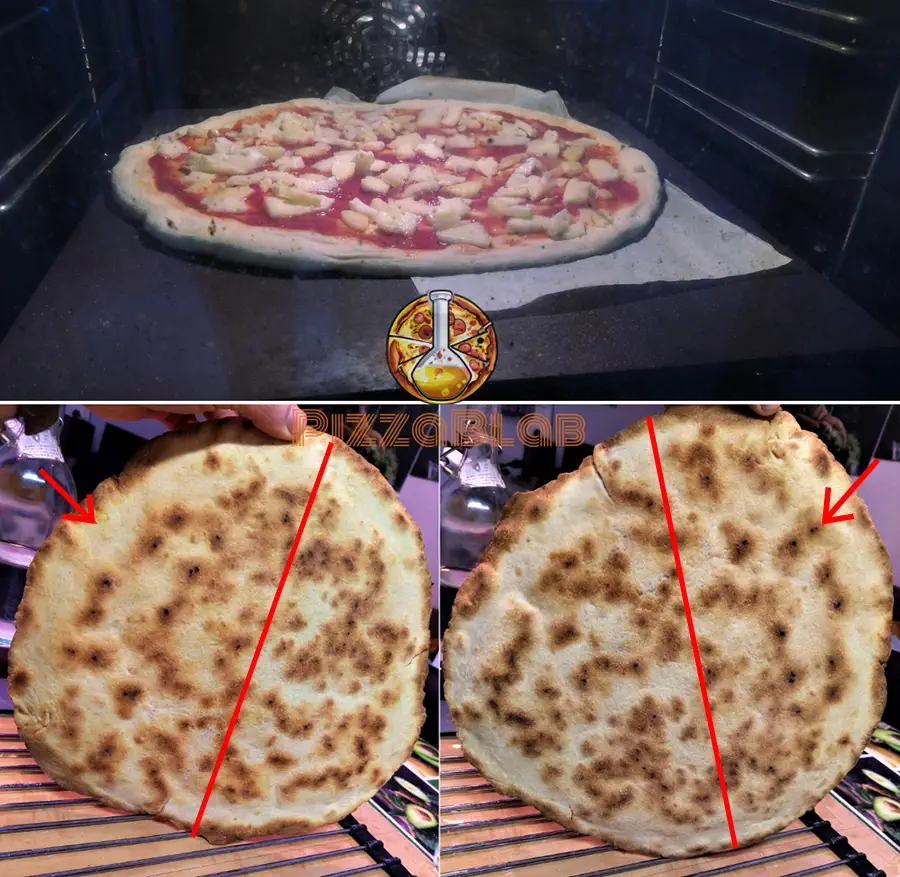
As seen in the picture, the half of the pizza baked directly on the steel, browned more – or more specifically became more golden – compared to the side baked with the paper. The reason? The parchment paper acts as a “buffer,” preventing radiative heat from the steel from reaching the pizza.
Areas of the pizza that made direct contact with the steel were not affected, and baked similarly. This is because heat was transferred through conduction, not radiation, directly from the steel to the pizza, “bypassing” the parchment paper. However, In areas where the pizza did not touch the steel, the parchment paper reduced the transfer of radiative heat from the steel to the pizza, affecting browning.
In simpler terms, the parchment paper acts as a barrier, blocking the transfer of radiative heat to parts of the pizza that don’t make direct contact with the surface, resulting in less browning.
This phenomenon is similar to standing in front of a heat source, like a fireplace, and holding a large piece of cardboard between yourself and the heat. The cardboard blocks the heat, preventing it from reaching you directly.
Even though the parchment paper was under the pizza for only two minutes (just long enough for the dough to set before being removed), it still affected the final result by reducing the heat transfer. While the difference may be subtle, it’s there.
Best Practices for Using Parchment Paper for Baking Pizza
It is recommended to remove the parchment paper as soon as possible to minimize heat loss to the bottom of the pizza.
Similar to using a pizza screen, the paper should be removed once the dough has set enough – typically around two minutes after placing the pizza in the oven.
To remove the parchment paper, gently lift the edge of the pizza closest to the oven door (ensuring the dough has set and is not at risk of sticking or warping). Grasp the edge of the parchment paper and carefully pull it out. Be careful!! The oven and pizza will be hot – take care not to burn yourself.
When you open the oven door, steam will escape. Avoid leaning directly into the oven; allow the steam to dissipate before proceeding.
In the video below, you can see a demonstration of how to remove the parchment paper after about two minutes of baking.
It’s important to note that standard parchment paper can withstand temperatures up to about 220°C (420°F). When you place the paper with the pizza in the oven, the areas in direct contact with the pizza typically remain below this temperature, as the pizza cools the paper’s surface. Therefore, there is no “danger” in this regard.
However, areas of the paper exposed to the oven’s heat may brown. There’s no need to worry tho – it will not burn or catch fire, especially when removed after 2~ minutes.
To prevent excess paper from browning, it’s recommended to trim off any extra parchment around the pizza before baking. This will keep the exposed paper from being directly exposed to the oven’s heat.
After preparing and dressing the pizza, simply cut the parchment paper around the pizza, leaving a few centimeters/inches as a “safety margin” (an exact measurement is not necessary). Make sure to leave enough paper for a firm grip when pulling it out from under the pizza during baking.
Baking Pizza Using a Pan
Pizza pans are essential for baking various types of pan pizzas. These include round pans for round pizzas, as well as square or rectangular pans for square pizzas.
The method for using a pizza pan largely depends on the type of pizza being made. Some doughs are fermented directly in the pan, as with Detroit style pizza or Sicilian pizza, while others are stretched (either inside or outside the pan) and placed in the pan just before baking, as seen with bar pizza or pizza al taglio.
Typically, when using a pizza pan, you will want to grease it with oil, butter, or shortening before adding the dough. This serves two main purposes:
- Prevents Sticking: The fat creates a barrier that helps prevent the dough from sticking to the pan, allowing for easier removal after baking.
- Creates a Crispy Texture: The fat also contributes to a “frying” effect on the dough, giving the bottom of the pizza a crispy, flavorful texture that distinguishes pan pizzas.
For best results, use a high-quality pan designed for pizza baking. Ideally, a good pizza pan should be made from materials like steel, cast iron, or dark anodized aluminum, all of which conduct heat efficiently to ensure even baking. Additionally, a thicker pan will generally lead to a better bake.
Avoid using glass pans, stoneware, ceramics, disposable pans, shiny aluminum or stainless steel pans. These materials do not conduct heat effectively, which can result in uneven baking and sub-optimal results.
Handling, Baking & General Techniques
Transferring the Pizza to the Oven
If you’re not baking with a pan or pizza screen, you’ll need a tool to transfer the pizza into the oven.
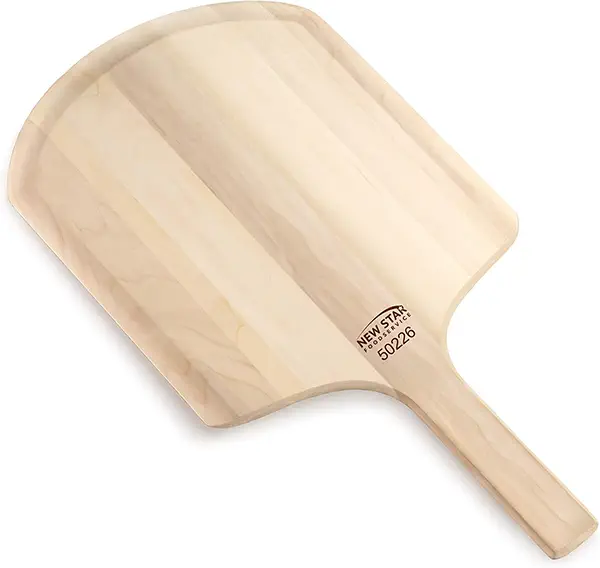
The most effective tool for this is a pizza peel. It’s an essential tool for anyone who bakes pizza.
How to Transfer the Pizza to the Oven Without a Pizza Peel
If you don’t have a pizza peel, you can use parchment paper (discussed in detail later) along with a large tray or flat surface that’s at least the size of the pizza.
Simply stretch the pizza, place it on the parchment paper, add your toppings, and transfer the pizza along with the parchment paper to the tray. Then, using the tray, carefully slide the pizza and parchment paper into the oven.
Turning the Pizza During Baking
In most cases, rotating or turning the pizza during baking is essential to ensure even baking and browning.
Home ovens often have uneven heat distribution, causing certain areas to be hotter or cooler. To counteract this, it’s advisable to turn the pizza during the baking process to achieve uniform browning of the dough, bottom, and toppings.
Typically, it’s best to rotate the pizza about halfway through the baking time. Here’s how to do it:
- If you don’t have a pizza peel, gently turn the pizza by hand. By this time, the dough should be fully set, allowing the pizza to turn easily on the baking surface. Be cautious not to disturb the toppings or burn yourself.
- If you have a pizza peel, carefully remove the pizza from the oven, rotate it on the peel, and then return it to the oven.
When you open the oven door, steam will escape. Avoid leaning directly into the oven; allow the steam to dissipate before proceeding.
The video below demonstrates how to turn the pizza using both methods (the rotation in the video is not perfectly precise – it’s meant to illustrate how to turn the pizza during baking).
For the most consistent results, a 180-degree turn (i.e., rotating the pizza so the side facing the oven door now faces the back) is usually enough. However, depending on your oven’s heat distribution, you may need to rotate the pizza 90 degrees to the right or left for even baking, or sometimes, you might not need to turn it at all.
Placing the Pizza on a Cooling Rack/Surface
To preserve the crispiness we worked hard to achieve, it is crucial to place the pizza on an elevated surface that allows steam to escape from the bottom, for at least a few minutes.
At the end of baking, a considerable amount of steam escapes from the dough, particularly from the bottom. This happens because the sauce, and especially the cheese (which has melted and released fat), create a “buffer” that prevents moisture from escaping through the top of the pizza.
As a result, the main exit path for steam is through the bottom.
If, after removing the pizza from the oven, we place it directly on a flat, sealed surface, the steam – escaping in large quantities – will accumulate under the pizza, wetting it. This wetness will ruin the crispiness we worked hard to achieve, turning the base into a soggy mess.
To prevent this, it is essential to place the pizza on an elevated surface after removing it from the oven. This allows the steam to disperse, preventing its accumulation and direct contact with the pizza base.
Any surface that raises the pizza even slightly will suffice – even a few centimeters (or millimeters) – as long as it creates enough space for the steam to escape.
It is recommended to let the pizza rest on this elevated surface for at least a minute, preferably longer, before transferring it to a tray or serving dish (it’s too hot to enjoy immediately anyway).
For maximum crispiness, you can cut the pizza into slices and return it to the cooling surface. This helps retain the crispiness of the bottom throughout your pizza meal.
Par-Baking Pizza (“Double Baking”)
Par-baking (or “double baking”) involves baking the pizza in two stages.
In the first stage, the dough is baked “naked” without toppings or with only partial sauce. After this initial bake, the dough is removed from the oven, fully dressed with the remaining sauce, cheese, and toppings, and then placed back in the oven to finish baking.
Par-baking offers several key benefits:
- Convenience: The par-baked dough can be stored for future use or frozen, making it easy to prepare ahead of time.
- Fluffier Dough: For pan pizzas, par-baking typically results in a puffier, airier dough, with a larger volume.
- Better Control: Par-baking allows you to control the baking and browning of cheese and toppings, especially for pizzas requiring longer bake times. This lets you add cheese and toppings later to control their doneness.
The goal of the first stage of par-baking is to bake the dough just until it has set, but before it begins to brown. The duration of this bake depends on the type of pizza and baking conditions.
By the end of the first bake, the dough should be fully set and cooked through, with only the final browning remaining. In the second bake, the sauce, cheese, and toppings are added, allowing the crust to achieve its desired browning.
The term “half-bake” is sometimes used to describe the process of par-baking. However, the dough is not truly “half” baked at the end of the first stage – it is fully baked, but not yet browned. If it were only partially baked, it would collapse when removed from the oven.
Par-baking is a common practice when making square pizzas baked in a pan, such as Detroit or Sicilian pizza. The latter, in particular, is traditionally made using a par-baking process. Baking the dough “naked” – primarily without the sauce that weighs it down – allows for maximum oven spring, which is desirable for these types of pizzas. The result is a dough with greater volume, typically more airy as well.
In a commercial pizzeria setting, par-baking allows dough to be prepared in advance for future use. All that remains is to dress the pizza and bake it for a few minutes when an order comes in. This is especially true for square pizzas like Sicilian pizza, which are typically sold as individual slices or squares rather than whole pizzas.
For round pizzas baked directly on a baking surface (not in pans), par-baking is generally unnecessary and does not provide any significant benefit.
While par-baking can help prevent the cheese or toppings from browning too much by adding them later in the baking process, it often results in cheese that hasn’t melted properly and develops an unappetizing texture. A better approach is to study your baking conditions and find a balance between baking the top and bottom of the pizza.
How to Par-Bake Pizza
The general order of par-baking is as follows:
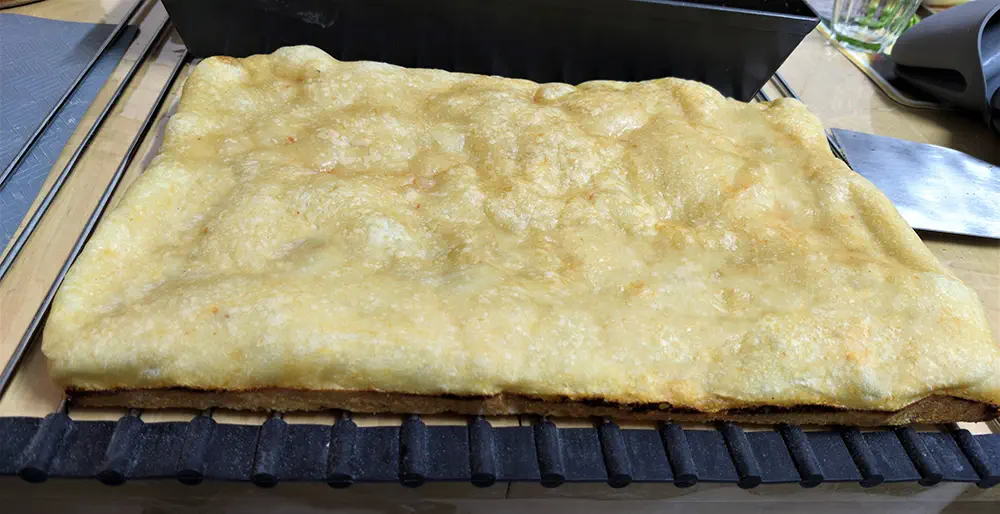
- Place the “naked” dough in the oven.
- Bake the dough just until it has completely set, but before it starts to brown (see picture below). The duration of this step depends on the type of pizza you are making and your oven conditions. For pan pizzas, this usually takes about 5-6 minutes.
- Remove the pan from the oven.
- For immediate use, add the sauce, cheese, and toppings, then return the pizza to the oven to finish baking.
- Bake until the toppings and dough are done to your liking.
For future use, remove the dough from the pan and place it on a cooling rack to let steam escape from the bottom. This prevents moisture from being trapped, which could make the bottom soggy.
You can store the dough for future use (up to 24 hours at room temperature) or freeze it after it has cooled completely.
To maximize oven spring during par-baking, you can try one of the following for the initial bake:
– Spray a little water on top of the dough.
– Spread a diluted sauce (with water) on the dough.
– Create steam in the oven by spraying water inside after placing the dough, or use another method to introduce steam into the oven.
This technique helps introduce moisture into the oven (or directly onto the dough), much like in bread baking. The moisture delays crust formation, allowing for more oven spring, which results in a lighter and fluffier texture.
Although this step is not mandatory, it can significantly improve texture. Note that this only applies to par-baked pizzas – introducing steam in the oven is not recommended for other types of pizzas, as it can negatively affect baking and browning.
Key Takeaways
- The Main Challenge:
Home ovens are designed for insulation and safety, not for the high-intensity heat required for professional pizza. The goal is to overcome the oven’s temperature limitations by maximizing heat transfer. - Optimal Oven Setting:
The best general setting is static heat (top & bottom setting). This provides the most balanced environment for a consistent bake. - Avoid Broiler & Convection for the Entire Bake:
Do not use the broiler or convection for the entire bake. Constant airflow or intense top-down radiation can dry out the dough or burn the cheese before the base is fully cooked. - Avoid “Pizza Settings”:
Most built-in pizza modes use a specific fan/element logic that often leads to uneven cooking. - Maximum Temperature:
Always set your oven to its absolute maximum temperature. High heat is the only way to achieve a professional crust structure in a home setting. - Bake Time:
In a properly preheated home oven at max temperature, a pizza should typically take between 5 to 10 minutes. - Strategic Rack Positioning:
Rack height is your primary tool for heat balance. The top rack speeds up the browning of the top of the pizza, while a lower rack reduces top heat and slows it down. - Baking Surface is Essential:
Using a baking steel or stone is essential. These surfaces provide the thermal mass necessary to transfer heat directly into the dough (conduction), which a standard oven tray cannot do. - Preheating is Crucial:
Preheat the oven for at least 20–30 minutes to ensure your baking surface and oven walls are fully heat-saturated. - Finishing the Bake:
If the bottom is cooked but the crust lacks color, you can use the broiler (grill) or convection setting during the final 1–3 minutes of the bake. This provides a targeted burst of radiant heat or airflow to accelerate top browning. - Use a Cooling Rack:
To preserve crispiness, the pizza must be placed on an elevated cooling rack immediately after baking. Because the toppings act as a moisture barrier, steam primarily escapes through the bottom of the crust. Placing the pizza on a flat, sealed surface traps this steam, causing the base to become soggy; an elevated rack allows the steam to disperse, maintaining the crust’s crispiness.
Enjoyed this article? Join the BLAB
Unlock the Key Takeaways above and enjoy a 100% clean, ad-free experience across the entire site.