Dough Transformation: The Physics and Chemistry of Baking Pizza
When you slide a pizza into the oven, a series of rapid-fire chemical and physical reactions begin to transform raw dough into a structured, flavorful crust. From the moment the yeast feels the heat to the final browning of the crust, every degree matters. Understanding these internal processes, such as starch gelatinization, the evaporation-condensation cycle, and the Maillard reaction, is essential to mastering the texture and flavor of your pizza
Introduction: The Transformation of Dough During Baking
Important terminology before proceeding:
Crust: The outer layer of the baked product that dries, hardens, and browns during baking. For pizza, this includes the bottom and the exterior of the rim (cornicione). For bread, it refers to the entire exterior.
Crumb: The soft, inner part of the baked product. In pizza, this is the interior of the rim, while in bread, it’s the entire inner section.
The processes that dough undergoes during baking result from a complex interplay of physics and chemistry, forming an entire field of academic study. To make this topic straightforward and accessible, this article highlights the key processes and their importance, giving you a foundational understanding of how dough bakes – knowledge you can use to improve your baking.
Below, you’ll find a table summarizing the processes that occur in dough at different temperatures throughout the baking process. It’s important to note that these temperatures refer to the dough itself – either at the surface or internally – not the temperature of the baking chamber.
| Temperature | What Happens |
|---|---|
| 30-50°C (90-120°F) | The gases in the dough (CO2) begin to expand and become less soluble The activity of amylase enzymes increases, breaking down starch into sugars Yeast activity rises, leading to the production of (more) CO2 |
| 50-60°C (120-140°F) | Yeast begins to die Amylase enzyme activity peaks The starch gelatinization process begins |
| 60-70°C (140-160°F) | Oven spring starts and the dough begins to rise Enzymatic activity decreases as the enzymes are denatured |
| 70-80°C (160-180°F) | Gluten coagulates and solidifies The crumb begins to stabilize and solidify |
| 90-100°C (190-210°F) | Starch gelatinization peaks |
| 100°C (210°F) | The maximum temperature inside the crumb The crust begins to form |
| 110-140°C (230-280°F) | Dextrins are formed in the crust (dextrinization of starch) |
| 140°C (250°F) | The Maillard reaction begins in the crust |
| 150-200°C (300-390°F) | Caramelization begins in the crust |
| 200°C (390°F) And above | The crust begins to carbonize |
The 8 Key Stages of the Baking Process
In the sections below, we’ll explore each of the key processes that take place in the dough during baking, breaking down their roles and impact on the final product.
1. Gas Expansion and Yeast Activity (30–50°C / 90–120°F)
As the dough heats, the carbon dioxide (CO₂) produced by yeast activity expands and becomes less soluble. This transition from a dissolved state to a gaseous one causes the gas to inflate the air cells within the dough. This expansion leads to a phenomenon known as oven spring, which will be explored in more detail later.
At the same time, yeast activity increases with the rising temperature, producing additional CO₂.
The amount of new CO₂ produced by the yeast during baking is minimal and insignificant compared to the CO₂ already present in the dough from fermentation.
The rising temperature also accelerates enzymatic activity, especially that of amylase enzymes, which convert starch into simple sugars. Consequently, starch undergoes rapid breakdown during a brief phase of the baking process.
Contrary to common belief, most starch breakdown by amylase enzymes happens during baking, rather than fermentation. As the temperature reaches around 50°C, amylase activity peaks, speeding up starch breakdown up to 40 times faster than during fermentation.
Additionally, as the starch in the dough begins to gelatinize (a process discussed later), it becomes more accessible to the amylase enzymes. This dual effect of higher enzymatic activity and starch gelatinization leads to significant starch breakdown into sugars within a short time during baking. In fact, the majority of starch breakdown in dough occurs at this stage, rather than during fermentation.
2. Yeast Dies, Amylase Activity Peaks (50-60°C / 120-140°F )
When the temperature reaches 50-60°C, yeast gradually dies, ceasing CO₂ production.
At the same time, amylase enzymes reach their peak activity, significantly accelerating the breakdown of starch into simple sugars.
3. The Start of Starch Gelatinization (50°C / 120°F)
When the dough’s internal temperature reaches approximately 50°C, the starch gelatinization process begins, and continues until the baking process is finished.
Starch gelatinization, together with gluten coagulation (covered later), is essential for stabilizing the crumb and giving it structure. This process is among the most important in dough baking.
In the following sections, we will explore the starch gelatinization process in detail, examining how it works, how it unfolds during baking, and its impact on the final product.
Defining Starch Gelatinization in Baking
Starch, which makes up about 75% of the flour, consists primarily of two molecules: amylose (25%) and amylopectin (75%).
In its “native” state, starch is a carbohydrate that is insoluble in water. If you mix flour (starch) with room-temperature water, you’ll observe a cloudy solution: the starch granules remain intact, without dissolving or “merging” with the water.
However, when the dough’s internal temperature rises above 50°C (120°F), water molecules begin to penetrate the crystalline structure of the starch granules (primarily amylopectin). As long as the temperature stays above 50°C and water is available, the starch continues to absorb water and swell.
Once a starch granule absorbs enough water (about 70% of its weight) and the temperature reaches around 96°C (205°F), it bursts. Its structure changes from crystalline to amorphous, allowing it to bind and retain even more water.
During this process, some of the starch, particularly the amylose, leaks into the surrounding liquid and dissolves, making the starch partially water-soluble.
The leaked amylose is responsible for the thickening of the liquid around the starch, a process that intensifies as more amylose is released when the granules burst.
Not all starch granules fully burst and undergo complete gelatinization during baking. This is often due to insufficient water availability in the dough – more on this in the next section.
When starch is fully gelatinized, it forms a thick “paste,” which thickens the surrounding liquid, creating a gel-like texture (hence the name of the process: gelatinization).
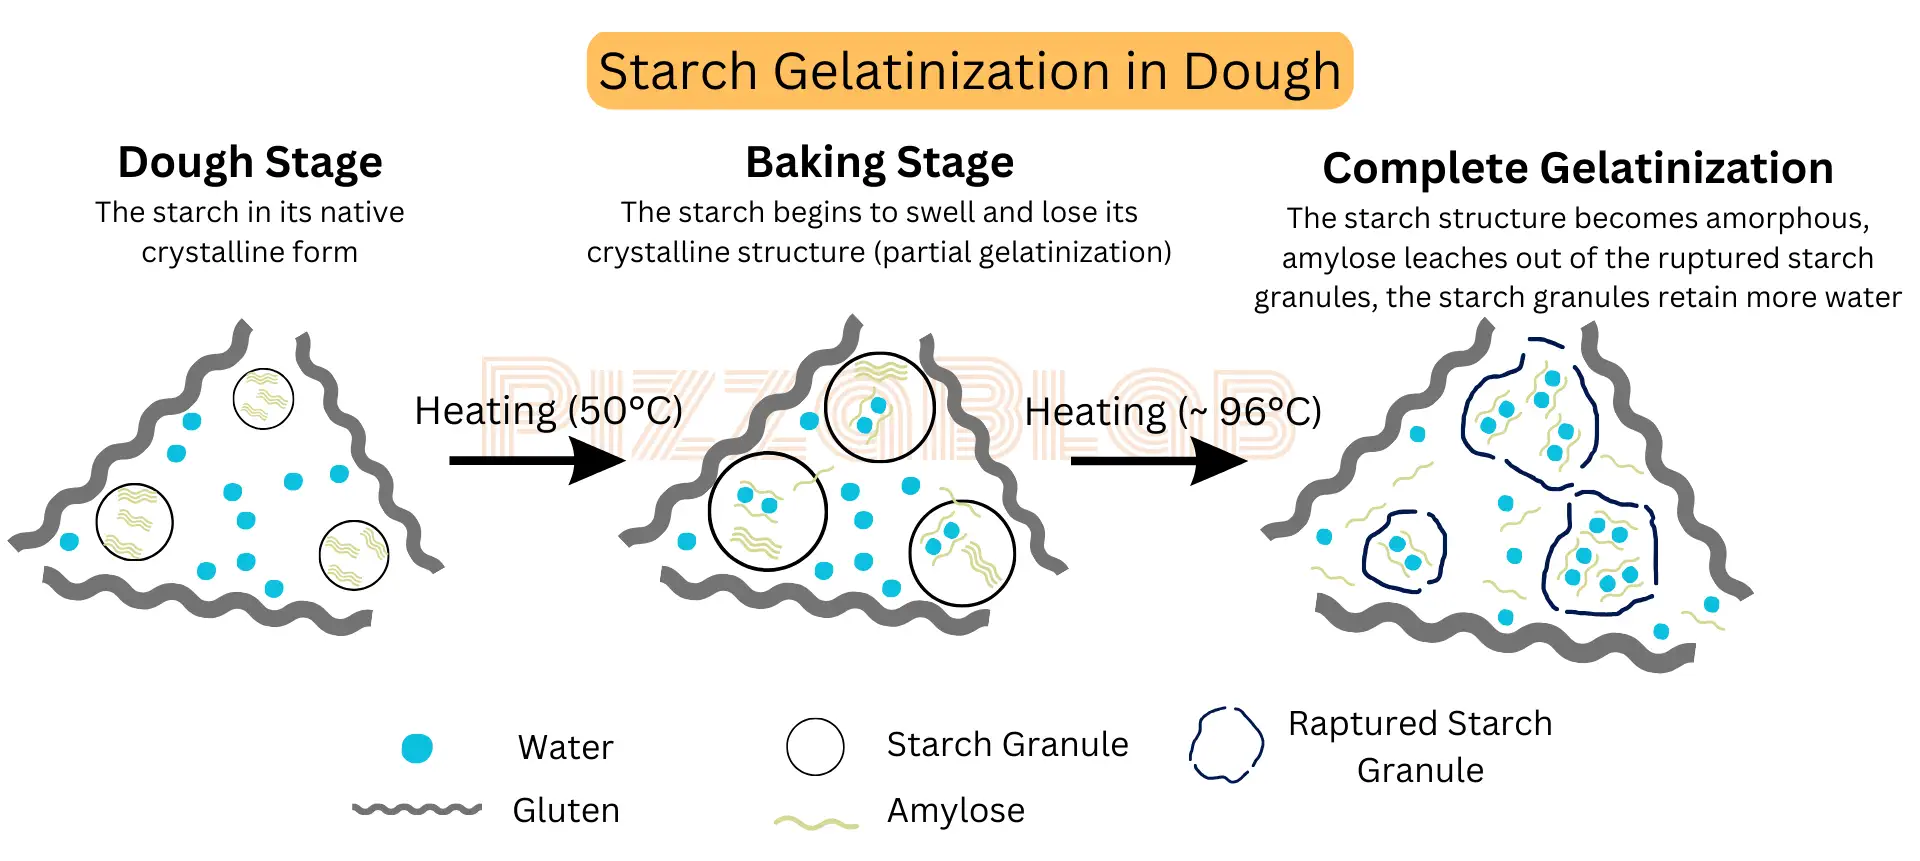
In summary: starch gelatinization is the process where starch granules absorb water and swell (partial gelatinization). With sufficient heat and enough water, the granules burst, releasing amylose and forming a gel-like “paste” that thickens the surrounding liquid (complete gelatinization).
If you’ve ever made béchamel sauce, pudding, porridge, or used flour or cornstarch to thicken a sauce, you’ve encountered this very process. Heating starch until it bursts to form a gel is the same mechanism at work. Similarly, pasta water thickens pasta sauces due to this gelatinization process, though to a lesser extent.
Partial vs. Complete Gelatinization: Key Factors
The degree of gelatinization is influenced by three key variables:
- The amount of water available in the dough.
- The temperature.
- The gelatinization time (the duration of baking at a temperature that supports gelatinization).
Complete gelatinization of wheat starch occurs at around 96°C (205°F), when the starch has absorbed enough water (approximately 70% of its weight).
At this stage, the starch granules “burst,” releasing amylose into the surrounding liquid, which drives the thickening process. While amylopectin also contributes to thickening, it typically remains within the granules and does not leak out.
These two starch components – amylose and amylopectin – play a key role in the spoilage or decline in dough quality over time through a process called starch retrogradation. During this process, starch molecules revert to their crystalline structure, causing the dough to toughen or harden.
Amylose undergoes rapid retrogradation, which is why pizza dough can quickly become tough and leathery within just a few minutes. Amylopectin retrogrades more slowly, which is why bread crumbs tend to become tough and crumbly over the course of hours or days.
The retrogradation of starch, particularly amylose, also contributes to the stabilization and “solidification” of baked products after being removed from the oven.
Partial gelatinization occurs when the conditions required for complete gelatinization are not met. In this case, the starch absorbs water and swells, but the granules do not burst. The crystalline structure of the starch is disrupted, but only a small amount of amylose leaks out.
In general, the degree of gelatinization increases towards the outer parts of the dough. This occurs because the outer layers are exposed to higher temperatures for a longer period, resulting in more gelatinization.
This is why, in underbaked dough, the center may remain “raw” while the outer sections bake properly.
Gelatinization Levels in Wheat Dough
Under typical dough conditions, the amount of water available for gelatinization is limited.
Additionally, not all starch in the dough is exposed to the same intensity of heat or for the same duration. The inner part of the dough is always subjected to less heat and/or a shorter exposure time compared to the outer layers.
As a result, not all starch granules can undergo complete gelatinization.
In standard bread and pizza doughs, the ratio of partially gelatinized to fully gelatinized starch typically ranges from 50-50 to 30-70, with a higher proportion of starch being only partially gelatinized (i.e., 50-70% of the starch is partially gelatinized, while the rest undergoes complete gelatinization).
Generally, the starch that undergoes complete gelatinization, the softer the crumb will be. This is because complete gelatinization allows starch to absorb more water and swell, resulting in a less dense, more tender texture that contributes to a moister, softer mouthfeel.
The main factors affecting the degree of gelatinization are:
- Baking temperature: Higher baking temperatures promote more gelatinization (both complete and partial), as increased heat exposure allows starch to undergo greater gelatinization.
- Amount of free water in the dough (dough hydration): The more free water present in the dough, the more water is available for gelatinization, leading to a higher degree of gelatinization.
When both of these conditions – higher heat and more water – are met, and all other things being equal, more starch will undergo complete gelatinization.
This is why baked goods that are baked at high temperatures for short durations, such as pita bread or other fast-baked flatbreads, tend to have a soft and fluffy texture.
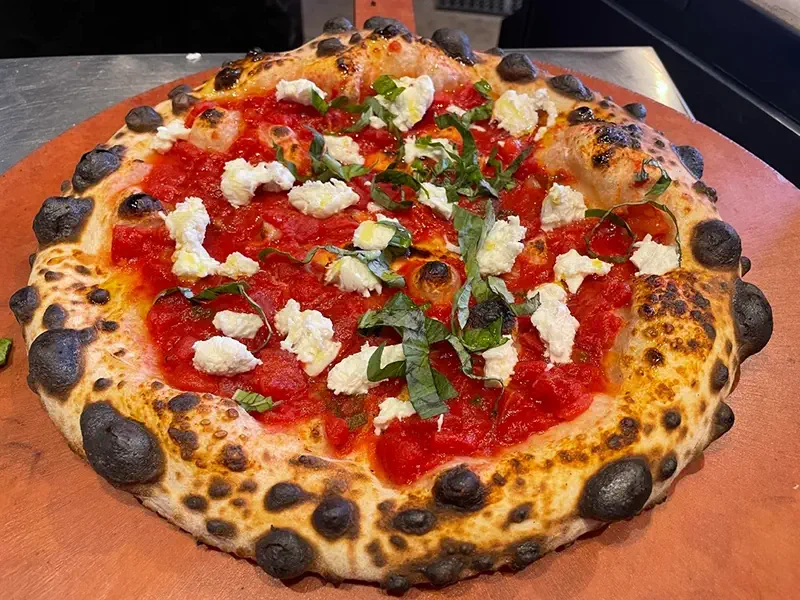
An example from the world of pizza is Neapolitan pizza, which is baked at high temperatures for a short period. This baking method allows for more gelatinization (both complete and partial), resulting in a very soft texture.
This principle also applies to baking techniques like Yudane and Tangzhong, where some of the flour is mixed with boiling water to gelatinize the starch before baking. These methods help create a softer, more tender crumb.
Why Gelatinization is Crucial for Crumb Texture
Starch gelatinization is a crucial process in baking, directly affecting the formation and stabilization of the crumb, as well as the final texture of pizza or bread.
When starch fully gelatinizes, it bursts and forms a thick gel that fills the spaces between the gluten structure. This gel stabilizes the gluten, helps trap air cells that expand during baking, and contributes to the formation of a well-structured crumb. Additionally, it traps water, enhancing the softness and moisture of the crumb.
Partially gelatinized starch also plays a key role in the final texture of the crumb. As it absorbs water and swells during baking, it helps retain moisture, contributing to a tender, soft texture.
The combination of complete and partial gelatinization creates the structure and texture we recognize and enjoy in baked goods:
- A stable, solid crumb structure that does not collapse upon cooling.
- A soft, moist, airy, and “springy” texture.
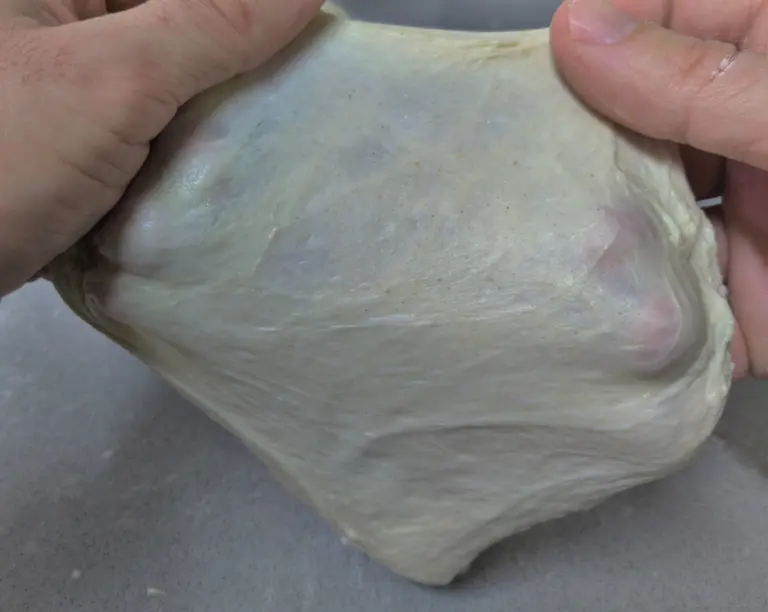
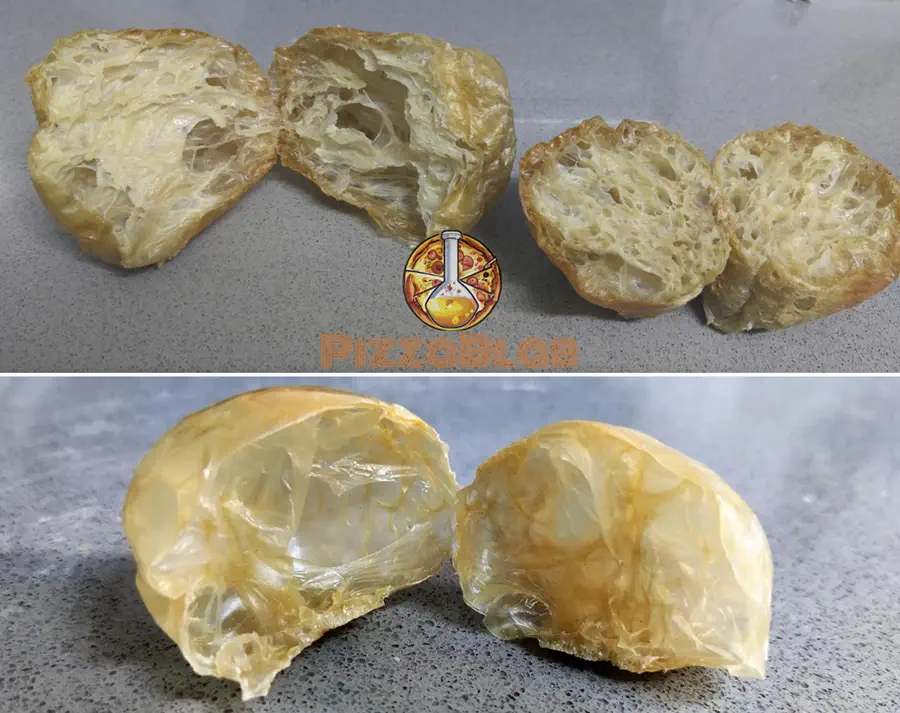
As shown in the picture below, dough that hasn’t undergone sufficient gelatinization during baking will have a ‘raw’ and wet texture, lack structure and elasticity, and fail to return to its original shape when pressed, remaining ‘squeezed.’
4. Oven Spring: The Final Rise (60°C / 140°F)
The oven spring phase begins between 60-70°C. During this phase, the dough “swells” and gains volume.
The oven spring phase starts as soon as the dough enters the oven, and lasts for about 20% of the total baking time, depending on the baking temperature and the composition of the dough.
The Science of Volume Gain and CO₂ Solubility
The following processes lead to oven spring and the increase in dough volume during baking:
- Presence of Air Cells in the Dough: The dough contains tiny “air cells” formed during kneading. These air cells are surrounded by a gluten network that acts as flexible “walls” around the air cells.
- Gas Filling the Air Cells: During fermentation, these air cells are filled with millions of tiny gas bubbles – primarily CO₂ – produced as a result of yeast activity.
- Gas Expansion: As the heat from the oven penetrates the dough, it warms the gases trapped in the air cells – mainly CO₂ and water vapor – causing the gas bubbles to expand and increase in volume. This process starts when the temperature inside the dough reaches 60°C.
- Evaporation of Alcohol in the Dough: When the temperature inside the dough reaches 78°C (170°F), the alcohol (ethanol), that has remained in a liquid state, begins to evaporate, further contributing to the expansion of the air cells (albeit to a lesser extent).
- Steam Formation: The steam generated during baking creates additional pressure on the gases trapped in the air cells, further promoting their expansion.
- Expansion of Air Cells: Due to the expansion of gases and steam, the air cells grow larger and gain volume.
- Expansion of the Gluten Network and Dough: The elastic gluten network surrounding the air cells expands as well, leading to an overall increase in the dough’s volume.
The air cells in dough are created during kneading by incorporating air (primarily nitrogen) into the dough. During fermentation, yeast activity fills these existing air cells with gas but does not create new ones. The number of air cells, or “bubbles,” is determined solely during the kneading stage and remains unchanged during fermentation, although their volume increases.
In simpler terms: the number of air cells, or “air bubbles,” is set during the kneading stage. Yeast activity only fills these cells with gas and allows them to expand.
This process is similar to filling a balloon with air: the gluten network acts as the “skin” of the balloon, surrounding the “air cell” and providing it with an elastic structure. When air (gas) is blown into the balloon (the air cell surrounded by the gluten network), the balloon expands until it reaches the elastic limit of the skin (the gluten network). If the network is overloaded, it will rupture and release the air cells, much like how a balloon bursts.
In summary: Oven spring is the expansion of air cells in the dough during baking. This results from the expansion of gases trapped within the cells, primarily CO₂ and water vapor, as well as the evaporation of alcohol in the dough.
The main contributor to oven spring is the expansion of CO₂, which accounts for at least 50% of the dough’s volume increase. Beyond this, there is no consensus on the exact contribution of steam and alcohol to the overall oven spring.
It is important to note that during baking, yeast plays a negligible to non-existent role in oven spring. The amount of CO₂ it produces during baking is insignificant. Theoretically, oven spring in a properly fermented dough will not be affected even if all the yeast is already dead.
CO₂ Solubility and How it Affects Baking
During fermentation and before baking, some of the CO₂ in the dough is in a soluble state – mixed with the liquids in the dough – while some is in a gaseous state.
Generally, the higher the dough temperature, the lower the solubility of CO₂. In simpler terms: the “hotter” the dough, the more CO₂ will be in a gaseous state, and the less will be in a soluble state.
As the oven’s heat penetrates the dough, it causes a sharp, rapid decrease in CO₂ solubility, converting it from a solution to a gas. Baking cold dough with a higher concentration of CO₂ in a soluble state may cause the CO₂ (in gas form) to be unevenly distributed, potentially leading to areas or “spots” where more CO₂ accumulates in the air cells.
For pizza, which is baked at a higher temperature than bread, this can lead to two problems:
1. Formation of bubbles in the pizza base.
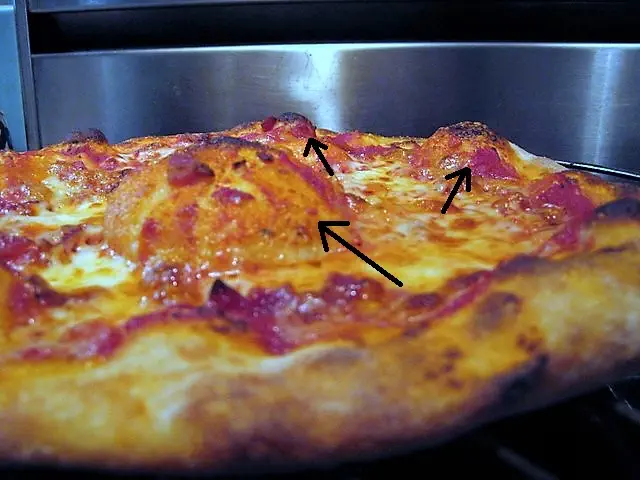
2. When baking at very high temperatures (over 350°C / 660°F), large “bubbles” may form on the crust. These bubbles are exposed to more intense heat since they are raised from the surface, bringing them closer to the heat source. As a result, they quickly become burnt or charred. This is why baking very cold dough at high temperatures is not recommended, as it can lead to aggressive black “leoparding”.
Generally, when not baking at high temperatures, pizza dough can be baked once its internal temperature reaches at least 10°C (50°F). In contrast, there is no problem baking bread directly from the fridge.
How Crust Formation Halts Oven Spring
Once the crust forms, it prevents further expansion of the dough, essentially stopping oven spring. This topic will be discussed in detail in the section on crust formation.
Factors Influencing the Strength of the Spring
The main factors influencing oven spring are:
- Dough Hydration: Increasing the dough hydration typically results in greater oven spring.
- Degree of Dough Extensibility/Elasticity: Dough that is too elastic (resisting expansion) will limit oven spring, while dough that is too extensible (stretchy) will stretch and expand too much until the gluten can no longer support it, causing it to collapse.
- Baking Temperature: Higher baking temperatures typically results in greater oven spring, as the heat accelerates the expansion of gases within the dough.
5. The Decline and Neutralization of Enzymes (60–70°C / 140–160°F)
In this temperature range, enzyme activity declines sharply, until it is completely neutralized.
6. Gluten Coagulation and Crumb Stabilization (70–100°C / 160–180°F)
At around 70°C (160°F), the gluten begins to coagulate. During this stage, the gluten in the dough gradually solidifies, contributing to the stabilization of the crumb.
Gluten coagulation is the process in which the gluten proteins, glutenin and gliadin, aggregate and form a semi-solid structure as they undergo denaturation – a change in their molecular structure that causes the gluten to solidify.
This process peaks at about 75°C (167°F), when the gluten structure becomes semi-solid (see picture below). The coagulated gluten, along with the gelatinized starch, provides the baked product with its stable and coherent structure.
7. Crust Formation and Surface Drying (100°C / 210°F)
When the surface temperature of the dough reaches 100°C, the crust begins to form, resulting in a hardened exterior on the baked product.
Crust formation is a critical stage in baking, with three main effects:
- Volume Limitation: Once the crust has formed, the dough cannot expand further because the hardened exterior prevents any additional rise.
- Heat Insulation: The crust acts as an “insulator,” limiting the penetration of heat into the interior of the dough. As the crust forms, it becomes more difficult for heat to reach the inner layers, concentrating more heat in the crust itself.
- Moisture Retention: The crust essentially “traps” moisture within the crumb, minimizing further moisture loss from the dough, except for minimal evaporation.
Crust formation occurs only once all the water on the dough’s surface has evaporated, leaving it dry. As long as moisture remains, the heat applied to the dough is used to evaporate the water. Since water cannot exceed 100°C before it evaporates, the surface temperature remains stable at 100°C until all moisture is gone. In simpler terms: a crust cannot form while moisture is present on the surface.
Once all the surface moisture has evaporated, the heat begins to warm the surface itself. As the surface temperature rises above 100°C, it dries, hardens, and solidifies, forming the crust.
In summary: During the initial stages of baking, the heat is used to evaporate the moisture on the dough’s surface. The crust forms only once all the surface moisture has evaporated.
The following sections will explain how crust formation influences the baking process and the final product.
Later, we will also explore how crust formation influences heat transfer within the dough and its moisture content during baking.
The Impact of the Crust on Volume and Moisture
The hard crust that forms on the surface of the dough prevents further expansion. Once the crust has formed, the dough’s volume is “locked,” and it cannot rise further.
Premature crust formation leads to a denser crumb with less volume, as the crust physically blocks the expansion of air cells within the dough.
When the crust forms too early, cracks often appear on its surface, caused by the pressure from the steam in the dough trying to escape.
To prevent premature crust formation when baking bread, it’s common to introduce steam into the baking chamber at the beginning. This creates a moist environment, helping to delay crust formation and allowing the dough to expand fully.
This can be done by:
1. Spraying the interior of the oven with water (be cautious not to spray directly on heating elements or electronics).
2. Baking the bread in a closed vessel (such as a Dutch oven), which traps moisture inside.
3. Placing a vessel of water in the oven to generate steam.
Note that this technique is more relevant to bread baking than pizza, which bakes in a shorter time. Using steam in pizza baking is not recommended, as it delays browning and can cause the crumb to dry out (as explained in the next section).
The Effect of Crust Formation on Crumb Moisture
In general, as long as the crust has not formed, the dough continues to lose moisture from the crumb. The faster the crust forms, the more moisture is “trapped” within the crumb.
However, rapid crust formation is not always desirable. If the crust forms too quickly, it can trap excess moisture inside the dough, leading to unbalanced baking. This may result in an undercooked crumb with a thick, hard crust (since heat concentrates in the crust rather than penetrating the interior), or an unevenly baked crumb with raw, “wet” sections.
On the other hand, if crust formation is too slow or delayed, it can allow too much moisture to escape, resulting in a dry crumb.
How Baking Temperature Shapes Crust Thickness
In general, the faster water evaporates from the surface of the dough, the sooner – or faster – the crust will form.
In practice, higher baking temperatures increase water evaporation from the dough’s surface, resulting in quicker crust formation. The surface of the dough receives more intense, concentrated heat, causing water to evaporate rapidly and the crust to form faster.
Higher baking temperatures also result in thinner crusts. The crust forms quickly before the heat penetrates deeper into the dough, creating a thinner “layer” of crust.
For example, Neapolitan pizza has a very thin crust due to its high baking temperature.
In contrast, lower baking temperatures cause slower water evaporation, resulting in thicker crusts. The heat penetrates deeper into the dough before the crust solidifies, creating a thicker or “deeper” crust layer.
8. Crust Browning and Flavor Development (100–200°C / 210–390°F)
Crust browning begins only after the crust has fully formed, as the surface temperature of the dough rises above 100°C. This stage plays a critical role in determining the quality and characteristics of the final baked product, influencing both its visual appeal and flavor profile.
The browning process involves three main chemical reactions, which occur simultaneously but are distinct from one another:
- Caramelization of Sugars: The natural sugars in the dough break down and develop a complex range of flavors and colors as they are exposed to heat.
- Dextrinization of Starch: Starches on the dough’s surface break down into simpler sugar molecules, contributing to flavor and a slightly glossy crust.
- The Maillard Reaction: A reaction between amino acids (proteins) and reducing sugars, responsible for the development of complex flavors and the deep brown coloration of the crust.
Among these, the Maillard reaction has the most profound impact on the final product’s appearance and flavor.
Sugar Caramelization: Sweetness and Color (160°C-200°C / 320-390°F)
Caramelization is a chemical process where sugars break down when exposed to dry heat (in a moisture-free environment) at high temperatures, typically ranging from 160°C to 200°C. This process does not involve enzymes or acids.
As the surface temperature of the dough exceeds the caramelization point, the sugar molecules undergo thermal decomposition, leading to new compound formations that result in a deep brown color and sweet, nutty flavors. In simpler words: caramelization occurs when sugar is heated to high temperatures.
Examples of caramelization include the preparation of toffee or caramel, as well as the “burning” of the surface of a crème brûlée.
The sugars involved in caramelization are reducing sugars. These can naturally occur in the dough due to enzyme activity, such as the breakdown of starch into maltose and glucose. Alternatively, reducing sugars can be added during dough preparation, such as table sugar (sucrose), which is not a reducing sugar itself but is broken down into glucose and fructose by the enzyme invertase.
Starch Dextrinization: Crust Shine and Crunch (Above 150°C / 300°F)
Dextrinization is the process in which starch, a complex carbohydrate composed of long glucose chains, breaks down into shorter carbohydrate chains called dextrins, when exposed to high heat (above 150°C) in a dry, moisture-free environment.
Dextrins contribute a light brown color and a sweet, delicate flavor to food. As heating continues, they can decompose further, resulting in additional browning and the formation of aromatic compounds.
A common example of dextrinization is toasting bread, where the bread turns brown as a result of the breakdown of starches into dextrins.
While dextrinization and caramelization both contribute to browning, they differ in the origin of the reaction:
Caramelization occurs in simple sugars (monosaccharides and disaccharides).
Dextrinization happens in starch, breaking it down into shorter chains of dextrins.
The Maillard Reaction: The Engine of Flavor (140°C-160°C / 250-320°F)
The Maillard reaction is a key chemical process in food browning, responsible for the rich brown color and complex flavors in many foods.
Named after French chemist Louis-Camille Maillard, who first described it in 1912, this reaction occurs between amino acids (the building blocks of proteins) and reducing sugars, typically at temperatures between 140°C-160°C, under dry heat and moisture-free conditions.
For the Maillard reaction to occur, three conditions must be met:
- Presence of amino acids.
- Presence of reducing sugars.
- High heat in a dry environment.
The Maillard reaction is responsible for the browning and flavor development in foods such as meat, vegetables, French fries, schnitzel, omelets, and baked goods. In each case, the reaction between proteins and sugars at high heat leads to browning and the creation of distinctive flavors and aromas.
In dough, the Maillard reaction is made possible by components formed during fermentation. Protease enzymes break down gluten (composed of gluten-forming proteins) into amino acids, while amylase and other enzymes break down starch and other sugars into simple sugars, mainly maltose, glucose, and fructose.
These byproducts formed during fermentation enable the Maillard reaction in dough. As the reaction progresses, new organic compounds are formed in the crust, significantly influencing its color, aroma, and flavor.
In fact, the Maillard reaction is the primary process responsible for the browning of the crust, playing a significant role in both its appearance and taste.
While the Maillard reaction produces rich and complex flavors, it also has drawbacks, creating several negative byproducts from a nutritional and health perspective.
First, the Maillard reaction can reduce the nutritional value of food by decreasing the digestibility of proteins and lowering the availability of essential amino acids, particularly lysine, which is crucial for the human body.
Additionally, the Maillard reaction leads to the formation of harmful byproducts, the most infamous of which is acrylamide.
Acrylamide is produced in varying amounts in any food that undergoes the Maillard reaction, including meat, French fries, and baked goods. Acrylamide is suspected to be a carcinogen, although there is ongoing debate regarding its actual effect on humans, especially given the relatively low doses to which a person is typically exposed in a normal diet.
This doesn’t mean you should avoid browned foods, but it’s important to be mindful of the possible effects.
The Maillard Reaction & Flavor
Beyond the visual browning of the crust, the Maillard reaction significantly impacts flavor.
During Maillard reaction, aromatic compounds are formed that contribute to the complex and rich aromas and flavors we associate with browned foods. These compounds, including melanoidins, aldehydes, phenols, esters, and more, directly influence the smell and taste of the crust and the overall baked product.
It’s important to understand that browning, particularly the Maillard reaction, is not just a cosmetic process – it plays a vital role in flavor development. Although the reaction primarily occurs in the crust, the compounds formed during it “seep” into the crumb, thus affecting the overall flavor of the pizza or bread, not just the crust.
In conclusion: Browning, especially the Maillard reaction, is an essential part of baking that directly impacts both appearance and flavor. A pale crust that hasn’t undergone sufficient browning will inevitably lack much of its potential flavor and aroma.
There are methods for “artificial” browning, such as applying oil to the rim before baking, to enhance browning in dough that hasn’t met the ideal conditions for the Maillard reaction (such as under or over-fermented dough, unsuitable dough formula, or unsuitable baking conditions, etc.).
However, this is merely a cosmetic fix that can help achieve a visually browner dough, but the contribution to flavor is marginal (aside from the taste of the oil itself). This “trick” cannot replace the essential browning that happens through the Maillard reaction during baking.
Variables That Affect Browning Intensity
The following factors influence the rate and intensity of browning in the dough, particularly the Maillard reaction:
- Baking temperature
- Humidity in the baking chamber
- Protein content of the flour used
- Enzymatic activity of the flour
- Sugar content in the dough
- Quality of fermentation (avoiding over- or under-fermentation)
- Dough hydration
- Acidity (pH) of the dough
From a physical (rather than chemical) perspective, any factor that allows more heat to concentrate in the crust will result in faster and more intense browning.
Baking Temperature
This is straightforward: the higher the baking temperature, the faster and more intense the browning will be, due to the quicker drying and heating of the dough’s surface.
Humidity in the Baking Chamber
Browning occurs only when the dough surface is dry. Any humidity in the baking chamber will delay both browning and the Maillard reaction, as the moisture in the air keeps the dough surface wet longer. The heat is used to evaporate the water, rather than heating the surface directly.
For this reason, a drier baking environment will facilitate faster and more intense browning.
This principle is especially relevant when baking in different types of ovens, as discussed in the following article: Gas, Electric, Wood, or Coal: Types of Pizza Ovens and Their Impact on Baking, Flavor, and Texture.
This is why, when aiming for a browned crust on meat, such as steak, it’s recommended to pat the surface dry thoroughly before searing – this allows the Maillard reaction to occur more efficiently and quickly.
Protein Content in Flour
For the Maillard reaction to occur, amino acids are required. These amino acids come from the breakdown of gluten during fermentation.
Therefore, the logic is straightforward: the higher the protein content in the flour, the more protein is available to break down into amino acids during fermentation. This, in turn, promotes a more intense Maillard reaction.
In conclusion: Flour with higher protein content is likely to produce a more pronounced Maillard reaction and enhanced browning.
Enzymatic Activity of Flour
You can read more about the enzymatic activity of flour in the article The Ultimate Guide to Pizza Flour: Characteristics, Differences, and Choosing the Ideal Flour (section ‘The Impact of Enzymatic Activity in Flour on Browning (Using the Right Flour for Your Baking Temperature)’).
In short, different flours have varying levels of alpha-amylase enzymes (referred to as ‘enzymatic activity’). These enzymes break down starch into reducing sugars, which participate in browning.
Flours with low enzymatic activity result in less starch being converted into sugars, both during fermentation and especially during baking. This leads to reduced browning in the final product.
Sugar Content in the Dough
Another essential factor for browning is the presence of reducing sugars. Generally, the more sugar the dough contains, the more intense the browning and Maillard reaction will be.
As mentioned, sugar can come from two sources: naturally, through the breakdown of starch during fermentation and baking, or from added ingredients like table sugar or honey.
For more on how sugar affects dough, see the following article: Sugar in Pizza Dough Explained: How It Affects Dough [Why & When to Use It].
Quality of Fermentation
The quality of fermentation directly impacts both browning and the Maillard reaction.
During fermentation, the dough undergoes maturing processes, including the breakdown of gluten into amino acids and starch into sugars – both crucial for the Maillard reaction. If fermentation is insufficient, whether due to inadequate breakdown of gluten or starch, the Maillard reaction will be negatively affected.
This section connects closely to the previous ones. While flours with higher protein content can potentially contribute to the Maillard reaction, the benefits are only realized if the dough undergoes proper fermentation, breaking down gluten into amino acids. Without this breakdown, the protein content’s potential contribution is lost.
Similarly, the sugar content in the dough, which also plays a key role in browning, is affected by the quality of fermentation. Over or under-fermented dough will have fewer residual sugar available for the Maillard reaction and caramelization, leading to reduced browning.
Dough Hydration
The effect of dough hydration on baking will be explored in more detail later.
In short, doughs with higher hydration have greater browning potential. This is because the larger ‘air bubbles’ that form during baking in high-hydration doughs create a layer of thermal “insulation” between the crust and the crumb, concentrating more heat in the crust, accelerating its browning.
The Acidity (pH) of the Dough
The acidity of the dough significantly impacts the rate and intensity of the Maillard reaction.
Generally, the Maillard reaction occurs most efficiently in a neutral to slightly basic environment (pH 7-9). The more acidic the dough, the slower the Maillard reaction will occur.
This is why sourdoughs, which are highly acidic (pH 3.5-4.5), brown much more slowly than ‘regular’ doughs. Similarly, using preferments like biga or poolish, which also greatly acidify the dough, slows down browning.
The Physics of Heat and Moisture Distribution
Heat distribution within the dough is uneven during baking, with the outer layers, such as the crust, absorbing more heat than the inner sections due to the gradual penetration of heat:
- Crust Temperature: The crust heats up quickly and can reach temperatures as high as 200°C. Beyond this point, the crust begins to carbonize (burn).
- Crumb Temperature: The crumb heats much more gradually than the crust, and its temperature can never exceed 100°C (212°F). This is due to the evaporation-condensation mechanism, discussed in the next section, which plays a crucial role in baking the dough properly.
The Evaporation-Condensation Mechanism
The evaporation-condensation mechanism works as follows:
- Heat penetration: Heat enters the dough, causing the water inside to heat up. Initially, the energy from the heat is used to evaporate the water within the dough.
- Evaporation: As the water temperature rises, it eventually reaches its boiling point (100°C / 212°F), turning into steam.
- Steam diffusion: The steam spreads in all directions – both into different areas of the dough and outside of it. This is how the dough loses moisture during baking.
- Condensation: When the steam reaches a cooler part of the dough (such as the inner layers), it condenses—turning back into a liquid.
- Heat release: The condensed steam releases the heat it carried, warming the surrounding dough.
This cycle of condensation and evaporation continues throughout the dough, facilitating heat transfer. Gradually, the temperature throughout the dough rises and approaches 100°C.
As you can see, it is the water within the dough that “bakes” its inner portion, driving essential processes like starch gelatinization and gluten coagulation.
Because of the evaporation-condensation mechanism, the temperature in the inner part of the dough will never exceed 100°C, as long as there is water present.
While baking time and temperature can affect the movement of water within the dough, the fundamental evaporation-condensation process by which the dough bakes remains consistent across various cooking methods, including baking, steaming, and deep frying.
How Baking Temperature Shapes Crust Thickness
The crust forms when the dough’s temperature exceeds 100°C. As the temperature surpasses this threshold and moisture is lost, the dough solidifies and browns, effectively creating a crust.
In general, from the moment the crust forms, the longer the baking time and/or the higher the temperature, the thicker the crust will become. This occurs because heat gradually penetrates deeper into the dough, drying and solidifying more layers, which results in a thicker crust.
In principle, baking quickly at a high temperature will produce a thinner crust compared to baking slowly at a lower temperature. For instance, baking for 50 minutes at 180°C will yield a thicker crust than baking for 40 minutes at 210°C.
The reason for this difference is that, as mentioned earlier, when baking at a lower temperature, the heat has more time to penetrate deeper into the dough, affecting a thicker layer.
Internal vs. External Temperature Distribution
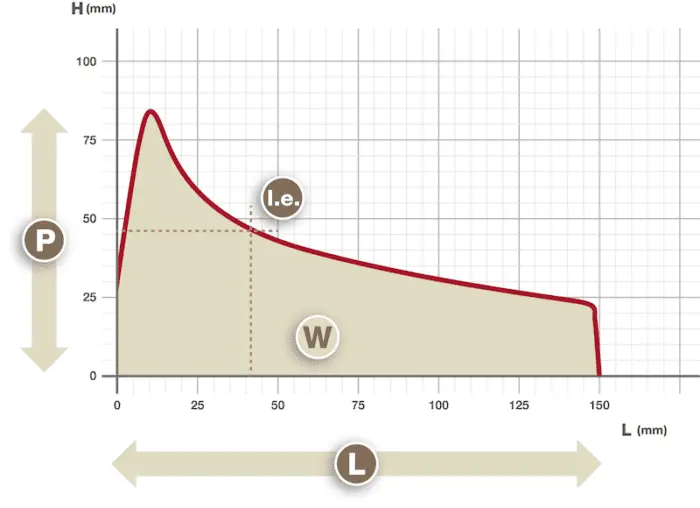
The graph below, from this study, shows the temperature at various depths of bread dough baked at 180°C (355°F) for 30 minutes.
Temperatures were measured at the crust (depth of 0 cm) and at depths of 0.5, 0.6, and 2 cm.
While this graph illustrates baking bread dough, the same principle applies to pizza dough.
In this context, the key difference between pizza and bread is the dough’s thickness. Since pizza dough is thinner, heat reaches the center more quickly, making the baking process faster.
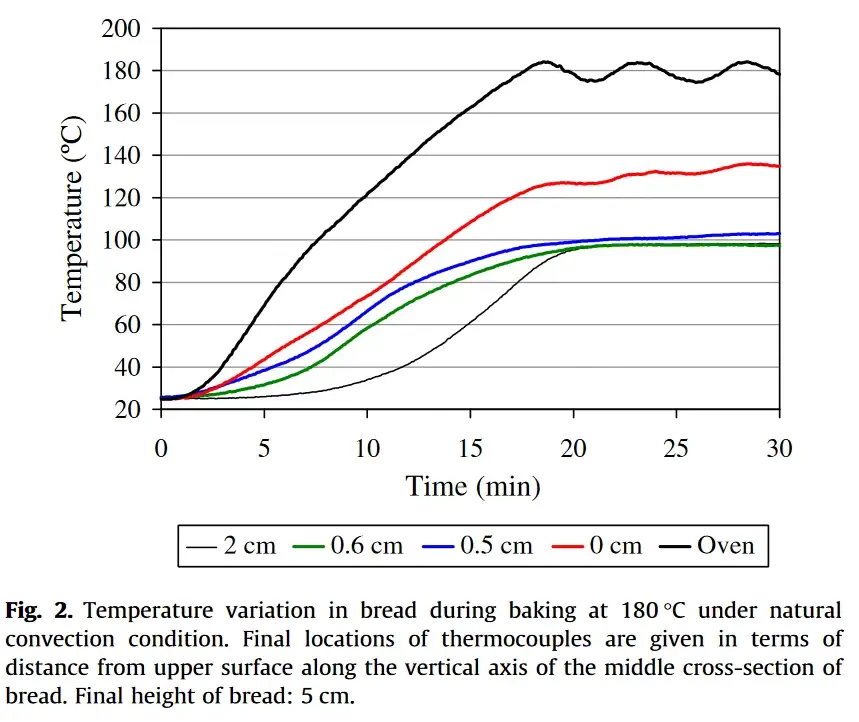
As shown, the red line, representing the crust, is the only one that exceeds 100°C. The other lines, representing the crumb, reach 100°C and remain at that temperature.
Additionally, the blue line (representing a depth of 0.5 cm) begins to rise slightly above 100°C, indicating that this area is starting to form a crust. If baking continued, the temperature of the blue line would have risen further, and eventually, the green line (representing a depth of 0.6 cm) would also exceed 100°C, turning into a crust.
Moisture Migration: Why the Crust Dries While the Crumb Stays Moist
During baking, dough loses moisture in two main ways:
- Drying of the crust.
- Steam (water vapor) created during the condensation-evaporation process, some of which escapes from the dough.
This process seems straightforward, but there’s a less intuitive detail we’ve already touched on: most of the moisture lost during baking comes from the crust, not the crumb. Contrary to popular belief, the crumb itself loses very little moisture during baking.
The graph below, from the study mentioned earlier, shows the moisture content in bread baked for 40 minutes at 180°C, starting with a dough moisture content of 40%.
Note: This moisture content refers to the total weight of the dough, not dough hydration (which is calculated as the water content relative to the flour weight, or baker’s percentage). The dough’s hydration, in this case, was 54%.
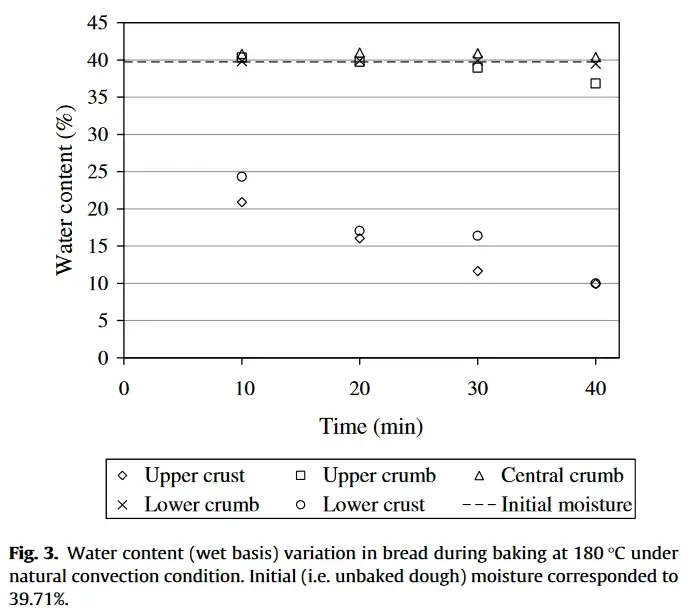
The circle and diamond symbols represent moisture levels in different areas of the crust
As shown in the graph, the moisture content in the crumb barely changes during baking, staying almost constant at 40%. The only exception is the upper crumb (marked by squares), which loses moisture gradually towards the end of baking, dropping to about 37%. This happens because the upper part of the crumb is closer to the crust, where it absorbs more heat.
In contrast, the moisture content in the crust steadily decreases throughout baking, reaching around 10% by the end.
This graph clearly illustrates how moisture is lost during baking, reinforcing the principles we’ve discussed. As the crust solidifies, it effectively “seals” the crumb, which slows or prevents the steam from escaping, thus preserving the moisture inside the dough.
Typically, a thin-crust pizza will have between 26% and 30% moisture after baking, while a Neapolitan pizza typically has around 40% moisture. By comparison, a loaf of bread generally contains 38% to 40% moisture.
The difference in moisture content between pizza and bread comes down to their structure. Bread has more crumb, which retains moisture more effectively than the crust. Pizza, being flatter, has a larger crust-to-crumb ratio, leading to greater moisture loss from the crust and a lower overall moisture content.
When Is the Dough Considered “Baked”?
As discussed earlier, the condensation-evaporation mechanism is crucial for baking the dough. Heat raises the temperature of the water, causing it to boil.
This generates steam, which in turn heats and bakes the dough from the inside.This process is responsible for the gelatinization of starch and the coagulation of proteins (gluten), both of which are most effective at around 90°C.
So, when can we consider the dough to be “fully baked”? For the crumb to set properly, the water inside the dough must boil, generating steam for a sufficient amount of time. This raises the dough’s temperature, allowing the starch to undergo both partial and complete gelatinization, while also ensuring that the gluten coagulates fully.
The time required for the crumb to set depends on several factors, including:
- Baking temperature: Higher temperatures speed up the process, while lower temperatures slow it down.
- Dough composition and fermentation: A dense, under-fermented dough bakes differently than an airy, well-fermented dough.
- Shape of the dough: Flat dough allows heat to reach the center more easily than thicker, round dough.
- Size of the dough: Smaller dough masses bake more quickly, as heat reaches the center more efficiently than in larger dough portions.
A common method to assess the degree of baking is to use a probe thermometer to measure the internal temperature of the dough.
The thermometer is inserted into the innermost part of the dough, where heat penetration is slowest. Generally, when the temperature at the center of the dough reaches at least 92°C (197°F), it indicates that both gelatinization (which peaks around 90°C) and gluten coagulation (which peaks around 85°C) have been completed, and the crumb is fully set.
While this test provides a useful indication of the baking progress, it has some limitations.
First, the temperature at the measurement point may not accurately reflect the temperature throughout the rest of the dough, especially in unevenly shaped dough or when there are inconsistencies in heat distribution within the oven.
Additionally, the test only gives a snapshot of the temperature at a single moment and doesn’t account for how long the dough has been at that temperature (unless measured continuously). This makes it difficult to definitively conclude whether the crumb has fully set.
Why Baked Goods Collapse: Structural Stability After the Oven
The most common reason cakes and baked goods drastically* collapse after being removed from the oven is that the crumb (or interior) hasn’t had enough time to solidify and stabilize. In simpler terms, they were underbaked.
Certain cakes, such as cheesecakes, will inevitably collapse and lose volume once removed from the oven – this is completely normal and expected.
This applies to all types of cakes and baked goods, including those that contain flour as well as those made without flour but with other stabilizing ingredients like eggs. Just as gluten proteins coagulate and solidify during baking, the proteins in eggs also help contribute to the structure and stability of the final product.
While the dough or batter is in the oven, the steam generated inside creates internal pressure that helps “hold” the shape. Think of it like a balloon: as long as air is being pumped in, the balloon keeps its shape; But when the airflow stops, the balloon immediately loses its volume.
The same principle applies to baked goods. If they’ve been baked properly, the crumb can maintain its structure once removed from the oven, thanks to the processes that occur during baking. However, if the dough or batter hasn’t been baked long enough, it will collapse as soon as the internal pressure from the steam dissipates.
We’ve already discussed the reasons why the crumb sets and solidifies during baking. Now, let’s explore some factors that can prevent this process from happening fully:
- Using an unsuitable baking material that doesn’t provide even heat distribution (e.g., silicone or glass pans).
- Too short of a bake time, which prevents the center of the dough or batter from fully setting.
- Baking at too low a temperature, preventing the necessary processes from taking place.
- Premature crust formation, which can block heat from penetrating the dough or batter’s interior.
- Excessively wet dough or batter, which can hinder proper setting.
For certain cakes, especially cheesecakes (though not exclusively), a common recommendation to prevent collapsing is to place a pan or vessel filled with boiling water in the oven.
The idea behind this practice is that the water generates steam, creating a humid environment inside the oven. This steam helps prevent the crust from forming too early, allowing heat to penetrate more effectively to the center of the cake, promoting even baking.
However, note that this method is not universally suitable and should not be seen as a “magic solution,” as the cause of a cake or baked product not fully setting is not always due to premature crust formation.
Key Takeaways
- The Transformation Timeline:
Baking is a race against temperature. The dough’s internal state changes at specific “milestones”, moving from gas expansion to structural stabilization and finally to surface browning. - The Evaporation-Condensation Cycle:
Water within the dough acts as the primary heat carrier. As water turns to steam, it moves through the dough and condenses in cooler areas, releasing heat. This cycle “bakes” the interior, driving processes like starch gelatinization and gluten coagulation. - The 100°C (212°F) Internal Cap:
Because of the constant evaporation of water, the internal temperature of the dough (the crumb) will never exceed 100°C (212°F). High heat only affects the surface once it has sufficiently dried out. - Temperature & Moisture Distribution:
There is a massive temperature gradient between the crust (up to 200°C+) and the crumb (max 100°C). Consequently, the crust is the only part that loses significant moisture and browns, while the crumb retains its moisture and simply “sets” into a solid. - Moisture Migration:
During baking, only the crust actually loses significant moisture, becoming dry and crisp. The crumb (the interior) maintains roughly the same moisture content it had as raw dough; it simply “sets” into a solid state. - Oven Spring (30-60°C):
This is the final “growth spurt” of the dough. It is caused primarily by the expansion of existing CO₂ gases and steam. - Starch Gelatinization (50-96°C):
Starch granules absorb water and swell, eventually bursting to form a “gel.” This process is essential for creating a soft, moist crumb. High heat and high hydration promote more complete gelatinization. - Structural Stabilization (70-80°C):
At this stage, gluten coagulates (solidifies). Along with the gelatinized starch, this creates the permanent “skeleton” of your baked good, ensuring it doesn’t collapse after baking. - Crust Formation (100°C+):
Once the surface temperature reaches the boiling point of water, moisture evaporates rapidly, forming a dry “skin.” This skin eventually hardens into the crust, which halts any further expansion (ending oven spring). - The Magic of Browning (140-200°C):
Real flavor develops through the Maillard Reaction and Caramelization. These reactions require dry heat and temperatures well above 100°C, which is why the inner “crumb” never browns – it stays hydrated and capped at boiling point. - When is it “Baked”?
Dough is considered fully baked when the crumb has set, meaning the internal water has boiled into steam long enough for starch to gelatinize and gluten to fully coagulate. This typically occurs when the innermost part of the dough reaches at least 92°C (197°F). - Starch Retrogradation:
After baking, starch molecules immediately begin to revert to a crystalline state. This is why pizza becomes “leathery” or tough as it cools.
Enjoyed this article? Join the BLAB
Unlock the Key Takeaways above and enjoy a 100% clean, ad-free experience across the entire site.