The Complete Guide to Cold Fermenting Pizza Dough
While cold fermentation is a popular and convenient choice for making pizza dough, many bakers struggle with inconsistent results. Most issues arise from ‘hybrid’ fermentation methods – mixing room temperature and refrigeration – which introduce variables that are difficult to control. This guide introduces the Lehmann Method: a scientifically grounded, professional approach designed to produce perfectly fermented dough every time
Introduction to Cold Fermentation Management
When it comes to the cold fermentation of pizza dough, there are two primary fermentation ‘methods’ or dough management procedures:
- Placing the dough in the fridge immediately after kneading and balling it (what I refer to as the Lehmann method).
- Hybrid fermentation, which involves allowing the dough to ferment at room temperature before and/or after the time it spends in the fridge.
In the following sections, we will explore each method, discussing their benefits and/or drawbacks, as well as how to perform them properly.
It’s important to note that both fermentation methods, and specifically the Lehmann method, work great for making all types of pizzas.
The Lehmann Method: Immediate Balling & Refrigeration
This is the fermentation method to be used with PizzaBlab’s dough calculator and also the method I recommend for cold fermentation. Whether you are using the dough calculator to make dough for pizza or for other purposes, the principle remains the same: once you have finished kneading and portioning the dough, place it in the fridge as soon as possible.
This fermentation method was established by the late Tom Lehmann, also known as “The Dough Doctor”. Tom was a food scientist, a renowned baking and dough consultant, and the former chairman of the American Institute of Baking.
Tom was one of the most influential mentors and experts in the field of pizza in the USA (and possibly worldwide). I personally learned a great deal from his extensive knowledge. His contribution to the world of pizza is immense and deserves recognition above all else. This is my humble contribution to carrying on his legacy.
This fermentation method is my personal favorite and is also the preferred method used by the majority of pizzerias for cold fermentation. It is also the fermentation method to be used with PizzaBlab’s dough calculator for cold fermentation (and we will soon understand why).
The primary purpose of this fermentation method is to provide predictable and consistent fermentation results, which are crucial in dough preparation, especially in a pizzeria or business setting. Hence, this method is preferred for cold fermentation in pizzerias. This is achieved by cooling the dough as quickly as possible after kneading and portioning/balling it.
The main advantage of this fermentation method is that it minimizes the factors that can influence the rate of fermentation (which we will discuss later). This creates an optimal and predictable fermentation process, allowing us to consistently achieve dough with excellent performance and a wide usability window.
Why the Lehmann Method Produces Superior Flavor, Texture and Consistency
In order to understand how cold fermentation using the Lehmann method helps achieve more consistent and predictable fermentation results, it is important to first understand what happens to the dough when it is refrigerated, especially when dealing with a large amount of dough (bulk fermentation).
For more information on this topic, refer to the following article: Bulk Fermentation vs Ball Fermentation: Effects on Pizza Dough and Timing Guidelines
In short:
- The larger the mass of dough, the longer it takes for its interior to cool. When a large mass of dough is placed in the fridge, it can take up to 12 hours or more for the interior to reach the fridge’s actual temperature. This means that the dough will ferment at a much higher temperature than that inside the fridge.
- When the dough is left to ferment at room temperature before being refrigerated, the yeast produces CO2, which forms an “insulating layer” within the dough. This layer slows down the cooling process of the dough’s interior. The longer the dough ferments prior to refrigeration, the more CO2 is produced, resulting in a larger insulating layer and a longer cooling time in the fridge.
- The yeast generates heat as it works in the dough, further impeding the cooling of the dough’s interior.
As can be seen, the combination of these factors means that dough that is cold fermented in bulk or allowed to ferment before being placed in the fridge will actually ferment at a higher temperature than the temperature inside the fridge. Consequently, the dough will ferment much faster, potentially resulting in unexpected fermentation outcomes, such as over-fermentation.
Using the Lehmann method allows us to effectively ‘solve’ the two issues mentioned above:
- Instead of having one large mass of dough, we divide the dough into smaller balls. This allows for quicker cooling compared to a larger mass of dough. Think about what freezes faster in the fridge: a whole bottle of water or small ice cubes.
- We “prevent” the yeast from starting to work and producing CO2 before placing the dough in the fridge. This prevents the formation of an insulating CO2 layer and allows for faster cooling.
By combining these two approaches, we achieve a dough that cools much faster once it is in the fridge. Consequently, the dough spends more time at the intended fermentation temperature and avoids being at a significantly higher temperature than planned, as is the case with hybrid fermentation (which we will discuss later).
If you prefer or need to ferment the dough in bulk (whether for space-saving reasons or otherwise), another option is to flatten the dough in the container to a thickness of no more than 2-3 cm (0.5-1″). This allows the dough to cool quickly, minimizing the impact of bulk fermentation on the fermentation temperature.
In essence, using the Lehmann method allows us to ferment the dough in the fridge at a temperature that closely aligns with the intended fermentation temperature. This yields fermentation results that are more predictable and consistent.
As we will explore later, hybrid fermentation often leads to the dough fermenting at a temperature significantly higher than intended, making it challenging to attain consistent and predictable fermentation results.
Another key advantage of the Lehmann method is its simplicity: you can refrigerate the dough immediately after kneading and use it almost straight from the fridge, eliminating the need for precise timing or additional fermentation steps:
- Immediate refrigeration: The dough goes straight into the fridge after kneading, eliminating any waiting period. This prevents accidental over-fermentation at room temperature, ensuring consistent results.
- Ready-to-use after refrigeration: The dough is fully fermented when removed from the fridge, requiring no additional fermentation time. Simply allow it to reach working temperature before use.
Yeast Calibration: Why Cold Fermentation [Using the Lehmann Method) Requires More Yeast
If you are accustomed to other cold fermentation methods, specifically hybrid fermentation (which we will discuss in the next section), you may find the yeast amount provided by the calculator to be very high compared to what you are used to.
The reason for this is simple: as we learned in the the lower the fermentation temperature, the more yeast is needed.
PizzaBlab’s dough calculator was designed to be used with the Lehmann method for cold fermentation in order to achieve consistent and predictable results as much as possible. Therefore, the yeast amount provided for cold fermentation is based on the assumption that the dough is divided into balls and immediately placed in the fridge after kneading, so that it reaches the desired temperature as quickly as possible.
On the contrary, in hybrid fermentation, the internal temperature of the dough will be higher for a significant portion of the time in the fridge, so the yeast amount should be smaller accordingly.
Let’s consider an example to illustrate this (the numbers used are arbitrary for demonstration purposes, but not necessarily far from reality):
We have two doughs: one fermented using the Lehmann method, and another fermented using hybrid fermentation (bulk fermented in the fridge). The total fermentation duration is assumed to be 24 hours in both cases, with a fridge temperature of 4C/40F degrees.
- The dough fermented using the Lehmann method is immediately placed in the fridge after kneading and dividing into balls. Out of the 24 hours in the fridge, each ball will have an internal temperature of 4C/40F for 20 hours.
- The dough fermented using the hybrid method goes into the fridge as a single mass (bulk) after one hour of fermentation at room temperature. Out of the 24 hours in the fridge, the internal temperature of the dough will be 4C/40F for only 5 hours. During the remaining 14 hours, it will actually ferment at a higher temperature (a temperature that cannot be accurately predicted).
The above example perfectly illustrates why it is necessary to use more yeast when using the Lehmann method. Fermentation at a lower temperature requires more yeast, while fermentation at a higher temperature (hybrid fermentation) requires less yeast.
This is why many calculators, which only calculate hybrid fermentation, provide a very small amount of yeast, and why PizzaBlab’s dough calculator provides a relatively high amount of yeast.
It is important to note that using a higher amount of yeast is not inherently worse, and the “goal” of fermenting dough is not to use as little yeast as possible, but rather to adjust the amount of yeast according to the fermentation duration and temperature in order to achieve optimal fermentation. The amount of yeast is a means to an end, not the ultimate goal.
Theoretically, in both cases in the above example, it is possible to achieve the same level of flavor in the dough by adjusting the amount of yeast to different fermentation conditions (lower/higher fermentation temperature).
As long as the amount of yeast is adjusted to the duration and temperature of fermentation, a dough containing 0.5 grams of yeast is not ‘better’ or more flavorful than a dough containing 2 grams of yeast. This distinction is completely meaningless and should not be a consideration.
This is precisely why PizzaBlab’s calculator provides a relatively high amount of yeast for cold fermentation. The amount is tailored to the Lehmann method and takes into account the actual fermentation at a low temperature, compared to other calculators, which are specifically designed for hybrid fermentation.
Based on my experience and the experience of many others, using PizzaBlab’s calculator’s recommended amount of yeast in combination with the Lehmann method yields optimal fermentation results for cold fermentation.
Implementation: A Practical Guide to the Lehmann Method
1. Knead and Control FDT:
Knead/mix the dough as usual, aiming for a Final Dough Temperature (FDT) of 15–20°C / 60–70°F. This lower starting point allows the dough to reach the fridge’s target temperature faster, ensuring a more predictable fermentation rate.
2. Immediate Balling:
Once kneading is complete, immediately divide the dough into balls. (If you are only making a single pizza, you can skip this step).
Note: Depending on your kneading method, you may need to let the dough rest at room temperature for 10–20 minutes before shaping (but no more than that). Intensive kneading can result in a very elastic dough at the end of mixing, which can resist balling. A short rest allows the gluten to relax, making the dough softer, more extensible, and easier to handle.
3. The 20-Minute Rule:
Place the dough in the fridge within 20 minutes of finishing kneading. Let it ferment for your intended duration. If your workflow requires folds, you can briefly remove the dough from the fridge, perform the folds, and return it to the fridge.
4. Balling / Reballing / Pan Stretching:
If your process involves reballing, if you used the flattened bulk method and need to ball the dough, or if you need to stretch the dough into a pan for pan pizzas, remove the cold dough from the fridge and shape your balls (or stretch into the pan) as usual, in accordance with your fermentation schedule.
Note: You may need to let the dough rest at room temperature for 15-30 minutes before shaping/stretching; otherwise, the cold dough may be too elastic and resist shaping.
5. Monitoring fermentation:
The dough is ready to be baked when it has roughly doubled in volume while in the fridge.
Note: At standard refrigeration temperatures (1–5°C / 34–40°F), yeast and enzyme activity slows down significantly but does not stop. Consequently, the dough continues to both ferment and mature, just at a decelerated rate.
If you are using the Lehmann Method and observe no visible sings of fermentation (such as a volume increase or bubbles along the bottom and sides of the container) it indicates a flaw in the process (e.g., incorrect yeast quantity, an FDT that was too low, or a fridge that is too cold). When following this method correctly, the dough should double in volume during its time in the fridge.
6. Using the Dough (Warm-up Period):
At the end of the fermentation period, remove the dough from the fridge. Let the balls rest at room temperature until their internal temperature reaches at least 10°C / 50°F. This usually takes 30 minutes to 3 hours.
Note: You are not waiting for the dough to reach room temperature; you are simply allowing it to warm up enough to facilitate easier stretching. While the dough is technically ready to bake straight from the fridge, cold dough is highly elastic and resistant. Resting it until it hits 10°C, 15°C, or 20°C (depending on your preference) ensures the gluten is relaxed and extensible enough to stretch into a pizza base. Crucially, this rest is for physical handling, not to allow for additional fermentation.
Style-Specific Dough Temperature Considerations
The internal temperature of your dough at the moment of baking can impact the final crust, depending on the style of pizza you are making:
- Neapolitan Pizza: For high-heat environments (e.g., wood-fired ovens at 430°C+ / 800°F+), it is recommended to let the dough reach a higher internal temperature, around 20°C / 68°F. Baking cold dough at these extreme temperatures can cause aggressive “leoparding“.
- Hand-Stretched Pizzas: For hand-stretched pizzas baked in standard electric or gas ovens (such as NY style), the dough can be worked at an internal temperature as low as 10°C / 50°F, provided you find it extensible enough to shape comfortably.
- Pan Pizzas (Detroit style, Sicilian, etc.): Because these doughs are stretched into the pan before the final proof, they can often be moved directly from the fridge to the oven. Since no manual shaping is required at the time of baking, there is no need to wait for the dough to warm up – it can be baked cold straight from the fridge.
Understanding Hybrid Fermentation Methods
The Mechanics of Combining Room and Cold Fermentation
Hybrid fermentation is a method that combines cold fermentation with room temperature fermentation. The principle behind this method is simple: the dough is fermented at room temperature for a certain period of time before (and after) being refrigerated for the remaining fermentation time.
The key aspects of this fermentation method include:
- After kneading, the dough is allowed to ferment at room temperature for an hour or more to “activate” the yeast.
- The dough is then transferred to the fridge for the desired fermentation duration (24-48-72 hours).
- A few hours before baking, the dough is taken out of the fridge to complete the fermentation process at room temperature. If the dough was fermented as a bulk, it is divided into balls after removing it from the fridge and allowed to ferment further before baking.
In the hybrid fermentation method, a very small amount of yeast is usually used. There are two reasons for this:
- The dough should undergo additional fermentation at room temperature. The fridge is used to slow down the fermentation process – the dough is not very active during its time in the fridge, primarily because of the relatively low amount of yeast.
- This fermentation method causes the dough to ferment in the fridge at a temperature higher than the actual fridge temperature, which means less yeast is needed.
These two reasons result in the need for a relatively small amount of yeast (usually between 0.1-0.3% instant dry yeast), which is suitable for the fermentation conditions of this method.
Due to the small amount of yeast, dough undergoing hybrid fermentation does not show significant signs of fermentation while in the fridge. This is why it is important to allow the dough to “complete” its fermentation after removing it from the fridge. The amount of yeast in the dough is too low to cause significant rising and maturation activity in the fridge, but enough to cause these activities when the dough is fermented at room temperature.
At low temperatures, the CO2 produced by the yeast (which is what causes the dough to gain volume) becomes much more soluble in water, transitioning from a gas to a liquid state.
This is one of the reasons why dough that undergoes cold fermentation, with a small amount of yeast, and specifically hybrid fermentation, often shows no significant physical change in volume during its time in the fridge. The concentration of CO2 in the dough is low (due to the small amount of yeast), and most of the CO2 is in a liquid state rather than a gas, preventing the dough from physically rising.
When the dough is removed from the fridge, the liquid CO2 becomes less soluble and reverts back to a gaseous state. This contrasts with the Lehmann method, in which a larger amount of yeast produces more CO2, leading to visible signs of fermentation in the dough even during the refrigeration period.
In other words, in hybrid fermentation, the fermentation time outside the fridge can sometimes be more important than the time spent in the fridge in terms of maturation and flavor development.
That’s why in hybrid fermentation it’s crucial to allow the dough to “finish” fermenting outside the fridge before baking, unlike the Lehmann method where the dough is ready to be baked after the fermentation time in the fridge.
In fact, it can even be said that the flavors in dough undergoing hybrid fermentation primarily come from the time outside the fridge, as the contribution of the time in the fridge to flavor development is smaller than commonly believed, although it still exists.
It’s important to note that not every dough undergoing hybrid fermentation will necessarily follow the same pattern. The results depend on specific temperatures and other variables, which is why this fermentation method can yield inconsistent and less predictable results compared to the Lehmann method, as we’ll see in the next section.
Like any fermentation method, the hybrid fermentation method works well when done correctly. The challenge, however, is that consistently executing it correctly is not a simple task. Personally, I believe in simplifying the process as much as possible, because why work harder when you can work smarter?
Why Hybrid Methods Lead to Inconsistent Fermentation
So, what is the main drawback of the hybrid fermentation method? In short, dough that undergoes hybrid fermentation will ferment much less consistently and predictably, and is much more susceptible to external influences such as the room temperature before and after being in the fridge, the time spent outside the fridge, and the final dough temperature.
The longer the fermentation time in the fridge, the more significant these effects will be.
Why does this happen? I have already discussed this in previous sections, but to summarize:
- The yeast activity in the dough produces carbon dioxide (CO2) or “gas bubbles” that make the dough less dense and more airy. These gas bubbles act as a physical “insulation layer” inside the dough, slowing down the transfer of heat or cold between the environment and the dough. Less compressed dough (more airy) means it is better insulated from the environment.
- The metabolic activity of the yeast itself generates heat (about 0.5°C per hour). Depending on the degree of insulation from the environment, this heat may remain inside the dough and further affect its internal temperature.
- The larger the mass of dough, the longer it will take for the external temperature to have an effect on it, and the effect will occur more slowly. For example, compare the melting time of a small ice cube to that of a shoebox-sized block of ice.
The above process is a kind of “cycle” – as the dough ferments (becoming more airy and creating a larger insulation layer), it is less affected by the ambient temperature. At the same time, the yeast’s activity generates more heat in the dough (which is retained due to the insulation layer). This heat, in turn, increases yeast activity and accelerates fermentation (more heat equals higher yeast activity). As a result, the insulation layer continues to grow, thus perpetuating the cycle.
What does this mean in practice? The longer we let the dough ferment at room temperature before refrigerating it, and the higher the temperature and/or the larger the dough (in terms of weight and volume), and/or the higher the final dough temperature, the “thicker” the “insulation layer” will become. As a result, the dough will be better able to maintain its internal temperature.
In other words, when we place such dough in the fridge, it already has an insulating layer that prevents its core from reaching the temperature of the fridge. As a result, the dough ferments at a higher temperature than intended, which leads to unpredictable and inconsistent fermentation results.
In practice, this means that controlling the fermentation of dough fermented using the hybrid method is much more challenging. It depends on several factors that are not easy (or even possible) to account for, even when using various calculators.
This is why PizzaBlab’s calculator does not offer an option for hybrid fermentation. Even if a certain amount of yeast is obtained for hybrid fermentation, it cannot be relied upon (the same applies to other calculators that calculate yeast amounts).
I had the opportunity to see (and taste) many pizzas that people made using the hybrid fermentation method, and they were highly satisfied with the results. However, upon observing and tasting pizzas made by the same person at different times using a supposedly identical process (hybrid fermentation), there is a noticeable lack of consistency in the final product. At times, the dough ferments perfectly, while at other times it is over-fermented or under-fermented. This inconsistency is often a result of hybrid fermentation.
On top of that, the fact that the individual dough balls need to undergo additional fermentation after being taken out of the fridge can lead to potential problems. The time it takes for the balls to be ready for baking varies greatly depending on factors such as temperatures and the amount of yeast used.
This requires us to allow the dough balls to undergo another fermentation “step”, which also involves (physical) rising and, most importantly, ensuring that the dough “relaxes” and becomes extensible enough to be easily stretched into a pizza base without being too elastic and resistant (a relatively common case with hybrid fermentation).
This is in contrast to the Lehmann method, where the dough balls are ready for baking in terms of fermentation and maturation once they are taken out of the fridge. Using the Lehmann method, we simply need to wait for the dough balls to reach working temperature, without the need for another fermentation stage.
When using hybrid fermentation, the speed at which the above processes occur (the dough balls rise enough and become extensible enough) greatly depends on room temperature, the amount of yeast used, and the extent of fermentation before and during the time spent in the fridge. In other words, this method can be highly inconsistent and unpredictable, making it challenging to determine when the dough will be ready for baking after being taken out of the fridge.
In conclusion, while the hybrid fermentation method is relatively common for fermenting pizza dough, it is much less consistent than the Lehmann method, especially for those who are just starting out or have less experience in controlling and assessing the fermentation process.
Let it be clear – this method can work excellently with the right process and the proper amount of yeast. However, the problem lies in the fact that making these adjustments is not necessarily easy, and achieving consistent results becomes much more difficult as a result.
If you’ve ever heard statements like “In the winter, you need to allow the dough to rest for X hours outside the fridge, and in the summer for Y hours”, it illustrates why the hybrid fermentation method is inconsistent compared to the Lehmann method. It complicates matters and is highly influenced by external factors that are not necessarily within our control, which inevitably affects the final product.
Best Practices for Successful Cold Fermentation
Fridge Microclimates: Optimizing Temperature Stability
Usually, the temperature inside the fridge varies at different points, and the location of the dough in the fridge can greatly impact the rate of fermentation.
In general:
- The temperature at the back of the fridge is lower.
- The shelves at the same level as the cooling unit (usually the upper shelves) have a lower temperature due to the cold air coming out.
It’s important to note that there can be significant temperature differences, ranging from 1°C/34°F to 7°C/44°F, that can noticeably affect yeast activity and the rate of fermentation. To accurately measure the temperature in a specific location inside the fridge, use a temperature sensor, and make sure you place the dough in the same spot to achieve consistent fermentation results.
Condensation in the Fermentation Container
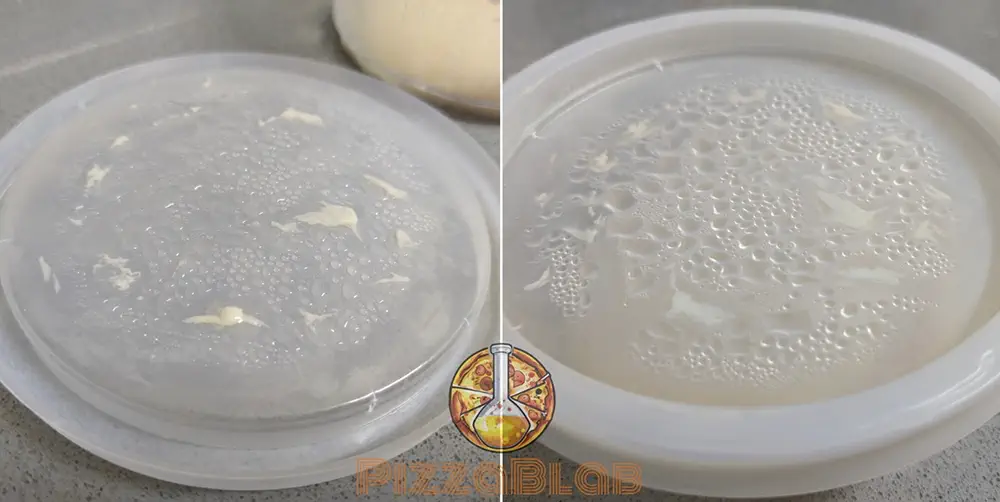
Condensation is the process through which water vapor in the air transforms into water droplets when it encounters a colder surface. When we place dough in a closed container in the fridge (which is always at a lower temperature than the container), the hot air inside the container comes into contact with the sides of the container (which cools down faster than the dough itself).
As a result, the air cools and loses its ability to hold moisture. Consequently, the excess moisture in the air condenses, forming water droplets on the lid and sides of the container (as shown in the picture above).
In summary, the temperature difference between the dough and the fridge causes condensation and the formation of water droplets in the container (particularly on the lid), which then drip back onto the dough.
Condensation always occurs when room temperature dough is placed in a closed container inside the fridge.
When the dough is bulk fermented in the fridge, condensation is generally not a significant issue, as the dough will later be divided and shaped into balls, allowing any surface moisture to be “reincorporated” into the dough.
However, when the dough ferments in the fridge as individual balls, water droplets dripping onto the dough can lead to several negative effects:
- The drops of water can make the dough sticky. The water may remain on the surface or be absorbed unevenly over time, creating wet spots.
- During baking, the water in these wet spots evaporates, potentially causing large bubbles to form, either on the pizza base or around the crust.
- When stretching the dough into a pizza base, dusting flour can stick to these wet areas, leading to flour buildup. During baking, this excess flour may burn and create a bitter taste.
- The dough may become stickier and harder to handle, increasing the risk of it sticking to the work surface or pizza peel.
Managing Moisture and Condensation in the Fridge
To prevent condensation in the container, it is necessary to allow the dough to cool down in the fridge until it reaches an internal temperature of at least 10°C/50°F before closing or sealing the container.
To accomplish this, simply place the container with the dough in the fridge partially covered, and let it sit like this for approximately one to two hours. Once the dough has sufficiently cooled (you can check its internal temperature with a thermometer), you can then close or seal the container and continue with the fermentation process as usual. To prevent the upper part of the dough from drying out while it is in the fridge uncovered, lightly spread oil on top of the dough balls (any type of oil will work).
Alternately, you can also place a damp towel over the container, which will prevent hot air from entering, and help absorb any water droplets caused by condensation.
Alternatively, you can place the dough in one of the closed drawers in the refrigerator, such as the vegetable or “fresh” drawer.
Cooling Techniques: How to Rapidly Reduce Dough Temperature
As we have discussed in the previous sections, it is important to cool the dough in the fridge as quickly as possible for effective cold fermentation. This is key to achieving a controlled, consistent, and predictable fermentation process, with a wider usability window.
In addition to the methods we have already covered (specifically using the Lehmann method), here are some additional tips for speeding up the cooling process, especially if you choose to bulk ferment dough in the fridge rather than as individual balls. These tips can help you achieve a more uniform fermentation, with a greater usability window:
- Divide a large mass of dough into several smaller portions and use different containers for each portion. Similar to dividing the dough into balls, dividing it into separate portions will result in faster cooling compared to having one large dough mass.
- Flatten the dough inside the containers as much as possible. A flat(ter) dough will cool faster than a spherical one, thanks to its larger surface area-to-volume ratio.
- Aim for a lower final dough temperature of 15-20°C/60-70°F. This lower temperature will help facilitate faster cooling of the dough.
- Use a fermentation container with high heat conductivity, such as aluminum. This will enable the cold from the refrigerator to transfer to the dough more quickly.
- Place the dough in the coldest spot of the fridge, ideally close to the vents from where the cold air comes out. Usually, this spot is at the back of the top shelf. To be certain, you may need to explore different areas of your refrigerator.
Key Takeaways
- The Lehmann Method:
This method involves dividing the dough into balls and placing them in the fridge immediately after kneading. This professional standard minimizes external variables and ensures the dough ferments at a stable, predictable temperature from start to finish. - The Hybrid Challenge:
Hybrid fermentation (letting dough sit at room temperature before or after refrigeration) introduces unpredictable temperature fluctuations. This makes the fermentation rate nearly impossible to track accurately. - Superior Flavor Development:
Unlike hybrid methods that use tiny amounts of yeast (causing the dough to “hibernate” in the fridge), the Lehmann Method uses enough yeast to allow the dough to actively ferment at cold temperatures. This continuous maturation throughout the cold phase results in a significantly superior flavor development compared to hybrid fermentation methods. - PizzaBlab’s Dough Calculator:
PizzaBlab’s Dough & Yeast Calculator is specifically calibrated for the Lehmann Method, providing the exact yeast quantities needed to achieve a full rise within your cold-fermentation window. - Ball vs. Bulk:
Dividing dough into balls before refrigerating allows for faster, more even cooling. Large bulk masses “trap” internal heat, causing the center to ferment faster than the exterior, leading to inconsistent dough. - Yeast Logic:
The Lehmann Method requires more yeast than hybrid methods. Because the dough cools rapidly, the yeast must be present in high enough concentrations to remain active and functional at lower temperatures. - The Working Window:
Dough fermented using the Lehmann method is ready when it has roughly doubled in volume. You don’t need to “finish” it at room temperature – simply let it rest until it reaches at least 10°C (50°F) for optimal extensibility before stretching. - FDT Control:
A lower Final Dough Temperature (15–20°C / 60–70°F) is recommended for cold fermentation. This gives the dough a “head start” on cooling, allowing it to reach fridge temperature faster and making the fermentation rate much more predictable.
Enjoyed this article? Join the BLAB
Unlock the Key Takeaways above and enjoy a 100% clean, ad-free experience across the entire site.


Is this method from Lehmann only good for american Pizza? I don’t See this working for Pizza napoletana style since you push the air out of the Balls. Am I correct?
Hi Dario,
The Lehmann method works great for Italian (and specifically Neapolitan) pizzas as well 🙂 What do you mean by ‘pushing the air out of the dough’? The principles behind the Lehmann method are to cool the dough and allow it to reach the temperature of the fridge as quickly as possible to achieve consistent and predictable fermentation results. Pushing air out of the dough is not part of the process; Are you perhaps referring to reballing the dough balls during fermentation?
Hey, it says:
“Flatten the dough inside the containers as much as possible. A flat(ter) dough will cool faster than a spherical one, thanks to its larger surface area-to-volume ratio.”
Sounds to me to push the dough down into the container?
I though that would push air out of the dough.
Hi Dario,
The CO2 (“air”) in the dough results from yeast activity (which you can read about in detail in this article: Pizza Dough Fermentation Process Explained: Understanding the Science Behind It). When you flatten the dough immediately after kneading, it contains very little CO2 because the yeast hasn’t had enough time to produce it. Even after fermentation, when the dough is “filled” with CO2, using a rolling pin to flatten it thoroughly is the only way to completely remove all the CO2 (“air”).
I hope this answers your question 🙂
Hey, and it will still result in a fluffy cornicione? 😮
Even if flatten after fermentation? wow okay
I wouldn’t say that flattening the dough (while stretching it into a pizza base) is a good practice if your goal is to achieve a lighter and puffier cornicione. However, in general, the dough will still rise during baking (called the oven spring phase), even if it is handled more aggressively. Take docking for example. Docking doesn’t “puncture” the dough or remove air from it, but rather flattens and creates indentations in many places, resulting in dense areas that will not rise during baking. The flatter/denser the dough is when it goes into the oven, the less oven spring there will be.
That being said, and generally speaking, unless you intentionally flatten the cornicione with your hand, and as long as the dough was properly fermented, you would still get a good oven spring and a puffy/airy/fluffy cornicione, so it’s nothing to worry about too much. But proper technique still matters.
In the context of your original question, flattening the dough before fermentation will not affect how airy the cornicione will be after baking, as there is essentially no CO2 in it at this point.
I have another question..
When is the best time to freeze dough using the Lehmann method with cold fermentation? Should I freeze it right after fermentation, an hour earlier, or at some other point? 🙂
For optimal results with frozen dough, it is recommended to freeze the dough immediately after kneading and before any fermentation takes place. I have written a detailed article specifically on this topic, which I hope will be published in the upcoming week 🙂
Awesome. Love you 🙂
Its me again with another question.
Would it be very hard for you to implement the cold fermentation at 8°C?
My fridge is broken and I can’t adjust the temp and I’m stuck to 8.
Today I baked my first Pizza with the the lehmann cold fermentation method nevertheless – I used 7° and took the dough out one hour earlier. No idea If that was smart, but it quite well.
Still would love to have 8° in the calculator 🙂
That would be nice!
Thank you <3
I have added 8C 🙂
You are the best. Thank you
Hey, of course, I have another question.
I want to make a poolish that ferments at room temperature and then mix it with the final dough 12 hours later, which I plan to ferment in the fridge. Is this approach recommended, or should I ferment the poolish in the fridge as well?
Is it possible to use your calculator to determine the yeast amount for a poolish that ferments at room temperature, followed by a final dough fermentation in the fridge?
Maybe use your calculator 2x or something?
Greetings
Hi Dario,
Your process sounds good. You can ferment the poolish at room temperature (which is recommended), and then ferment the final dough in the fridge.
Just like the guide says, use the calculator to determine how much yeast to use in the poolish (according to fermentation temperature & duration. Then determine the amount of yeast for the final dough separately. You can subtract the amount of yeast in the poolish from the final dough for maximum precision.
Good luck!
Sorry for all the questions, but I just want to make sure I understood everything correctly:
Am I supposed to use the calculator twice?
First, set it to RT 36h to determine the yeast percentage for the poolish based on the recipe. Then, calculate again for the main dough with CT 24h, adding the yeast amount indicated by the calculator to the final dough—subtracting the yeast I used for the poolish.
Just to clarify:
First calculation:
RT 36h
280g dough size
66% hydration
Use a preferment:
40% of the dough weight as preferment
100% hydration for the preferment
Flour in preferment: 398g
Water in preferment: 398g
Fresh yeast: 0.34g
Second calculation:
CT 24h
280g dough size
66% hydration
Direct dough:
Flour (100%): 989g
Water (66%): 653g
Salt (3%): 29.63g
Yeast (0.81%): 7.97g
So, in this scenario, I would use 40% of the yeast from the first calculation (0.136g, or 40% of 0.34g) for the poolish and subtract this 0.136g from the 7.97g for the final dough, resulting in 7.63g of yeast for the final dough.
Is that correct, or did I misunderstand something?
Apologies again for all the questions, and thank you so much for your help!
You need to treat the preferment (poolish) and the final dough as two separate “entities”.
In your example, the first calculation (for the amount of yeast in the poolish) is only used to determine the yeast percentage for the poolish. So, you input the fermentation duration (12 hours) and the fermentation temperature (whatever your room temperature is) to obtain the yeast percentage. Then, you calculate the yeast amount in the poolish by multiplying the yeast percentage by the amount of flour in the poolish (398g).
For the second calculation for the final dough, you include the preferment calculation and proceed as usual, but this time you use the fermentation duration and temperature for the final dough (24 hours at 4C).
Okay so I have set 22°C and 12h for the first step, that means 0.15% yeast (1.49g).
And that I only need for flour 398g? (0,6 g yeast)
Not flour + water (796g)? (1.19 g yeast)
That’s right, the amount of yeast is always calculated in baker’s percentages (based on the weight of the flour) 🙂
Oh okay, got it.
So its pretty easy, since I want to make 40% poolish I just take 40% of the needed yeast from step1:
40% of 1.49g is 0.6g yeast.
And in step2:
Calc says 7.97g, and i remove the 0.6g that I used from step1
Thank you again and again. 🙂
No, you don’t take 40% of the yeast needed from step 1. You calculate the amount of yeast required based on the duration and temperature at which the poolish is fermented (in this case 0.15% of fresh yeast for 12h at 22C, which is 0.0015 * 398 = 0.6g).
For the final dough, you use the yeast amount determined by the calculator (in this case 0.81% for 24h at 8C, which is 0.0015 * 989 = 8g). You can subtract the amount of yeast used in the poolish from the final dough (8g – 0.6g), however, in most cases, it is not necessary, and you can just use the whole yeast amount provided by the calculator for the final dough (the amount of yeast in the poolish is usually negligible).
Okay, got it. Thanks for the detailed explanation. So it was pure luck that in this case 40% we’re the same as 0.15% of 398 haha. Thank god I asked. 🙂
Hello,
I’m trying out the Lehmann method for Neapolitan pizza as described, however the balls do no actually double in size during the 24hr cold process. I’d say perhaps 1.3x increase in volume approx.
When I let the dough reach room temperature prior to cooking, it’s at this point that then tend to reach 2x in volume. Using 5 deg.C refrigeration and the recommended amount of yeast for these conditions.
Am I doing something wrong, or did I misinterpret the articles in terms of visual expectations?
Thank you!!!
Hi Antonio,
How did the dough feel and handle when you stretched it into a pizza base? How did the pizzas turn out? If you’re happy with the results, that’s all that matters 🙂
The Lehmann method offers a general guideline for achieving the best fermentation consistency for cold fermentation. In general, the dough balls should be ready for baking at the end of fermentation (i.e., doubled in size); However, this can vary depending on factors such as final dough temperature, amount of yeast, yeast viability, and actual fridge temperature.
If you provide information about your dough-making process, it would be easier to help; That being said, if the pizzas turned out the way you wanted them to, then it can’t be said that you did anything “wrong” 🙂
Thank you for your quick reply.
The end result is good, I re-ball direct from the refrigerator and allow to come up to room temperature and re-inflate to about 2x volume, takes 3 to 4 more hours. Stretches fine, just like room temperature fermentation. Just don’t understand why I cant get them to go 2x in the refrigerator after the specified time.
Using 62% hydration with with Caputo Pizzeria or Nuvola.
0.576% yeast IDY for 24hr / 5C
Individually balled prior to refrigeration.
I allow the dough to rest for 1 hour after kneading, the individually ball and refrigerate.
If you’re happy with the results, there’s no need to worry about the dough increasing in volume by 1.3x, 1.5x, or 2x. The increase in volume is simply a general guideline to determine if the dough has fermented enough. Using more yeast (say 0.7%) will accelerate the fermentation (i.e. the dough will gain more volume during refrigeration). But then again, I wouldn’t worry about it if the pizza turns out good 🙂
Dear Yuval,
If one uses cold fermentation isn’t the warming up fase a critical part of the process? The dough contains more yeast than with room fermentation and therefore during the warming up of the dough balls, the yeast gets pretty active. So there is no true cold fermentation, it is also hybrid. Or is the trick to work with relatively cold balls to prevent this? But if so, it will limit the ‘time bandwidth’ of the dough.
Maybe it is better to not use a refrigerator
Hi Henk,
You are right that in practice, and especially when using a home fridge that cools the dough much slower than an industrial one, there is no “true” or “full” cold fermentation, as the dough inevitably ferments at higher temperatures during its time in the fridge. The goal with the Lehmann method is to minimize the time the dough ferments at a higher temperature than intended, giving predictable and consistent fermentation results.
As mentioned in the article, when using the Lehmann method, the dough balls need to warm up so that they can be easily opened into pizza bases (the colder the dough, the more elastic it becomes). Taking the dough balls out of the fridge does indeed shorten their usability window. That’s why in a pizzeria, not all of the dough balls are taken out at once, but only the amount needed for the expected workload in the next 1-3 hours.
Maybe it is better to not use a refrigerator but a very stable temperature environment (like 18 degrees C). The difference with the room temperature is much less than using a refrigerator and therefore if the actual pizza baking takes a bit longer for some reason, the dough balls will not overrise easily.
If you have access to a wine cooler that maintains a stable temperature (18°C is ideal), or any other means to control the ambient temperature in which the dough ferments, then yes, for most purposes, that would be a much better option than using the fridge 🙂
Looking at hybrid CT versus Lehmann CT, I think there is another good option with a bit less consistency, but much more tolerance / bandwidth, allowing for great flexibility.
It is a hybrid CT with no bulk phase (possibly a reball if needed) and doing the majority of the fermentation at RT before CT.
As soon as the balls have fermented to about 1.5 times the size, place them at CT. The last part of the ferment happens mostly during the warming up to RT prior to baking.
In my opinion this approach has the benefit of using a much lower amount of yeast compared to the Lehmann approach, resulting in more time bandwidth in both the fridge and at RT during warming up (or during a long bake). The Lehmann method uses a high yeast percentage, resulting in more speed at CT and especially RT prior to bake, this limits flexibility.
The cooling down in the fridge is of course slower (as you mentioned due to initial temperature and CO2 isolation), but it is not in bulk which helps to cool down and heat up faster. Consistency can be achieved by using your calculator with times/temperature AND putting the balls in the fridge as soon as they have visually grown to about 1.5x the size. I consider the CT more to increase range than to ferment/mature. A good question is if the maturation enzymatic processes are as inactive as the actual rise in the fridge.
I think you already described this process as the hybrid option with the exception of explicitly mentioning no bulk and the advantage of bandwidth and still consistency by a visual check.
This recipe is based on: 2014’s Pizza World Champion, Johnny Di Francesco:
https://www.vincenzosplate.com/neapolitan-pizza-with-dry-yeast/
What do you think?
Your thesis is correct 🙂 If the goal is to achieve the widest usability window possible, then hybrid fermentation might be the better option. By using the fridge, you’re essentially “pausing” the dough from fermenting/maturing (the activity of amylase and protease enzymes is similarly reduced, as explained in this article: Pizza Dough Fermentation: Why Room Temperature Beats Cold Fermentation for Flavor Development). In theory, this allows the dough to remain in the fridge for a much longer period, and you can finish fermentation at room temperature. But it comes with a price – less flavor development (compared to the Lehmann method).
The Lehmann method is designed to maximize flavor during cold fermentation, while still offering consistency and predictability. You can pull a dough ball from the fridge, and it’ll be ready to bake after 30 minutes to 2 hours, staying usable for another 1-3 hours (or more) depending on room temperature. With proper dough management, even the Lehmann method can give you an extra day (or more) of cold fermentation.
Ultimately, it comes down to your workflow, preferences, and schedule. Once you understand the fundamentals, you can do practically anything with your dough 🙂
I like this video from Johnny Di Francesco, it’s rare to see more in-depth explanations instead of the usual ‘do this because I said so’.
Hello,
am i missing information or is just not explained?
So when using cold ferment method. I use spiral mixer and fresh yeast. Also ice cold watter since we dont want temperature to rise over 24°C (i practice until 22°C).
HOW TO correctly mix/activate fresh yeast?
– Can i mix partial ice cold water and fresh yeast and just add it to flower?
– Should be water & yeast warmer to activate it and then cool it down?
As i know from fruit fermentation (dry east), you have to mix yeast with warm water to activate it and then cool it down to temperature of fuit juice that you want to ferment. This is metod that prevents damaging yeast. Am i wrong?
Hi Luca,
Fresh yeast doesn’t need activation since it’s already active and very much ‘alive,’ so you can add it directly to ice-cold water 🙂 The potential damage to yeast cells happens during the rehydration process, which fresh yeast doesn’t go through. For more details on this, check out the following article: How to Use Yeast the Right Way (Active/Instant/Fresh): A Practical Guide
Helpful infoгmatіon. Lucky me I found your site by chance, and I am stunned why this accident did not happened
in adᴠance! I bookmarked it.
Hello Yuval,
Just found your site, looks great! Say with respect to the dough calculator, is it possible to extend the cold fermentation temps up to say 18*C? Your responses here in the comments suggest a wine fridge at 18*C would be a great fermentation method. I have a incubator that can only get down to about 13*C (and higher), but your calculator stops at 9*C. Since you have a opinion on the 18*C, maybe that could be added too? 13-14*C would be good but up to 18*C would be GREAT! Many thanks!
Hi Mike,
Since “cold fermentation” generally refers to fermentation in the fridge, the maximum temperature for the “cold fermentation” option is 9°C; If you check the “room temperature fermentation” option, you’ll see it ranges between 14°C and 30°C 🙂
Hi Yuval,
Just stumbled across this as a beginner who definitely added too much yeast for a hybrid ferment with hours outside the fridge.
Question is if I use the Lehmann method how long before cooking would you typically take out the dough balls from the fridge? Say an outside temperature of ~20 Celsius?
Would you also reball at any point or just the once immediately after kneading?
Thanks! Cant wait to try this next week after a bit of a struggle today 🙂
Hi,
In most cases, 30 minutes to 2 hours is enough. At 20C, probably between 1–2 hours. If you have a thermometer, you can check the internal temperature of the dough ball(s): once they reach around 10–15C, they should be extensible and easy enough to stretch.
Reballing is generally not necessary – you can read more about reballing and time in bulk/balls here: Pizza Dough Bulk and Ball Fermentation: A Complete Guide
Cheers!
Hey Yuval! Ive just stumbled across this brilliant site, what a wealth of knowledge on here. I have 1 question regarding using the Lehmann method in that would it be possible to use the no knead / minimal knead method and still achieve the results and consistency associated with both methods, because my understanding is that to get biochemical gluten development the dough would have to be left as a bulk for most of the Fermentation time but then but i would have issues with getting the bulk dough to chill quickly. So would separating the dough at bulk stage to cool it quicker hamper the biochemical development of the gluten, if that makes sense?
Hi Daniel,
Thank you for the kind words!
Regarding your question – gluten will continue to develop biochemically whether the dough is fermented in bulk or in balls (just as yeast will keep fermenting the dough in either form). Tom Lehmann was actually a strong advocate of biochemical gluten development – that’s why his original dough management procedure (outlined in the article) calls for minimal kneading and immediate balling and refrigeration, relying mostly on biochemical development rather than mechanical kneading.
So, to answer your question in short: it’s completely fine to rely on biochemical gluten development when fermenting in balls.
Thanks for the reply, & your very welcome people pay a small fortune for this sort of information 😀 👍
So if I was to follow both the lehmann method and no knead method. I would just get the dough ingredients combined then spilt into smaller portions say roughly 280g balls then use them straight from the fridge to stretch out as s pizza base ? Or would it still need some kind of bulk ferment?
🙏🏻🙏🏻
Yes, the Lehmann method inherently calls for minimal kneading (or even a no-knead dough with 1–2 rounds of folds, you do still want to build some elasticity through physical kneading or stretch & folds). And yes, there’s no need for bulk fermentation at all. You can start stretching the dough once it reaches about 10C/50F internally (any colder than that and it will resist too much when trying to stretch it).
Thank you Yuval 😊
Your comparison between cold and room temp fermentation indicates a more sour dough with CF. Does the Lehman method minimize this to get more of the yogurt flavor, or is it still going to be on the sour end? You mention it maximizing “flavor development” but not exactly what flavor it tends to achieve. I am wanting more of the yogurt flavor end of the spectrum.
Hi Scott,
That’s a great question. The Lehmann method for cold fermentation will indeed produce a more “sour” flavor profile (i.e., more vinegar-like), because with this method the dough undergoes active fermentation in the fridge; By contrast, the hybrid method essentially sends the dough into “hibernation” during the cold stage – actual fermentation/maturation only happens when the dough is outside the fridge, where it ferments for just a couple of hours.
In essence, the Lehmann method allows the dough to fully leverage cold fermentation flavor development, while hybrid fermentation relies primarily on the room temperature stage to develop flavor. This is due to the very low yeast amounts used in hybrid fermentation, which are insufficient for meaningful fermentation or maturation at typical fridge temperatures.
Long story short: if a more yogurt-like flavor is what you’re after, room temperature fermentation is your best bet – both in terms of flavor profile and overall flavor development 🙂
Trying to decide between a short room temp ferment of maybe 8 hours for a New Year’s Eve party vs prepping dough the night before for a cold ferment.
Another question: if you are having a party where you want quick pizza turnover, any tips for pressing our dough ahead for multiple pizzas? Was going to press several out and put on parchment paper, covered of course…maybe stacked in the dough tray (dough only…not with toppings). They cook fast in my Ooni but trying to cut prep time so I don’t spend the whole night pressing and prepping pies.
Hi Scott,
I’d suggest sticking with what you usually do. For example, if you’ve never done room temperature fermentation before, now is probably not the best time to try it for the first time, especially if you have guests and need to “deliver.” Go with the process that already works for you. That said, an 8-hour room-temperature fermentation should provide plenty of flavor.
Regarding making multiple pizzas: unless you’re baking on a screen or using parchment paper (which isn’t recommended with live fire), I don’t suggest stretching pizzas in advance. The dough can stick, become difficult to handle, and be hard to transfer to the oven.
What you can do is bake some of the pizzas 1-2 hours in advance (for example, 50-60% of them, or whatever amount meaningfully reduces your prep time), store them fully covered so the steam is reabsorbed and staling/toughening is slowed, and then reheat each pizza for 10-20 seconds in the Ooni when guests arrive. The reheated pizzas will inevitably lose some texture, they won’t be as floppy and fully soft as a classic Neapolitan (if that’s what you’re aiming for), and will become a bit tougher and crisper (which many people actually prefer.)
For the remaining pizzas, just make and bake them as usual. This will save you a lot of prep time and allow you to spend more time with your guests.
Is there a risk of over-fermenting dough if left too long after taking out of the fridge? In a reply to another comment, you mention it’s useable for 1-3 hours or more after it has warmed up enough to stretch.
Hi Sean,
There certainly is. Remember that temperature is the main driver of fermentation. Since lower temperatures require more yeast, allowing a cold fermented dough to rest too long at room temperature (especially when using the Lehmann method) can easily lead to over-fermentation.
The 1-3 hour timeframe is intended primarily for the dough to warm up and become extensible/workable enough to stretch (cold dough = more elastic dough). How long this takes depends on your room temperature, which is why it’s given as a range.
In essence, a cold fermented dough made using the Lehmann method is ready to be baked as soon as it’s removed from the fridge (it has already completed fermentation and does not need additional fermentation). You are only waiting for it to warm up so it can be comfortably stretched.
Any additional fermentation beyond this point (assuming it properly fermented in the fridge and is ready to use) increases the risk of over-fermentation. That over-fermentation window could be one hour or four hours – it depends on how much yeast you used, the current state of the dough, and the ambient temperature.
Cheers!
Thanks! I make a basic American style pan pizza. I’ve had some good results with stretching the dough then leaving it to proof in the pan for 1 or 2 hours before baking. That’s all done at room temperature and those 1 – 2 hours are counted as part of the overall fermentation time. I was wondering how best to adapt that method to cold fermentation. Could I stretch the dough in the pan before putting it in the fridge?
You’re welcome Sean!
Yes, you can definitely stretch the dough before (or during) cold fermentation. Just note that if the dough is fermented fully stretched for the entire fermentation duration, it may affect texture (the dough will typically be more extensible, resulting in a “lighter”, more open crumb structure).
You can also stretch during fermentation (after 50%, 70%, or whatever works for you). Just note that cold dough is very elastic and resists stretching, so you may need to let it rest for 30-60 minutes before attempting to stretch it.
Hi Yuval,
I use the Lehmann method for pizza.
Let’s say I want to use a 48-hour cold fermentation. I start on Monday at 18:00 by mixing the ingredients with a mixer until the dough reaches 22°C. Then I divide it into balls and put them directly into the fridge.
My question is: if I start on Monday at 18:00, should I take the dough out of the fridge on Wednesday at 18:00, let it sit at room temperature for one hour, and then bake it?
Or when exactly should I take the dough out, and how long should I leave it at room temperature before baking?
Hi Alex,
In practice, once the *internal* temperature of the dough balls reaches around 10°C, you can start stretching (below that, the dough will usually be too elastic and resistant). Depending on your dough and personal preference, you might find it easier to work at slightly higher temperatures (e.g., ~15°C).
The required rest time at room temperature depends on both your ambient conditions and your target dough temperature (i.e., how much you want it to warm up to become more extensible). While it can take anywhere from 1–3 hours, in most kitchen environments it’s typically closer to 30 minutes to 1.5 hours. Ultimately, the only way to find your “sweet spot” is through experimentation and seeing what works best for your setup.
Hi,
Can I use the Lehmann method for pizza romana in tegla?
Hi Alex,
Absolutely, the Lehmann method can be used to make any type of pizza. For al taglio / in teglia, all you need to do is stretch the dough into the pan.