How to Choose Your Ideal Pizza Flour: A Technical Guide
Choosing the right flour is the most critical decision in the pizza-making process, yet it is often the most misunderstood. This guide moves beyond marketing labels to explore the technical reality of flour – from the mechanics of gluten development and enzymatic activity to the practical logic of matching flour with fermentation time, desired crust characteristics, pizza style, and oven temperature. Whether you are a home baker or a professional, this resource provides the fundamental knowledge and reference guides needed to understand how flour behaves and how to choose the right one for your specific needs
Note: This is a comprehensive, 12,000-word resource. To make the information more accessible, you will find “Key Takeaways” summary boxes at the end of each major section for quick reference.
What Makes a “Good” Pizza Flour? Core Characteristics
Before we dive into the details, here is a brief overview of the essential characteristics that define a high-quality pizza flour. We will explore each of these in-depth in the following sections:
- Sufficient protein content and gluten quality: The flour should have a protein content on the higher side (at least 10.5%), and form good-quality gluten.
- Structural integrity during fermentation: The dough should maintain its shape and structure without collapsing or becoming overly sticky and difficult to handle.
- Workability and stretchability: The dough should be easy to stretch into a pizza base, with a balance of extensibility to elasticity, so it doesn’t stretch too easily, resist too much, or tear during stretching.
- Gas retention and crumb development: The dough should effectively trap fermentation gases, producing an open, airy internal crumb with well-formed air pockets.
Note: While flour plays a major role in all of these aspects, the fermentation process often has an even greater influence on the final results.
Gluten: Understanding the Backbone of Pizza Dough
When discussing pizza flour, or flour in general, it’s important to understand the key characteristic that makes a flour suitable for making pizza and other baked goods: gluten.
For an in-depth read on gluten and its role in baking, see The Science of Gluten: Understanding Its Role and Impact on Pizza Dough.
Wheat flour contains two gluten-forming proteins, glutenin and gliadin, which make up 75–85% of the total protein content in white flour. When these proteins interact physically in the presence of water, they form chemical bonds, that we refer to as gluten bonds.
Gluten can also form spontaneously over time through a process called biochemical gluten development.
Wheat is unique in that it contains both a high quantity, quality, and the right ratio of glutenin and gliadin, enabling the formation of gluten bonds in both the amounts and qualities required for baking.
As we’ll see later, the quantity and properties of these gluten bonds vary between different flours, directly affecting the dough’s behavior and the final product.
Note that wheat, and therefore the flour made from it, does not inherently contain “gluten,” but rather gluten-forming proteins that can develop into gluten.
The gluten network gives structure, volume, strength, and elasticity to baked goods. Making a pizza or bread without gluten, is like trying to construct a building out of plastic bricks – it collapses the moment any stress is applied.
In the following sections, we’ll explore what gluten is, its characteristics and what affects them, and how all of this impacts both dough and pizza.
As noted earlier, flour doesn’t naturally contain “gluten”, but rather gluten-forming proteins. For simplicity, I’ll use the terms “gluten” and “protein” interchangeably throughout this article; So, when I refer to “flour with a high gluten content,” I mean flour that contains a high level of protein (gluten-forming proteins), and vice versa – “flour with high protein content” = flour with high gluten potential.
The Role of Gluten in Dough Performance
The gluten bonds formed in dough made from wheat flour:
- Create a structure that balances elasticity and extensibility, providing strength, while allowing the dough to stretch and change shape without tearing.
- Enable the dough to hold its shape during fermentation and baking, preventing it from collapsing or spreading out.
- Allow the dough to trap gases produced by yeast activity during fermentation, which enables it to rise and expand in volume during fermentation and baking.
- Contribute to a proper internal crumb structure in the final product – defined, airy, and filled with air pockets of varying size and distribution, rather than being flat and/or dense.
Gluten-forming proteins can absorb up to twice their weight in water, and are responsible for about one-third of the flour’s total water absorption in the dough. As we’ll see later, the higher the (gluten-forming) protein content in a flour, the greater its water absorption capacity – allowing for higher-hydration doughs.
In short: Gluten gives the dough an elastic structure that allows gas cells to expand without tearing or collapsing, and enables the dough to rise, stretch, and hold its shape throughout fermentation and baking – resulting in the familiar qualities of well-made baked goods: good volume, and an airy crumb structure.
Quantity vs. Quality: Not All Proteins are Created Equal
One of the main differences between various flours lies in the amount and composition (quality) of gluten they contain. These differences directly influence the dough’s properties and the final characteristics of the baked pizza.
Determining Gluten Content in Flour
As discussed earlier:
- Gluten-forming proteins account for the majority (75–85%) of the total protein content in white flour.
- Gluten forms when these proteins interact in the presence of water and create gluten bonds.
Therefore, when it comes to white flour, a simple rule of thumb applies: The higher the protein content, the more gluten-forming proteins the flour contains – meaning greater potential to develop a strong gluten network and, in turn, a stronger dough structure.
A flour’s protein content can be determined by checking the nutritional label (protein per 100 grams):
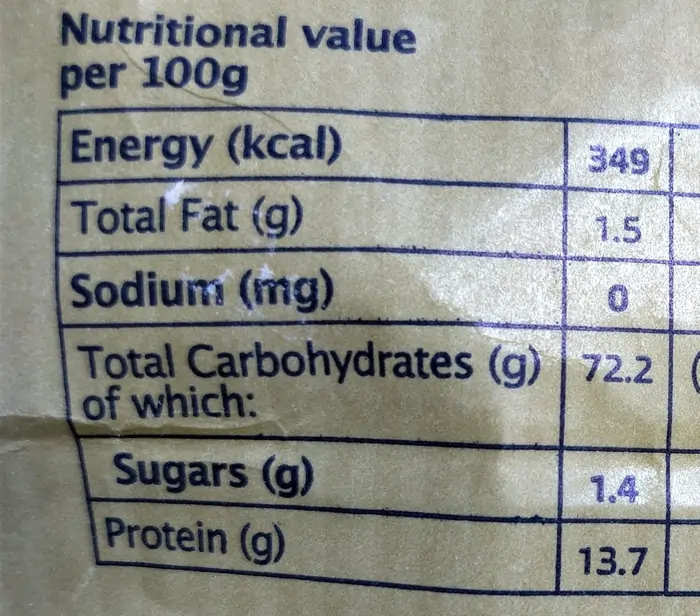
When we say “strong flour,” we mean flour with a high gluten-forming potential, usually indicated by a high protein content. One exception are Italian flours, which is often labeled using a different system called the W rating.
White flours generally range from about 8% protein (very weak flours, used for cakes and cookies) to over 14% (very strong flours). Most fall somewhere between 10.5% and 13%.
For pizza dough, depending on the pizza style, we usually want a flour with at least 10.5% protein.
There are two important exceptions: whole wheat flours and ancient/special flours.
Whole wheat flours often show a high protein content, but much of that protein comes from the bran and germ, and is not from gluten-forming proteins. These non-gluten proteins don’t contribute to gluten development, and may even hinder it (we’ll cover this in more detail later).
“Ancient” or “special” flours, such as rye, spelt, and khorasan, may also appear high in protein, but their gluten-forming proteins differ significantly from those in regular white wheat flour. As a result, they generally don’t produce a strong enough gluten network for pizza dough.
In summary: For white wheat flour, higher protein content usually means a stronger flour, leading to a more elastic and resilient dough.
However, protein quantity alone doesn’t tell the whole story, which brings us to the importance of gluten quality.
The Science of Protein Quality: Elasticity vs. Extensibility
While a flour’s protein content indicates its potential to develop gluten, the quality of that gluten is just as important. This quality depends largely on the specific composition of the gluten-forming proteins in the flour, or more precisely – in the wheat from which it was milled.
Flours milled from different wheat varieties, or processed in different ways, can have the same protein content, but vary significantly in protein quality. As a result, they can produce very different gluten structures.
Remember that in white flour, 75–85% of the total proteins are gluten-forming, depending on the wheat variety used. This means that two flours with the same total protein content may contain different amounts of gluten-forming proteins – directly influencing the flour’s gluten quantity, strength and behavior.
In both theory and practice, two flours with identical protein content can form completely different gluten structure – each varying in strength, density, and elasticity/extensibility properties (discussed in the next section). For example, a high-protein flour with poor gluten quality may perform worse than a lower-protein flour with high-quality gluten-forming properties.
A good example is durum wheat flour. While rich in gluten-forming proteins, its unique protein composition results in short gluten strands. This creates a very elastic and compact gluten network, which makes the dough strong but stiff and less extensible – typically unsuitable for pizza (but very suitable for pasta).
Other examples include “special” flours like rye and spelt, and “ancient” flours such as Khorasan and Emmer. Even when these flours match regular white wheat flour in protein content, their fundamentally different gluten protein compositions lead to weaker, less elastic gluten structures – generally making them a poor choice for pizza-making.
So, while a flour’s gluten-producing potential can be roughly estimated by its protein content, assessing its gluten quality is less straightforward.
Unfortunately (or fortunately), the only reliable way to evaluate gluten quality is through trial and error. Technical data can help, but the true behavior of the gluten only becomes clear when you actually work with the flour.
Flour mills do use a metric called the Gluten Index (GI) to assess gluten quality. This index ranges from 0 to 100, with higher values indicating stronger, more resilient gluten. However, GI values are rarely made publicly available, and must typically be requested directly from the mill.
In conclusion: While protein content is a useful indicator, the quality of that gluten plays a critical role in how the flour performs, and ultimately in the strength, elasticity, and extensibility of the dough.
Gluten Elasticity and Extensibility Properties
For an in-depth read on extensibility and elasticity in dough, see Dough Elasticity and Extensibility: Understanding the Two Most Important Properties in Pizza Dough (highly recommended).
Different flours are milled from different wheat varieties, each containing varying ratios of the gluten-forming proteins glutenin and gliadin. This ratio determines whether the resulting dough will be more extensible (stretches and holds its new shape) or more elastic (resists stretching and snaps back to its original form).
A flour’s extensibility and elasticity properties can be considered key aspects of its gluten quality.
These properties also influence the dough’s overall structure and the texture of the baked pizza – more on that in the article linked above.
Each wheat variety naturally has its own balance of glutenin and gliadin, which directly affects the flour’s behavior:
- A higher ratio of glutenin → More elastic dough: strong, tight, and resistant to stretching.
- A higher ratio of gliadin → More extensible dough: softer, stretchier, and easier to shape.
Durum wheat flour, for example, is very elastic – it’s strong and “hard,” resisting stretching and forming a dense gluten network. Spelt flour, on the other hand, is highly extensible and produces a relatively weak, soft, and stretchy dough. In both cases, the balance between extensibility and elasticity is not ideal for pizza dough: overly elastic dough resists stretching and tends to snap back, while overly extensible dough lacks strength, stretches too easily, and risks tearing due to lack of structure.
One of the key features of Italian flours, particularly those designed for pizza, is their extensibility/elasticity ratio. These flours are typically more extensible, making the dough easier to stretch and shape without tearing or snapping back.
For most pizza dough, the goal is a balance between elasticity and extensibility, with a slight lean toward extensibility:
- The dough should stretch easily without springing back or tearing (sufficient extensibility).
- It should also hold its shape during fermentation and baking without collapsing (sufficient elasticity).
As we’ll see later, different pizza styles may call for different elasticity/extensibility profiles. What works well for one type of pizza may not suit another.
While most flours labeled as “pizza flour” are formulated to have a suitable extensibility/elasticity ratio for pizza-making, many other flours naturally offer a good balance as well – even if they aren’t specifically marketed “for pizza”.
The elasticity and extensibility properties can be measured in a lab using devices like the alveograph and extensograph, which evaluate dough strength and stretching behavior; But, as with gluten quality, the most practical and reliable way to assess a flour’s performance is through hands-on experience and trial and error.
Testing Gluten Quantity and Quality at Home (The ‘Gluten Wash’ Test)
If you’d like to evaluate or compare the amount and characteristics of gluten in a specific flour, you can perform a simple at-home experiment known as the Gluten Ball Test (also called gluten wash test).
You can find the full test protocol here.
The test involves making a small dough ball, weighing it, and then “washing” it under running water to remove the starch (which is water-soluble) until only gluten and water remain. Since gluten-forming proteins are not water-soluble, they remain intact in the dough.
The result is a rubbery mass known as wet gluten, which you weigh and compare to the weight of the original dough ball. This gives you the wet gluten content of the flour. Typical wet gluten yields range from:
- ~20% of the original dough weight: Very weak flour
- ~35% or more: Very strong flour
You can repeat the test across different flours to compare their relative gluten-forming potential.
Note that the results of the gluten ball test are comparative, not absolute. They depend heavily on how consistently the test is performed. As long as the method is the same for all flours tested, the results can reliably show differences in gluten quantity between flours.
You can also take this test a step further by baking the wet gluten ball in the oven. This produces a dry gluten ball, allowing you to visually assess the structure and quality of the gluten formed by each flour.
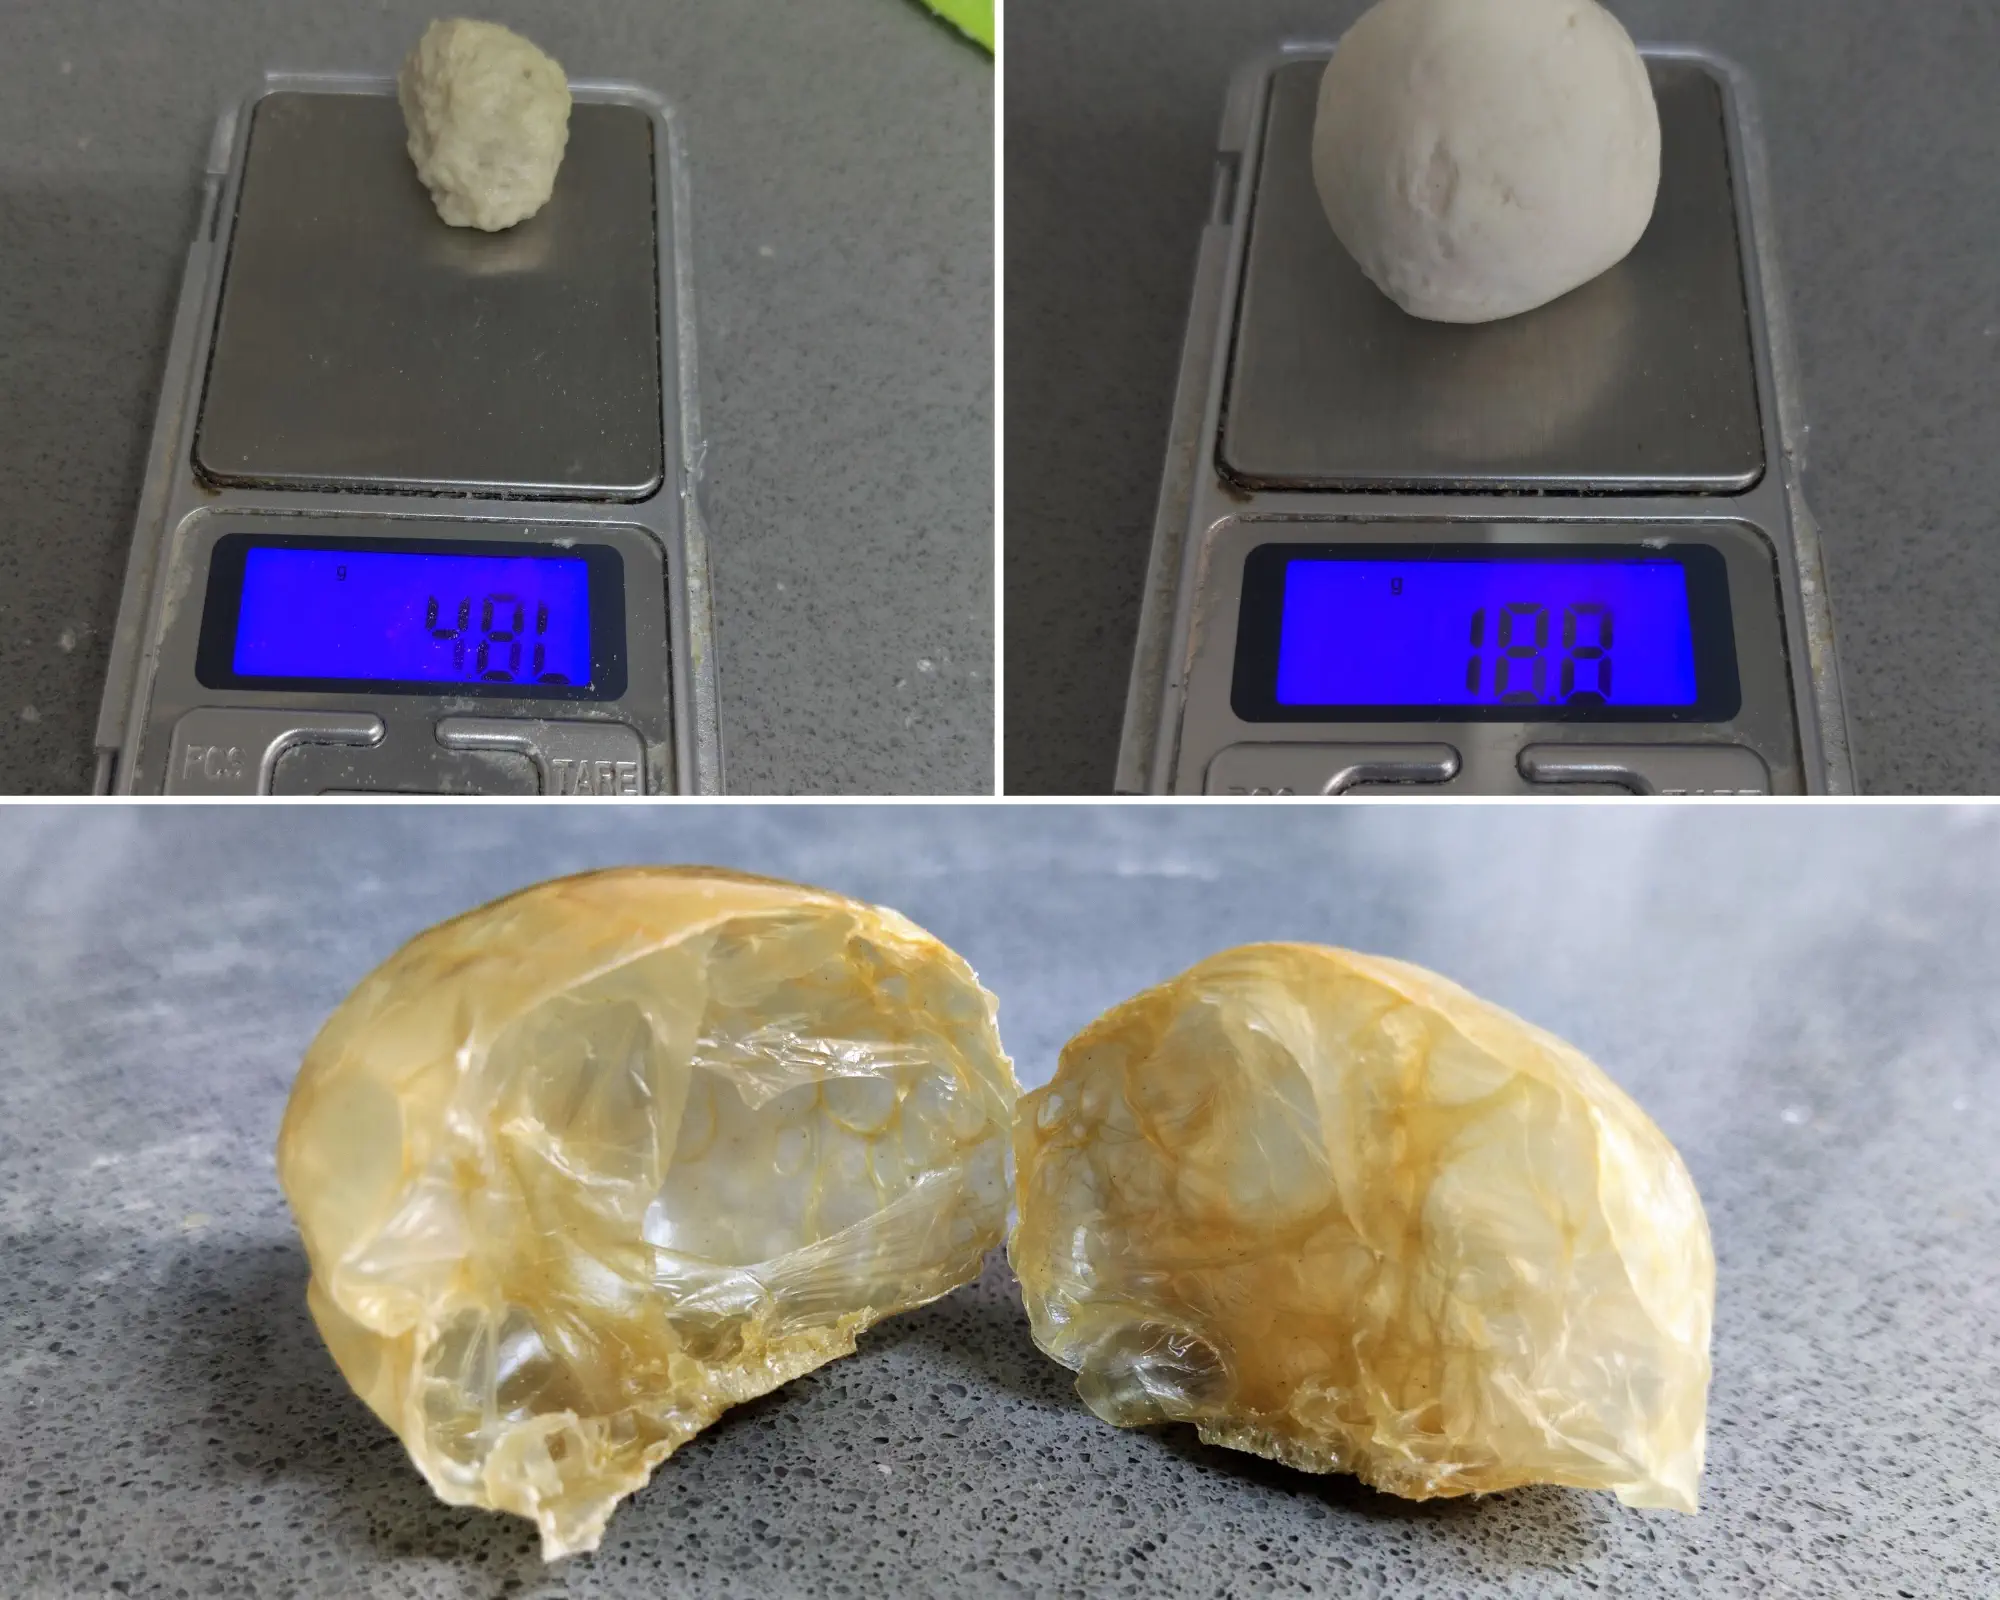
In the image below, you can see two wet gluten balls from different flours, alongside their corresponding dry forms after baking.
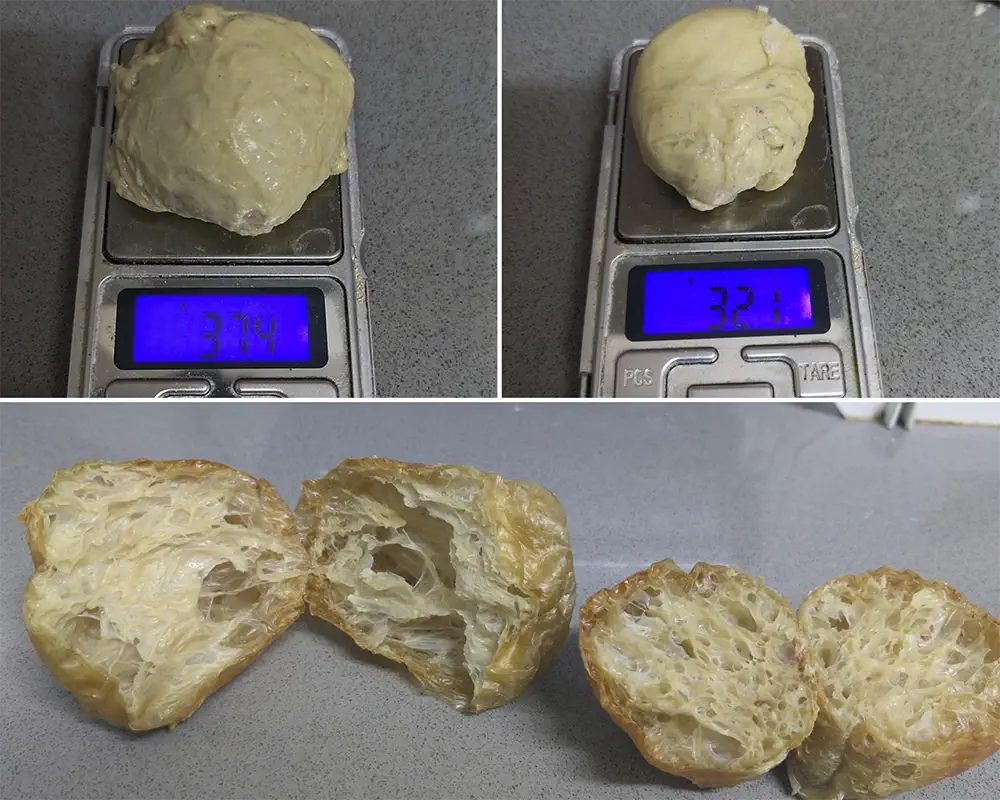
In the next image, you can see a gluten ball made from Caputo Chef/Cuoco flour. Although its wet gluten content is similar to the previous example (about 25.5%), the structure is noticeably different – much more ‘delicate’ and open.
Key Takeaways: Understanding Gluten
- The Structure Provider:
Gluten doesn’t exist in the bag; it is created only when glutenin and gliadin proteins meet water. It acts as the “scaffolding” that traps gas, allowing your pizza to rise rather than collapse. - Quantity vs. Quality:
A high protein percentage (quantity) suggests a stronger flour, but quality (the protein’s properties) determines if that strength is actually usable. A 12% protein flour with poor quality can perform worse than a 10% high-quality flour. - The Balancing Act:
High-quality pizza dough requires a balance between Elasticity (the ability to snap back) and Extensibility (the ability to stretch without tearing). - Label Limits:
While 10.5%–13.5% protein is the “sweet spot” for most white pizza flours, protein labels on Whole Wheat or Ancient Grains (like Spelt or Rye) can be misleading, as they don’t form the same strong gluten network needed for making pizza. - The “Gluten Wash” Test:
You can assess a flour’s gluten potential at home by rinsing a small piece of developed dough under cold water to wash away the starch. The remaining rubbery, insoluble mass is the “wet gluten,” which reveals the actual quantity of gluten formed. By baking this gluten ball, you can observe its expansion and structural strength, providing an indication of the flour’s gluten characteristics.
Does Flour Affect Flavor? (And Why It Matters Less Than You Think)
Most pizza flour is “white flour,” made exclusively from the endosperm of the wheat kernel. Since the endosperm is primarily starch and protein with very little fat or minerals, it is essentially flavorless.
The flavor of wheat is concentrated in the bran and the germ. These components are removed during the milling of white flour, which is why refined flours have a neutral taste.
The primary source of flavor in pizza dough is the byproducts of fermentation (alcohols, acids, and esters), not the flour itself. If a crust has a deep, complex flavor, it is a result of a long, healthy fermentation process, not the brand of flour. If your crust is bland, the solution is usually better fermentation, not more expensive flour.
For a deeper look at the science of wheat flavor and the role of ash content, see How Flour Affects Pizza Crust Flavor: Myth vs. Reality.
Flour Strength: How to Match Your Flour to Your Fermentation Time
In the following sections, we’ll explore how the choice of flour, specifically its strength, affects (or is affected by) the dough’s fermentation time and method.
How Flour Strength Dictates Fermentation Tolerance
During fermentation, a dough undergoes two simultaneous processes:
- Rising (gas production)
- Ripening/Maturation (structural transformation and flavor development).
How well a dough handles these processes over time depends largely on its “fermentation tolerance.”
The Role of Protease Enzymes
Naturally present in all flour, protease enzymes act like tiny biological scissors. As fermentation progresses, they gradually break down gluten bonds.
- The Benefit: This process softens the dough, making it more extensible and easier to stretch.
- The “Risk”: If fermentation goes on too long, the protease enzymes will “over-work,” weakening the gluten network to the point of collapse. This results in a sticky, slack dough that is difficult to handle and fails to rise in the oven (over-fermentation).
Choosing the Right Flour for the Job
The connection between flour choice and fermentation is straightforward:
The more gluten a flour contains, and the higher the quality of that gluten – the more “resistant” it is to enzymatic breakdown, and the longer its fermentation tolerance.
Think of it as a structural “buffer.” A high-protein flour starts with a much denser, stronger network of gluten bonds, meaning it can withstand the protease activity for a longer period, while still maintaining enough strength to hold its shape.
Summary: As a rule of thumb, higher gluten content equals higher fermentation tolerance. This ensures your dough retains enough structure and does not get over-fermented.
Visualizing Fermentation Tolerance
The video below demonstrates the performance of three different flours over a 12-hour period.
Note how the dough on the far left loses its structural integrity and collapses around the 7-hour mark. This is a classic example of low fermentation tolerance – the flour simply didn’t have enough gluten strength to “survive” the duration of fermentation.
Choosing Flour Based on Fermentation Time
When choosing a flour, the general rule of thumb is: The longer your planned fermentation, the stronger the flour you need, and vice-versa. This relationship is driven by how the dough’s structure evolves over time.
The goal is to find the “sweet spot” where the dough has softened and turned extensible enough to stretch easily, but hasn’t yet lost its structural integrity.
For Shorter Fermentations:
Lower protein (weaker) flours are generally better.
Because there is less time for protease activity to “soften” the gluten network, a high-protein [strong] flour can remain overly elastic and difficult to stretch.
Furthermore, without the sufficient breakdown of a strong gluten network, the resulting crust can be tough, dense, and have a closed-structured crumb.
For Longer Fermentations:
Stronger flours are required to provide a structural “buffer” against the prolonged activity of protease enzymes.
During long fermentation, protease enzymes have enough time to break down the gluten network without causing it to collapse entirely. This allows enzymes to break down a strong gluten network into an extensible dough that is easy to stretch, while maintaining enough structural integrity to hold fermentation gases and produce an airy crumb.
Protein-to-Fermentation-Time Table
Here’s a general guide to classifying flour fermentation tolerance based on its protein content:
| Protein Content | Flour Strength | Optimal Window (Room Temp Fermentation) | Optimal Window (Cold Fermentation) |
| Below 10.5% | Weak (Not Recommended for Pizza Dough) | 2–5 Hours | Up to 24 Hours |
| 10.5% – 11.5% | Medium | 2-12 Hours | ~72 Hours |
| 11.5% – 13.5% | Strong | 4–24 Hours | 72+ Hours |
| 13.5% + | Very Strong | 4–48 Hours | 72+ Hours |
Note:
1. This is a broad classification. The quality of gluten can influence fermentation tolerance as much as, or even more than, the total protein content.
2. Fermentation is a temperature-driven process. The actual fermentation temperature has a massive impact on the specific window of time a dough can withstand before over-proofing.
The W Rating: Technical Strength vs. Practical Application
The W rating (or W index) measures a flour’s “strength” – specifically its ability to resist over-fermentation before the gluten structure breaks down.
It is a specific laboratory metric (Alveograph test) primarily used for Italian and French soft wheats. Outside of Europe, it is rarely used or needed. Most North American millers do not provide a W rating, relying on protein % instead.
For American/Hard wheat flours, protein content is a reliable enough indicator of strength. For Italian flours, protein content alone can be misleading, making the W rating more relevant.
The most important thing to know about the W rating is: Don’t obsess over it. Mastering your dough management process is more important for pizza quality than a laboratory index.
For a technical deep dive into the W rating and why it differs from protein content, see Understanding Flour W Rating: The Definitive Guide for Pizza Makers.
Do You Need Specialized “Time-Labeled” Flours?
The short answer is no.
The best advice for any baker is to embrace trial and error. If a specific flour consistently gives you results you love, then the “W index” or the specific classification on the bag becomes irrelevant. Success is found in the oven, not on the label.
Skill Over Specs
It is entirely possible to produce an excellent long-fermented pizza using relatively “weak” flours. While doing so requires more skill and precise dough management, pushing these boundaries is the best way to improve as a baker.
Of course, every flour has its physical limits; for instance, using a 9% protein pastry flour for a 72-hour cold ferment is likely to end in a sticky mess. However, reaching those limits depends heavily on your technique and how you manage the dough.
Ignore the Marketing Noise
Try to filter out the “marketing background noise” and focus on actual pizza making.
In many cases, a flour labeled for “short fermentation” can easily handle a longer rise if the dough is managed correctly.
Questions like “Is Flour X suitable for exactly 24 hours?” are often the wrong ones to ask. If you are using a standard bread flour, it will almost certainly withstand a long fermentation without issue.
The Importance of Dough Management
A solid dough management process, primarily adjusting your yeast amount based on fermentation time and temperature, is far more critical than finding a “perfect” flour.
The Bottom Line: Instead of obsessing over flours marketed for specific durations, focus on mastering the fermentation process itself. Once you understand how dough responds to time and temperature, you’ll find that most flours are much more versatile than the packaging suggests.
Tips for Making an Emergency Dough (Very Short Fermentation)
Emergency dough, as the name implies, is designed to be prepared quickly – “in an emergency.” The term originated in pizzerias that needed dough ready as fast as possible, sometimes within just an hour from the end of kneading to baking.
For practical tips on making an emergency dough, see: “Emergency” Pizza Dough: Quick Fermentation Tips.
Key Takeaways: Matching Flour to Time
- The Structural Buffer:
Think of gluten as a structural “bank account.” The stronger the flour, the more “currency” it has to survive the protease enzymes that naturally break down dough over time. - The Fermentation Window:
Higher protein content generally equals a wider fermentation tolerance. Weak flours collapse quickly (over-fermentation), while strong flours can withstand longer fermentation. - The Rule of Thumb:
the general rule of thumb is: The longer your planned fermentation, the stronger the flour you need, and vice-versa. The goal is to find the “sweet spot” where the dough has softened and turned extensible enough to stretch easily, but hasn’t yet lost its structural integrity. - W Rating vs. Protein:
In Italy, the W Rating is the gold standard for measuring technical strength (resistance to breakdown). However, for most flours outside of Europe, Protein % is a perfectly reliable indicator of a flour’s strength. - Process Over Packaging:
Don’t be fooled by “Time-Labeled” flours (e.g., “Good for 24 hours”). Your dough management process – specifically how you control temperature and yeast amounts – is more important than the marketing on the bag. - The Skill Factor:
While strong flour makes long fermentation easier, a skilled baker can push a “weaker” flour to great results with precise dough management process. - Emergency Dough:
For very fast pizzas (1–2 hours), weak flours are actually better. Since there isn’t enough time for enzymes to “soften” a strong gluten network, a high-protein flour will result in a “bouncy” dough that is impossible to stretch and a final crust that is unpleasantly tough.
How Protein Content Defines Your Pizza’s Final Results
The protein content of flour directly affects both the behavior of the dough and the final result. The primary effects of protein content in flour are:
- The water absorption capacity of the flour (whether it can absorb more or less water)
- How the dough behaves (whether it is elastic, extensible, soft, or stiff)
- The final volume of the pizza or baked goods
- The degree of browning during baking, which directly affects the flavor and crispness of the crust
- The [crumb] texture of the final product (whether it is soft or “hard” and chewy)
As you can see from the above, using flour with different protein content allows us to achieve different crust/crumb characteristics, depending on the desired results.
Protein Content and Water Absorption
In general (and for white flour), a flour can absorb more water as the protein content increases.
For most styles of pizza (containing around 60% hydration), this is not a significant factor because the majority of flours can easily handle this hydration level.
However, it becomes crucial for pizzas that require higher hydration, such as Al Taglio or modern Neapolitan.
Flour with a high water absorption capacity allows for higher hydration without the dough reaching its “saturation” point, which would result in a weaker gluten structure and a sticky, challenging dough to work with. This, in turn, would inevitably affect the final product as well.
Dough Handling: How Protein Dictates Strength and Elasticity
As a general guideline, and all things being equal (say 60% hydration and a standard dough formula), flour with a higher protein content will result in a dough that is more elastic and “stiff”. For instance, a flour with 13% protein content will always produce a dough that is more elastic, stiff, and “resistant” than a flour with 10% protein content.
In practice, this means that flours with a higher protein content may result in a dough that is more resistant and challenging to work with. Such dough may also require additional fermentation time to allow the protease enzymes to sufficiently “soften” the gluten. This is the main reason why flours with a higher protein content are generally less suitable for short fermentation (however, this does not mean that they cannot be used in short fermentation, as discussed in the previous section on short fermentation using strong flours).
Italian flours, for example, most of which have a low to medium protein content, produce doughs that are highly extensible and easy to work with.
It is important to note that there are various dough conditioners (specifically dough reducers/relaxers) that work to soften the dough in an “artificial” way, thus making it possible to obtain a workable dough when using high protein content flour for short fermentation. One example of such a dough reducer is L-cysteine (E920).
Oven Spring and Volume
The protein content also directly affects the volume of the baked product. While the quality of the gluten also plays a significant role in this context, a general guideline is that a higher protein content in the flour leads to more gluten formation and a stronger gluten structure; A stronger gluten structure can capture more gases, resulting in a larger volume.
For standard round pizzas, there is no need to consider this issue, as even “regular” flours will provide sufficient volume; However, for square pizzas like Al Taglio, Pala, Detroit, and Sicilian, where volume is important, using flour with a higher protein content will help achieve greater volume.
Browning and Crispness: Protein’s Role in the Maillard Reaction
The protein content directly affects the browning of the crust, and, indirectly, also impacts the flavor and crispness of the pizza.
What causes the dough to brown during baking is the Maillard reaction, which occurs when reducing sugars and amino acids interact. Amino acids, which are the “building blocks” of proteins, are present in the dough as a result of the breakdown of gluten during fermentation by protease enzymes.
Since amino acids are the result of proteins (gluten) in the dough being broken down during fermentation, a dough made of flour with higher protein content, will potentially contain more amino acids; And the greater the amount of amino acids in the dough, the more intense the Maillard reaction during baking, resulting in more browning.
A dough that has browned more during baking will necessarily:
- Yield a crust with stronger and deeper flavors. In other words, the protein content of flour indirectly affects the flavor of the crust.
It is worth noting that the degree of baking and the fermentation of the dough also play a role in this regard; For example, during a shorter fermentation time, the proteins will not be fully broken down into amino acids, as this is a process that takes time. - Yield a crispier crust. When people talk about a “crispy” pizza (that is not a cracker style pizza), they typically mean a tender interior with a crispy, “eggshell”-like exterior – this crispy exterior is achieved through the Maillard reaction.
To conclude, flour with a higher protein content has the potential to yield a crust that is more flavorful and crispier.
Crumb and Crust Texture
Protein content in flour directly affects the texture of the end product, specifically the softness, toughness, or chewiness of the crust (or crumb, in the case of bread).
As a general guideline, flour with a low protein content will yield a softer crust, while flour with a high protein content will result in a chewier and “tougher” crust; This is because a higher protein content leads to a stronger and more elastic and cohesive gluten structure, resulting in a firmer texture in the end product.
It’s also important to note that the impact of gluten content on texture also applies post-baking – the higher the protein content of a flour, the “tougher” the pizza will become once it cools down.
Of course, in this case as well, the properties and quality of gluten can also affect the texture, in addition to its quantity. However, the above rule of thumb generally applies to most flours and applications.
Let’s take New York pizza, for example, which is known for its chewy texture. It is traditionally made using high protein content flour, specifically strong American flour with a protein content of 12.5% or higher; On the other hand, Neapolitan pizza, known for its soft texture, is traditionally made with weak Italian flour that has a medium-low protein content.
By using different flours with different protein content, we can achieve different crust textures according to our preferences.
It is important to note that while the protein content of flour directly affects texture, the texture of the final product is also influenced by the kneading process (particularly the degree of gluten development at the end of kneading) and the timing of baking (specifically, the balance between elasticity and extensibility). These topics will be covered in future posts.
Matching Protein Content to Pizza Style and Characteristics
Not all pizzas are created equal – different pizza styles often require flours with distinct characteristics.
For instance, Chicago deep dish dough is entirely different from New York style or Neapolitan dough, and therefore calls for a different type of flour. Likewise, thick doughs baked in a pan require different handling – and flour – compared to thin pizzas that are hand-stretched.
Below are some general examples of popular pizza types and the flour strength they typically require (based on protein content):
- Neapolitan Pizza [Classic]: Hand-stretched to a thin base. Requires medium-strength flour. Typically made with medium-strong Italian flours or non-Italian all-purpose flours with medium protein content.
- Modern Neapolitan Pizza (“Canotto Style”): Features a big crust and a very open and airy crumb structure. Requires strong flour. Typically made with very strong Italian flour or strong non-Italian flour. Often paired with a preferment.
- New York Style Pizza: Thin, hand-stretched crust. Requires medium-strong flour. Typically made with bread flour.
- Detroit Style Pizza, Sicilian Pizza: Thick, pan-baked dough. Requires medium-strong flour.
- Midwest/Bar-Style / Cracker-Style Pizza: Dough is rolled or hand-shaped and often pan-baked. Requires low-medium strength flour.
- American-Style Pizza (Generic): A generic, pan-stretched and baked pizza. No special flour characteristics are needed – most pizza-appropriate flours will work.
- Chicago Deep-Dish Pizza: More similar to a pie crust dough than traditional pizza dough. Requires weak flour.
Flour, and specifically its elasticity/extensibility properties, also affects the final baked result. For example, a highly extensible flour with strong gluten-forming potential can produce a crust with more volume and a lighter, airier crumb. In contrast, flour with “simpler” gluten properties will yield a more compact dough with less oven spring.
For more on this, see Dough Elasticity and Extensibility: Understanding the Two Most Important Properties in Pizza Dough.
Note that there’s no such thing as “better” or “worse” flour – only flour that is more or less suitable for a specific use. One baker might aim for maximum volume and an open structure, while another may have entirely different goals. The ideal flour depends on the application and the outcome you want to achieve.
In summary: Your flour choice should match the style of pizza you’re making and the characteristics you’re aiming for. What works perfectly for one type of pizza, may perform poorly for another.
Key Takeaways: The Impact of Protein Content on Crust and Crumb Characteristics
- Hydration Capacity:
Higher protein content increases the flour’s ability to absorb water. While most flours handle standard (60%) hydration, strong flours are essential for high-hydration styles (like Al Taglio) to prevent the dough from becoming a sticky, unworkable mess. - Dough Handling:
High-protein flours create more elastic, “stiff” doughs. Without sufficient fermentation to soften this structure, these doughs can be difficult to stretch and prone to snapping back. - Volume and “Oven Spring”:
Protein provides the structural strength to trap gases. For styles where a high, airy rise is critical (like Detroit or “Canotto” Neapolitan), higher protein content is necessary to support that volume. - The Browning Connection:
Proteins break down into amino acids, which fuel the Maillard reaction. Higher protein flours have more browning potential, leading to deeper flavors and a crispier, “eggshell” exterior. - Texture Control:
Protein dictates the “bite.” Low-protein flours yield a soft, tender crust (Neapolitan), while high-protein flours create a chewy, sturdy structure (New York Style). - Style-Specific Matching:
There is no “best” flour – only the most suitable one for your goal. Use weak flour for crumbly Chicago Deep-Dish, medium flour for tender Neapolitan, and strong flour for chewy New York or high-rise pan pizzas.
The Heat Factor: Matching Flour to Your Oven Temperature
The enzymatic activity in flour, primarily driven by the alpha-amylase enzyme, is a critical factor in determining how your crust browns.
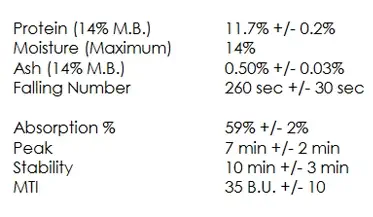
This activity is measured by the Falling Number (FN) index, which tracks how effectively enzymes break down starch into fermentable sugars.
In the world of pizza, the general rule is:
- Low Enzymatic Activity: Best for high temperatures (above 350°C/660°F).
- High Enzymatic Activity: Best for lower temperatures (below 350°C/660°F).
For a detailed read on enzymatic activity in flour and its influence on dough performance, see: Enzymatic Activity (Alpha-Amylase) in Flour: Understanding its Impact on Dough and Baking.
How Amylase and Enzyme Activity Drive Crust Browning
Alpha-amylase enzymes act as biological catalysts that convert starch into sugar. While this happens slowly during fermentation to feed the yeast, the process accelerates dramatically during the first few minutes of baking.
As the dough temperature reaches approximately 60°C (140°F), starch begins to gelatinize and amylase activity peaks, producing a surge of residual sugars.
These sugars are the primary fuel for the Maillard reaction – the chemical process responsible for crust browning and flavor development.
A flour with high enzymatic activity will produce sugar rapidly, causing the dough to brown very quickly. If used in a high-heat oven, this can lead to a burnt exterior before the inside is cooked.
Conversely, a flour with low activity may result in a pale crust when baked at lower temperatures.
The Relationship Between Temperature and the Maillard Reaction
Before we continue, it is important to understand an important concept – the baking temperature greatly influences the “intensity” of the Maillard reaction, which in turn affects how quickly the dough browns.
For example, when baking at 400°C/750°F, the Maillard reaction occurs much more rapidly and intensely than at 300°C/570°F.
As we are about to see, this is a crucial factor in relation to baking temperature and the enzymatic activity in flour.
Baking at High Temperatures (Over 350°C/660°F)
When baking at high temperatures (Over 350°C/660°F), the Maillard reaction occurs more quickly and aggressively, resulting in faster browning of the pizza. Therefore, it is preferable to use flour with low enzymatic activity when baking at high temperatures – this helps to limit browning, and prevents the pizza from becoming overly browned during baking.
For example, let’s consider a classic Neapolitan pizza, which is baked at around 450°C/850°F for no more than 90 seconds. To achieve the desired soft texture of a Neapolitan pizza, a moderate level of browning is desired. Excessive residual sugar in the dough, whether due to high enzymatic activity or the addition of sugar, combined with baking at such high temperatures, can accelerate browning to the point of charring; Therefore, in such cases, it is best to use flour with low enzymatic activity.
In other words: flours with low enzymatic activity are more “resistant” to browning, making them particularly suitable for baking at high temperatures (i.e., in a wood-fired oven).
This does not mean that flour with high enzymatic activity cannot be used for baking at high temperatures; However, if choosing to use such flour, extra attention must be paid to the dough during baking to prevent excessive browning.
Baking at Low(er) Temperatures (Up to 350°C/660°F)
When baking pizza in a home oven, the temperature typically does not exceed 300C/570F. All the points mentioned earlier apply to baking in a home oven as well, but in reverse: When baking at these temperatures, it is best to use flour with HIGH enzymatic activity – this will increase the residual sugar content in the dough, and promote browning during baking.
..But what happens if we use flour with low enzymatic activity (like most Italian flours) for baking in a home oven (without adding a high level of sugar to the dough)? There are two possible outcomes:
- The crust will not brown properly and will remain pale, giving it an unbaked appearance. This is not only unappetizing, but it also results in a crust that lacks A SIGNIFICANT amount of flavor due to inadequate browning.
- Alternatively, the crust will eventually brown, usually after a long baking time; However, this will result in a very dry crumb, giving the pizza a cracker-like texture (which is great if you enjoy cracker style pizzas).
Therefore, when baking in a home oven, it is best to use flour with HIGH enzymatic activity.
One option we bakers have to enhance the enzymatic activity of flour is by adding diastatic malt powder to the dough. Diastatic (enzymatic) malt powder contains active amylase enzymes, and adding it to the dough allows us to “manually” boost its enzymatic activity.
Alternatively, you can increase the amount of sugar in the dough by adding sugar, honey, or other types of sugars to it.
It is important to note that adding sugar to flour with low enzymatic activity will not necessarily “solve” the lack of browning during baking; This is because a relatively large amount of sugar (about 5%) will be required to “compensate” for the low enzymatic activity, and this high amount of sugar will also affect other aspects of the dough, such as texture and yeast activity.
When it comes to baking in the oven, it is important to understand that “artificial” browning techniques, such as using olive oil on the crust prior to baking, are purely cosmetic and do not enhance the flavor of the crust (except for the taste of fried oil). These methods cannot substitute the authentic browning (Maillard reaction) that results from a proper fermentation and baking process. In reality, resorting to applying oil on the crust to achieve browning indicates that something went wrong in either the dough preparation or the baking process.
How Enzymatic Activity Shapes Crumb Structure and Texture
The enzymatic activity can also affect the texture of the crust.
Generally, dough made from flour with high(er) enzymatic activity will result in a more open and “airy” crumb structure. This is because higher enzymatic activity leads to a faster breakdown of sugars, providing more food for the yeast, and resulting in increased yeast activity; As a result, more CO2 is produced, creating more “air” in the dough.
An example of this is Caputo’s Nuvola flour, which has high enzymatic activity (uncommon in Italian flours) – this is one of the reasons why it produces a very open and airy crumb structure with large “air bubbles”.
Summary: Selecting Flour Based on Oven Temperature
Here is a summary of how a flour’s enzymatic activity should align with your oven’s heat profile:
| Baking Temperature | Recommended Enzymatic Activity | Typical Falling Number | Flour Examples |
| Over 350°C/660°F (e.g. Wood-Fired Ovens) | Low | Greater than 300 | Most Italian flours, ‘unmalted’ American flours. |
| Up to 350°C/660° (Standard kitchen oven) | High | Less than 300 | Most bread flours and many non-Italian pizza flours. |
Note: The recommendations above are not set in stone, and the best advice remains to experiment with different flours in your specific environment. However, understanding these enzymatic differences is important, as they have a significant impact on how your pizza bakes and browns.
Key Takeaways: Enzymatic Activity & Baking Temperature
- The Browning Fuel:
Alpha-amylase enzymes convert starch into sugars. These sugars feed the Maillard reaction, which is responsible for the crust’s color, aroma, and crispness. - The Falling Number (FN):
This index measures enzymatic activity. A high FN (300+) means low activity (slow sugar production), while a low FN (<300) means high activity (fast sugar production). - High-Heat Strategy (350°C/660°F+):
Use flour with low enzymatic activity (unmalted). In high-heat environments like wood-fired ovens, the crust browns instantly; low-activity flour prevents the crust from burning before the interior is cooked. - Home Oven Strategy (<350°C/660°F):
Use flour with high enzymatic activity (malted). Since home ovens bake more slowly, you need rapid sugar production to achieve a browned, flavorful crust. Without it, the pizza often ends up pale and dry. - Texture Boost:
High enzymatic activity doesn’t just affect color; it provides more food for the yeast, often resulting in a more open, airy crumb structure and increased oven spring. - The Diastatic Malt Fix:
If your flour lacks enzymatic activity (common with Italian flours in a home oven), you can manually boost it by adding diastatic malt powder. - Checking the Label:
You can often spot high enzymatic activity flours by looking for ‘malted barley’, ‘enzymes’ or amylase in the ingredients list.
Technical Differences: What Really Distinguishes One Flour from Another?
In practice, there is a wide variety of flours suitable for making pizza. Any flour that meets the criteria outlined in the previous sections, regardless of whether it’s specifically labeled as “pizza flour”, can produce excellent results.
Two key factors distinguish different flours:
- Protein Content & Quality: The sheer amount of gluten-forming proteins and how strong those bonds are.
- Elasticity vs. Extensibility: How the dough balances “snap-back” (elasticity) with the ability to be stretched thin (extensibility).
Although these are “just” two factors, they can dramatically change how a flour behaves. This is the core distinction between flours, whether for pizza or other baked goods, and it applies across different brands or even different product lines from the same manufacturer.
While flours labeled as “pizza flour” are generally optimized for these characteristics, many bread flours and even certain all-purpose flours can also be perfectly suited for pizza.
How Different Flours Influence the Dough and Crust
To illustrate how these characteristics affect your results, consider these general examples:
- Gluten Quality vs. Quantity: Two flours with the identical gluten content but different gluten quality can produce very different doughs in terms of strength, handling, and final internal structure.
- Elasticity and Extensibility: Doughs can vary widely in how they stretch. Some may snap back aggressively (high elasticity), while others stretch easily (high extensibility), allowing for thinner, more even stretching without tearing.
- Fermentation Tolerance: Stronger flours generally offer more resistance to over-fermentation, whereas weaker flours may collapse or lose their structural integrity much sooner during a long fermentation.
- The Baked Result: These variations influence the final appearance and texture – from the volume of the crust (tall vs. flat) to the crumb texture (airy vs. dense).
In summary, the main differences are in the amount and quality of gluten and the extensibility/elasticity ratio. These properties directly influence how the dough handles and the quality of the final crust.
While flour choice significantly influences dough behavior, these outcomes depend just as much, if not more, on your entire process: kneading, fermentation, and baking.
Specialized Applications
Many flour producers adapt flour characteristics for specific uses. For example:
- Fermentation Timing: Flours optimized for long fermentation typically have stronger gluten structures, while those intended for short fermentation times are generally “weaker” or contain dough additives to make the dough easier to handle in short fermentations.
- Pizza Styles: A flour suited for thin, hand-stretched Neapolitan pizza requires high strength and extensibility, whereas a pan-baked pizza may require less of both.
- User Experience: Some flours are designed for home bakers, prioritizing ease of handling and shaping over high-performance professional characteristics.
A Note on Additives
Some flours include dough conditioners or “improvers” to adjust these natural properties, for example:
- To increase elasticity: If a flour naturally produces a very slack (extensible) dough, additives like ascorbic acid may be included to strengthen the gluten network.
- To increase extensibility: Conversely, if a flour is naturally too “rubbery” or elastic, reducers such as L-cysteine may be added to soften the dough, making it easier to stretch and work with.
“Pizza Flour”: Marketing Label vs. Technical Reality
Now that we’ve covered how different flours vary and what makes them suitable for pizza, a natural question arises: is the label “pizza flour” mainly a marketing tactic?
The answer is both yes and no.
On the one hand, flours marketed as “pizza flour” usually do have properties that make them well-suited for pizza-making, such as a sufficiently high gluten content & quality, and a good balance between elasticity and extensibility.
However, many other flours with similar characteristics aren’t labeled as “pizza flour”, and can deliver equally excellent results. A good example is bread flour, which often shares the same functional traits.
Most bread flours are strong enough to support long fermentation and maintain their structure, with an elasticity/extensibility ratio that allows for easy shaping. Their gluten quality is typically high and enables a good volume and an airy internal structure – features that are desirable in most types of pizza. As a result, many bread flours are excellent choices for pizza baking.
“Bread flour,” like “pizza flour,” is a vague and unregulated term. There are no specific industry standards a flour must meet to be labeled as “bread flour” – it’s purely a branding decision made by the manufacturer. As with “pizza flour,” bread flours can vary widely in strength, gluten quality, and elasticity/extensibility characteristics. In practice, a “multi-purpose” flour from one producer may perform better for pizza or bread than a “bread flour” from another.
It’s not uncommon for a manufacturer to introduce a new line, or expand an existing one, with a “pizza flour” – even if it closely resembles other flours in their catalog. Often, this new label comes with a higher price point, and is designed to position the product as a more “specialized” or “professional” option; But in many cases, the actual differences are minimal, and the rebranding is simply a way to increase profits or tap into niche markets.
This isn’t limited to pizza flour. Other examples include flours labeled for specific uses like “focaccia flour” or “baguette flour,” which often have very similar properties to standard bread or pizza flours. The main exception is flours made specifically for cakes or cookies, which are intentionally weak in gluten and unsuitable for pizza or bread.
In summary: Flours labeled as “pizza flour” are generally suitable for making pizza, but the marketing aspect plays a significant role. Much of the “specialized” branding is part of a business strategy, and many of these flours – whether from the same manufacturer or another – may be equally well-suited for pizza making, even if don’t carry the “for pizza” label.
How to Find and Read a Flour’s Technical Data Sheet
To find the technical data sheet of your flour and determine its enzymatic activity, here’s what you can do:
- PDF Search : Most mills host their technical data as PDF files. To find them, search for the brand and flour name followed by ‘filetype:pdf’ (e.g., “King Arthur Bread Flour filetype:pdf”). Look for a section labeled “Falling Number” or “Enzymatic Activity.” The Falling Number (FN) will be displayed as a single number or a range.
- Note: Not all mills publish this technical data publicly.
- Direct Inquiry: If the sheet is not available online, you can contact the mill’s technical or quality control department directly via email. While commercial mills usually provide these to bakeries, they may not always fulfill requests from home bakers.
- Enzymatic Activity Audit: A quick way to check for added enzymes is to inspect the ingredient list. Look for terms such as “malted barley flour,” “barley malt,” “amylase,” “fungal enzymes,” or “sprouted barley.”
- Malted Flour: In the United States, flour with these additions is referred to as “malted.”
- Unmalted Flour: Flour without these additions is “unmalted.”
Note: A clean label does not guarantee low enzymatic activity. Wheat harvested during a wet season may have a high natural enzyme count (a low Falling Number) even without the addition of malt or enzymes. Conversely, a flour with added malt will almost certainly have a high(er) level of enzymatic activity.
Key Takeaways: Technical Reality vs. Marketing
- The Two True Metrics:
Beyond branding, a flour’s performance is defined by two things: Protein Quality/Quantity and its Elasticity & Extensibility properties. - The “Pizza Flour” Myth:
The label “Pizza Flour” is unregulated. Many high-quality Bread Flours or All-Purpose Flours share the exact same technical specs as specialized pizza flours and perform identically. - Price vs. Performance:
Specialized labels (like “Focaccia” or “Baguette” flour) are often used to position products in niche markets at higher prices. The actual differences between these and standard strong flours are often negligible. - Process Over Product:
While flour choice is important, the final result depends more on your kneading, fermentation, and baking technique than the name on the bag. - Additives as Shortcuts:
Some flours use “improvers” (like ascorbic acid for strength or L-cysteine for softness) to artificially adjust behavior. These are common in flours designed for “easy” home use.
“Special” Flours and Their Function in Pizza Dough
Manitoba Flour
Manitoba flour takes its name from the Canadian province where the original wheat variety (Canada Western Red Spring) is grown. It is renowned for its high protein content, typically ranging between 12% and 15%.
Today, “Manitoba flour” is primarily used as a marketing term for flour milled from high-protein wheat, most of which is sourced from North America.
If you are in the US or Canada, you likely won’t see “Manitoba” on the label, unless the flour is imported from Europe. Instead, look for “high-gluten flour” or “bread flour” with a high protein content; these are essentially the same product without the specific geographic branding.
The term became popular because local wheat in many parts of Europe, particularly Italy, tends to have a low(er) protein content. Consequently, some European mills use “Manitoba” as a catch-all name for strong flours made from North American wheat or grains with similar strength.
In short: Manitoba flour is simply a high-gluten flour.
Note: Using Manitoba (or any high-gluten flour) as the sole flour in your recipe can result in an overly elastic dough that resists stretching and produces a tough, chewy crust.
“00” Flour
Contrary to popular belief, the “00” classification reveals very little about a flour’s performance characteristics.
The “00” designation refers strictly to ash content (below 0.55%), which is a measure of refinement. It indicates the degree to which the bran and germ have been removed from the endosperm.
Beyond this level of purity, the “00” label tells us absolutely nothing about the flour’s protein quality, strength, or its overall suitability for pizza making.
Outside of Italy, “00” is frequently used as a marketing buzzword synonymous with “pizza flour.” However, using “00” flour is not necessary to produce high-quality pizza.
When selecting flour, you should prioritize the technical specs discussed throughout this article, rather than searching for the “00” label alone.
For an in-depth read on 00 flour, see: 00 Flour (Tipo 00) Explained: The Science, The Myths, and The Reality.
Durum Wheat
Durum wheat (Triticum durum) is a high-protein, gluten-rich variety of wheat, usually yellow in color, though some varieties are similar to regular wheat. There is also red durum, primarily used as fodder. The protein content in durum wheat typically ranges from 12% to 16%.
For further details on durum wheat, see: What Is Durum Wheat (Durum Flour), and Should You Use It in Pizza Dough?.
Italian Flour
While Italian flours enjoy a legendary reputation in the pizza world, they are not essential, or even required, for making great pizza. High-quality flour produced in other regions can yield equally impressive results.
That said, most Italian flours share two distinct technical properties that make them particularly well-suited for specific pizza making applications:
- Low Enzymatic Activity: Most Italian flours have a low enzymatic activity (high FN). This makes them specifically suited for baking at very high temperatures (e.g., a classic Neapolitan pizza).
- Natural Extensibility: Italian flours are typically very extensible, which generally produces a dough that is easy to handle and results in an open crumb structure.
For a detailed article on Italian flours, see: Italian Pizza Flour: Is It Actually Better?
Wholemeal, Ancient, and Other Grain Varieties as Pizza Flour
If you want to give your pizza crust a unique flavor, using a combination of wholemeal flours (or “semi-wholemeal” flours) and/or flours made from other types of wheat/grains, whether they are wholemeal or not, is a great option.
In general, these flours will add a nutty/earthy flavor to the crust and will also change its texture because of their different gluten composition (see details below). The effect on flavor and texture will naturally vary depending on the type and amount of flour used in the dough.
When making pizza dough, it is recommended to limit the use of these flours to no more than 20% of the total flour in the dough formula, especially when using whole wheat flour that is not made from bread wheat. Going beyond this 20% “threshold” will negatively affect the texture of the crust, resulting in a denser and flatter crust. Based on my own experience, most people find that these flours contribute enough flavor when used in the range of 5-20%; if used in larger quantities, the flavor can become overpowering and overwhelming.
Feel free to experiment with different combinations of flours in your dough – you may really like the result.
Wholemeal (Whole Wheat) Flour
As mentioned above, using whole wheat flour, regardless of the type of wheat or grain, will change the flavor profile of the crust; Whether the end result will be better or worse (in terms of flavor) is subjective and depends on your personal taste. The crust will take on a more nutty and earthy flavor, similar to that of wholemeal bread.
Within the wholemeal flour category, there are also flours containing different percentages of whole wheat (20/40/60% etc., like the Italian Tipo 1). Each of these flours will have a distinct impact on both the flavor profile and texture of the crust.
A standard wholemeal flour typically contains a relatively high amount of protein (11-14% or more); However, it’s important to note that using wholemeal flour does not necessarily lead to the creation of more gluten. There are several reasons for this:
- The additional protein in whole wheat flour comes from the bran and germ; These parts of the wheat grain do not contain the proteins necessary for gluten formation (glutenin and gliadin).
- The (sharp) particles of bran literally cut the strands of gluten, effectively weakening the dough.
- The germ of the wheat kernel contains components that interfere with the development of gluten.
In practice, this means that using wholemeal flour will result in a final product that is significantly different compared to using white flour. Doughs that include wholemeal flour will have a less uniform and elastic gluten structure compared to dough made with 100% white flour;. On the other hand, doughs made with 100% wholemeal flour will be very dense with a coarser texture, a dark color, and a strong, dominant nutty flavor.
In terms of health benefits, wholemeal flours will indeed contribute essential vitamins and minerals to the dough; However, this does not necessarily mean that the dough is “healthier” (more like “less unhealthy”). It is important to remember that wholemeal flour consists of 100% white flour (endosperm), plus the bran and germ which are rich in beneficial nutrients.
It is worth noting that enriched flours, which may be suitable for making pizza (most bread flours are enriched), have a nutritional composition that is very similar (yet not identical) to that of whole wheat flour – this is because they are “fortified” with the vitamins and minerals that are lost during the milling process of white flour.
As mentioned, when making pizza dough, it is recommended to use up to 20% whole wheat flour (based on the total weight of flour in the dough formula). In my experience, using 5-10% will do the trick for added flavor.
Flours from Other Grain Varieties
Flour from Alternative Wheat Varieties and Grains, including “ancient” wheat varieties, can also be combined in the dough (as an anecdote, the most “ancient” wheat variety commonly used today is bread wheat, from which regular white flour is milled; The term “ancient wheat” is mainly – you guess it – a marketing label).
Some of these alternative flours include:
- Rye
- Spelt
- Emmer (known as “Farro” in Italy)
- Khorasan
- Einkorn
- Barley
- Teff
- And more
All of these flours can be found as wholemeal flour or as “white” flour.
In terms of flavor, these flours will add a nutty/earthy flavor to the crust, depending on the amount and type of flour used. Using any of these flours as wholemeal flour will result in a stronger taste compared to using them as white flour, although they will still contribute to the flavor of the crust even in their white flour form.
In terms of texture, the gluten in these flours – more precisely, the composition of the gluten-forming proteins in them – is significantly different from that of flour milled from bread wheat:
(1) They contain fewer gluten-forming proteins, resulting in less gluten formation in the dough overall.
(2) The composition of the gluten-forming proteins is different, resulting in gluten that is less elastic and “weaker”.
This difference in the amount and quality of gluten results in a dough that will be less elastic (weaker), trapping fewer gasses, and consequently gaining less volume; As a result, the baked product (pizza crust in our case) will be denser and flatter.
The only two exceptions regarding the impact on texture are emmer (“farro”) and spelt. The content of gluten-forming proteins in emmer and spelt is higher than in other types of (non-bread) wheat, which results in a stronger dough. Additionally, the protein composition of emmer and spelt will produce a very extensible and “stretchy” dough (due to more gliadin and less glutenin), but still “strong” enough for baking – this makes both of these flours a good choice to combine in pizza dough.
Flour from other types of wheat/grains may also offer different health benefits. I will not discuss these benefits here as they are not particularly relevant to pizza making, as these flours are typically used in small amounts in pizza dough, and more importantly – the health benefits can vary depending on the individual – what may be considered “good” for one person may not necessarily be good for another.
In this case as well, the recommended “limit” is 20% of the total flour weight.
“Tipo 1” Flour
Tipo 1 is essentially a “partially sifted”, high-extraction flour, or “semi-wholewhat”.
In practice, it functions as a blend, containing an approximate bran and germ content of 10% to 30%.
By Italian law, Tipo 1 flour must have an ash content between 0.65% and 0.80%. Beyond this specific mineral range, there is nothing structurally unique about the flour.
Its impact on dough, including water absorption, fermentation speed, and final taste, is identical to that of a white flour blended with a small percentage of whole wheat.
If you enjoy the flavor profile of Tipo 1, you can easily replicate it at home by blending any standard whole wheat flour with white flour. Because whole wheat is “100% extraction” (containing the full bran and germ), you simply use a smaller ratio of it to match the ash content of Tipo 1.
For Example: To replicate the flavor profile of a blend containing 80% white flour and 20% Tipo 1, you would use approximately 5% total whole wheat mixed into your white flour. This is because the bran in Tipo 1 is already diluted; replacing it with “pure” whole wheat requires a much smaller amount to reach the same bran concentration.
Key Takeaways: “Special” Flours and Their Uses
- The Manitoba Label:
Originally referring to high-protein Canadian wheat, “Manitoba” is now a generic term for high-gluten flour (12%–15% protein). In North America, standard high-quality bread flour offers the same performance. - The “00” Misconception:
The “00” label refers only to refinement (ash content) – nothing else. It is not a guarantee of high protein or quality; it simply means the bran and germ have been almost entirely removed. You don’t need 00 flour to make great pizza. - The Italian Profile:
Italian flours are renowned, but not “essential.” They are technically distinct for their typically low enzymatic activity (making them suitable for high temperature baking) and their natural extensibility, which makes the dough exceptionally easy to stretch and produces an open crumb structure. - Wholemeal (Whole Wheat) Limits:
Whole wheat flour is rich in protein, but much of it comes from the bran and germ, which do not form gluten. Furthermore, sharp bran particles physically “cut” gluten strands. For best results, limit whole wheat to 5%–20% of your total flour blend. - Durum Wheat:
High in protein but naturally very elastic, durum produces a stiff dough with a yellow hue. It is excellent for pasta, but best used as a minor addition in pizza dough to add color, chew, and distinct flavor. - Ancient & Alternative Grains:
Grains like Rye, Spelt, and Khorasan add earthy, nutty flavors but have weaker or more extensible gluten structures. Except for Spelt and Emmer, which handle relatively well, these flours will result in a denser, flatter crust if used in high percentages. - Tipo 1 & High-Extraction Flours:
“Tipo 1” is essentially a semi-whole-wheat flour. You can replicate its flavor and performance at home by mixing a small amount of whole wheat (5%–10%) into your standard white flour. - The 20% Rule:
To maintain a strong, workable pizza dough while experimenting with alternative grains, treat 20% as your maximum threshold. This ensures you get the flavor benefits without compromising the structural integrity and texture of your crust.
Summary Tables: Choosing Flour Based on Your Needs
The following tables provide a practical starting point for matching protein content to both your fermentation schedule and your specific pizza goals.
Note: These are general guidelines intended to help you choose the most suitable flour for your goals. They are not “hard rules” – with the right adjustments to kneading, hydration, and fermentation, you can successfully use flours outside of these ranges to produce excellent pizza.
Flour Performance by Protein Content
| Protein Content | Fermentation Tolerance | Dough Handling | Primary Result |
| Below 10.5% | 2-5h (RT), < 24h (Fridge) | Fragile, lacks elasticity, stretches easily, prone to tears | Biscuit-like, no structure |
| 10.5% – 11.5% | 2-12h (RT), ~72h (Fridge) | Soft & extensible | Tender, light, airy crumb structure |
| 11.5% – 13.0% | 4-24h (RT), < 72h+ (Fridge) | Balanced, extensible yet strong | Chewy, sturdy, large volume |
| 13.0% + | 4-48h (RT), < 72h+ (Fridge) | Very elastic; high “snap-back” | Very tough & chewy, maximum volume |
Matching Flour to Pizza Style
| Pizza Style | Recommended Protein | Target Crust Texture | Comments |
|---|---|---|---|
| Neapolitan | 10.7% – 12.5% | Maximum tenderness | Traditionally made with low to medium protein flour. |
| New York / New Haven | 11.5% – 13.5% | Chewy, crispy, “foldable” | Traditionally made with strong bread or high-gluten flour. |
| Square Pan Pizza (Detroit, Sicilian/Grandma, al Taglio) | 11.0% – 13% | High rise, fluffy interior, slight chew | Needs structure to support a high, airy rise in the pan. |
| Cracker-Style (Midwest Style, Tonda Romana) | 10.5% – 11.5% | Cracker-like, shattered-glass crisp | Low protein makes rolling easier and removes chew. |
| Chicago Deep Dish | 10.5% – 11.0% | Crumbly, pie-like | Low protein achieves a “short” crust style. |
Tips for Working with Pizza Flour
Using Vital Wheat Gluten to Enhance Flour Strength
Vital Wheat Gluten (VWG) is an excellent option for strengthening weaker flours, especially when strong flour is not available or when you want to further strengthen a specific flour.
In general, adding 1% of VWG to the dough will increase its protein content by 0.6%. For example, if a flour has a protein content of 10%, adding 1% VWG will result in a final protein content of 10.6%.
VWG should always be added to the flour, not directly to the water! VWG absorbs water quickly and clumps easily; Adding VWG directly to the water will create “gluten lumps” that will not be properly incorporated into the dough. Therefore, it is always advisable to add VWG on top of the flour.
Blending Flours: Is It Truly Necessary?
There are two main reasons for blending flours:
- Changing the flavor profile of the crust, as discussed in the previous sections.
- Creating a “new” flour with specific characteristics (stronger, weaker etc.).
We have already discussed the first reason (changing the flavor profile) in detail. Now, let’s focus on reason 2 – blending flours with the aim of creating a “new” flour with specific characteristics.
It’s fairly simple – blending two or more flours will result in a flour that “combines” the characteristics of the blended flours, depending on the ratio of each flour in the blend. For example, we can strengthen a weak flour by mixing it with a stronger flour (or vice versa), combine flours with different levels of enzymatic activity, mix flours with different gluten properties, and so on.
The most common reason for mixing flours is to “strengthen” weak flour with stronger flour or to “weaken” strong flour with weaker flour. This, of course, depends on the ratio between the flours; If you add a small amount of weak flour to strong flour, it is considered “weakening”, and if you add a small amount of strong flour to weak flour, it is considered “strengthening”. Any mixing of flours will result in a dough that behaves differently and, consequently, produce a different crumb texture.
Personally, I’m not a fan of blending flours, whether for weakening, strengthening, or texture change, and it’s a practice that I don’t recommend for a few reasons:
- It creates a specific process with extra steps and logistics (essentially, we have “created” a new flour that may require a specific dough management process), and also leads to a sort of “dependency” on the availability of several different types of flour (what do we do if one of the flours runs out or is unavailable?)
- Different flours come with different characteristics and are suitable for different applications (strong, weak, extensible, elastic, etc.), and most of the time, it is not beneficial (and can even be counterproductive) to mix them. The only exception to this is durum wheat (flour/semolina), which adds significant elasticity to the dough and chewiness to the crust.
In my opinion, a better practice would be to pick one flour, stick with it, and learn how to maximize the results from using it; And this is true not only when it comes to mixing flours, but also when choosing a pizza flour in general.
Beyond strengthening weak flours with stronger ones, it is rare that mixing flours is truly necessary to achieve a specific outcome. This is especially true when using white flour, as opposed to whole wheat or durum flour, which may be used for a specific change in flavor or texture.
If you come across a person, pizzeria, recipe, etc. that claims to use a “mixture of X flours” (especially if X > 2), it is important to understand that, in many cases, this is simply a marketing statement with little substance. It is primarily meant to create an illusion of “professionalism” or needlessly complicate the dough-making process.
As a general rule, if it is not possible to clearly explain the role each flour plays in the mixture and its contribution to the final result – there is no need to blend them.
An excellent example of this is pizzeria L’Industrie in New York, whose dough consists of a mixture of 3-4 flours (and is made through a complicated and unsympathetic process).
Although the pizza at L’Industrie is excellent, its crust, in terms of flavor and texture, is not significantly different from that of the famous Joe’s, also located in New York; However, contrary to L’Industrie, Joe’s dough is the most basic and “simple”, but it is made to perfection, just like at L’Industrie.
What I’m saying is that the dough management process is much more important than the specific mixture of flours used, and the two excellent pizzerias mentioned above serve as examples of this principle.
Moisture Content: How Humidity and Weather Affect Your Dough
At the end of the milling process, the moisture content in any type of flour is typically around 14%. However, it’s important to note that this moisture content is not constant and can vary depending on how the flour is stored throughout the distribution chain and after it is purchased; By the time the flour arrives at our homes, its moisture content may have already changed.
Any change in the moisture content of the flour, whether it increases or decreases, will inevitably affect its water absorption capacity as well.
When the humidity in the air, specifically the relative humidity (the commonly reported value in weather forecasts), drops below about 60%, flour starts to lose moisture to the air. Conversely, when relative humidity exceeds 60%, flour absorbs moisture from the air.
To break it down:
- In high-humidity environments (above ~60%), flour absorbs moisture, increasing its moisture content.
- In low-humidity environments (below ~60%), flour releases moisture, reducing its moisture content.
This exchange happens because moisture naturally moves from areas of higher concentration to lower concentration until reaching equilibrium. For flour, a relative humidity in the air of around 60% represents this balance point. Deviations above or below 60% cause flour to either gain or lose moisture.
However, moisture absorption or release isn’t immediate, and takes time. Typically, these changes become apparent after at least 30 days in normal storage conditions.
While relative humidity indicates whether flour will gain or lose moisture, absolute humidity (the actual water vapor content in the air) dictates how quickly and significantly this process unfolds. Higher absolute humidity accelerates and amplifies the extent of moisture transfer in either direction.
Summary of Humidity Concepts:
Relative Humidity: This is the percentage of water vapor in the air relative to the maximum amount the air can hold at a specific temperature. As temperature increases, the air’s capacity to hold water vapor also increases, which influences relative humidity. For example, 60% relative humidity means the air holds 60% of the moisture it can contain at that temperature.
Absolute Humidity: This is an absolute measurement of water vapor in the air, usually given in grams per cubic meter, and is not affected by temperature changes. It shows the actual amount of moisture present in the air.
Key Distinction: Relative humidity indicates the air’s moisture saturation level relative to its temperature, whereas absolute humidity provides a precise quantity of moisture in the air, regardless of temperature. For instance, 60% relative humidity at 30°C/86°F means the air holds more water vapor than it would at 60% relative humidity at 15°C/59°F, as warmer air can retain more moisture.
If you weigh a newly purchased package of flour and notice that it contains less or more than what is specified on the package, this is the reason behind it; Flour that has lost moisture to the air will inevitably weigh less, and vice versa, so rest assured – the flour mill is not trying to shortchange or favor you.
Under normal circumstances and storage conditions, the moisture content in flour will not fall below 10.5% or exceed 14%.
So, what should we do with this information? Nothing, really.
In theory, a flour that has lost moisture to the air will be able to absorb slightly more water compared to flour that is fresh from the mill; On the other hand, if a flour has absorbed moisture from the air, it will be able to absorb less water.
With that being said, the difference in actual water absorption will be small. Therefore, there is no need to dwell on this or consider the relative humidity in the air when making dough.
I felt the need to address this matter because it is not uncommon to see people suggesting that “hydration should be adjusted depending on the time of year (season/weather)” – so, no, this is neither necessary, nor justified.
To Sift or Not to Sift? The Reality of “Aeration”
Unless you want to ensure that there are no non-flour materials (such as insects, sand etc.) due to kosher or other considerations, there is no need to sift flour. Sifting will not increase the flour’s water absorption (or speed up the process), and other than removing non-flour materials, it is entirely unnecessary.
*The only exception is when baking cakes – sifting the flour ensures that no large lumps will form in the batter, which would be difficult or even impossible to break down later on and could affect the texture of the cake.
Best Practices for Maintaining Flour Freshness and Stability
Flour should be stored covered and sealed, in a cool and dry environment.
All types of flour have a limited shelf life. In most cases, flour manufacturers recommend not storing flour for more than six months to a year. The primary process that occurs in flour stored for an extended period is the oxidation of its natural fat due to exposure to air, which can result in a rancid taste and unpleasant aftertastes resembling cardboard.
Wholemeal flours typically oxidize faster due to their higher fat content from the bran and germ. However, even the small amount of fat found in white flour (about 1%) will eventually oxidize and turn rancid. This does not necessarily make the flour dangerous or unfit for use and consumption and mostly affects the taste and aroma of the flour, however, it is advisable to avoid this situation by storing the flour properly.
Additionally, flour is hygroscopic and absorbs moisture from the air; Therefore, it is important to store flour in a dry place to prevent it from absorbing moisture. Moisture absorption can lead to the formation of lumps in the flour, a decrease in its ability to absorb water, and potential problems such as attracting insects, pests, and the formation of fungi and mold.
Storing flour in the refrigerator or freezer is a great and advisable practice, especially for flour that won’t be used for a while. However, it’s important to note that cold flour takes longer to absorb water, which will also delay gluten development during kneading. If you store flour in the freezer, keep in mind that it will take a relatively long time for it to thaw completely, so it’s advisable to move it to take it out of the freezer at least a day before using it.
Key Takeaways: Handling, Blending, and Storage
- Boosting Strength with VWG:
Vital Wheat Gluten (VWG) is a powerful tool for strengthening weak flours. Adding 1% VWG increases total protein by 0.6%. Always mix VWG into the dry flour first to prevent rubbery lumps. - The Case Against Blending:
While you can blend flours to adjust protein or flavor, it is rarely necessary. Mastering one consistent flour is usually more effective than creating complex, multi-flour mixtures that complicate your process and logistics. - Humidity vs. Hydration:
While flour absorbs or releases moisture based on air humidity, the impact on dough is minimal. There’s generally no need to adjust your hydration based on the season or weather – the differences are too small. - Sifting is Futile:
For pizza dough, sifting is unnecessary unless you are concerned about debris or pests. Unlike cake batter, the vigorous kneading process for pizza naturally breaks down any flour lumps. - Oxidation and Shelf Life:
Flour is a perishable product. White flour lasts 6–12 months, while wholemeal flours spoil faster due to the oils in the bran and germ. Rancid flour will have a bitter, cardboard-like taste. - Optimal Storage:
Store flour in a cool, dry, and airtight container. While the fridge or freezer can extend shelf life, note that cold flour absorbs water more slowly, which can delay gluten development during kneading.
Summary: How to Choose the Right Flour for Your Needs
To begin with, “pizza flour” is any flour that meets the functional criteria described earlier – regardless of whether it’s officially marketed or labeled as such.
A flour suitable for pizza-making should have good gluten quantity and quality, along with a well-balanced ratio of extensibility to elasticity. This allows the dough to be easy to work with – not too slack, not too tight, and results in a defined, airy internal structure with good volume.
The specific flour characteristics you need depend on the type of pizza you’re making, your desired outcome, and your dough-making process. Many flours, whether marketed as “premium” or “budget,” can meet your needs. The only way to find the “best” flour for your specific process, pizza style, and personal preferences – is through experimentation.
There is no universally “best” flour. Some flours will perform better or worse under certain conditions, and those conditions vary between individuals, techniques, and recipes. You might find that a particular bread or pizza flour works best for you, or that a generic, unbranded, “all-purpose” flour does the job just as well. In this context, price is not a reliable indicator of quality or suitability.
Likewise, someone else’s recommendation for flour X may not apply to you. How the flour is used makes all the difference, and the only way to understand how a flour behaves is to test it in your own process.
Finally, while flour choice is important, proper fermentation is equally – if not more – critical to producing great results. Using a “premium” or “professional” flour won’t magically improve your pizza, just as a football player won’t play better simply by wearing expensive shoes.
Flour can help you reach specific goals, and some flours might serve as helpful “training wheels” for less experienced bakers. But ultimately, flour is just the canvas – the real impact comes from the baker’s knowledge, technique, and experience.
Key Takeaways
- The “Pizza Flour” Label is Marketing:
There is no legal or technical standard for “pizza flour.” Suitability is determined by the flour’s properties, not the label. High-quality bread flours often outperform many flours branded specifically “for pizza”. - Flour is Naturally Flavor-Neutral:
Most pizza flours are “white flours” made from the endosperm, which is essentially flavorless. The complex aromas of a great crust are byproducts of fermentation, not the brand of flour. If your crust is bland, the solution is usually better dough management, not a more expensive bag of flour. - Protein (Gluten): Quantity vs. Quality:
While protein percentage (quantity) is a useful starting point, protein quality is what dictates how the flour performs. Two flours with 12% protein can perform completely differently based on their gluten quality. - Strength vs. Fermentation Duration:
A flour’s strength must be matched to your fermentation timeline. Stronger flours (higher protein/W rating) have the structural “stamina” to withstand longer fermentation without the gluten network degrading. Using a weak flour for a long ferment can lead to a sticky, slack dough that won’t hold air or spring in the oven; Conversely, using a strong flour for a short fermentation can lead to an overly elastic dough that resists stretching and produces a dense, tight crumb. - Protein Content:
Protein % is the primary driver of water absorption and final texture. Higher protein levels (13%+) typically allow for higher hydration and create a strong, elastic gluten network, resulting in a chewier, “bread-like” crumb with significant oven spring. Conversely, lower protein flours typically yield a less resistant dough and a more tender crust that is easier to bite through, but lacks the structural stamina for long, high-hydration fermentations. - Matching Flour to Oven Temperature:
This is a critical selection factor. Flours with low enzymatic activity (“unmalted”) are designed for high-heat ovens (350°C / 660°F +) to prevent burning. For home ovens (lower heat), flours with higher enzymatic activity (“malted”) are essential for proper browning. - The W Rating is a Strength Index:
Common in Italy, the W rating measures the energy required to break the dough’s structure. It is a technical indicator for how long a flour can ferment without collapsing. - The “00” Myth:
The “00” classification refers only to the refinement (ash content), not the strength of the flour. A “00” flour can be very weak (cake/pastry flour) or very strong (bread/pizza flour). Never choose a flour based solely on the “00” stamp. - Blending Flours:
Don’t blend just for the sake of it – it is usually unnecessary. However, if your favorite flour lacks strength for a long ferment, or you want to “dilute” a very elastic flour to make it more extensible, blending gives you the technical control to create your own “ideal” flour blend.
Enjoyed this article? Join the BLAB
Unlock the Key Takeaways above and enjoy a 100% clean, ad-free experience across the entire site.

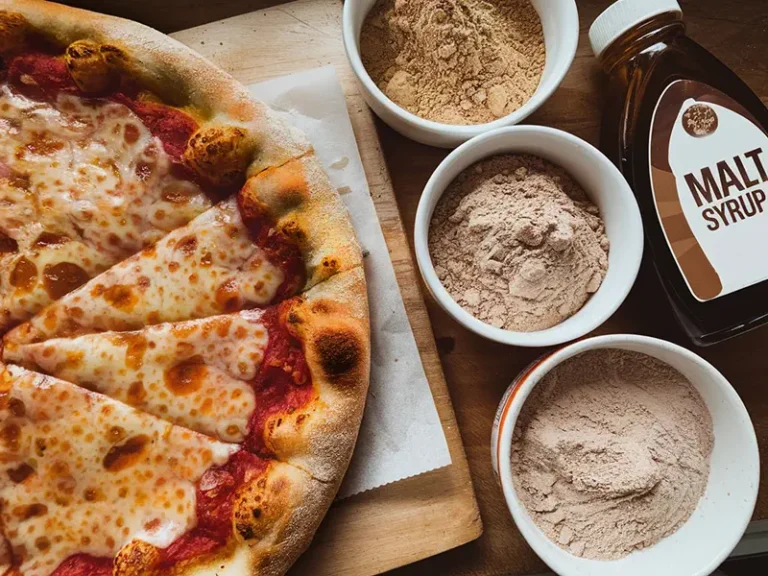

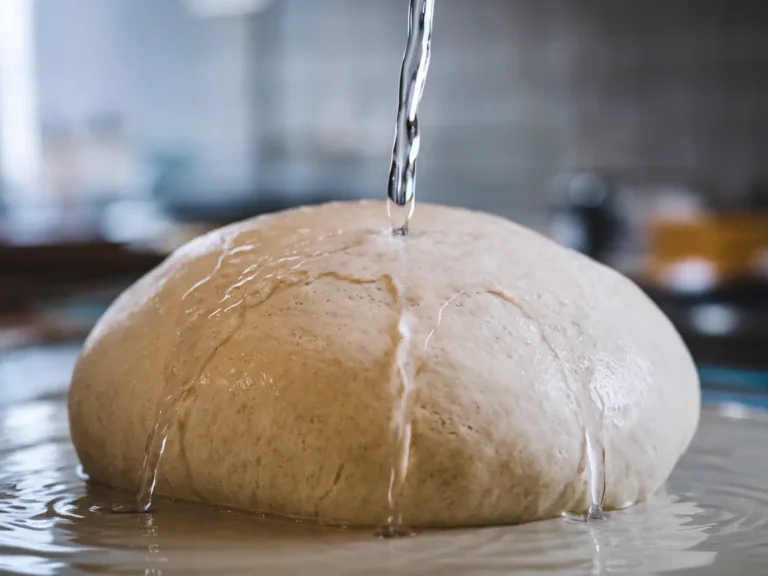
I wonder if enhanced amylase activity contributes to the “shelf life” of baked pizza due to the fact that it breaks down more starch, so less starch remains to crystallize upon cooling.
Hi Arie,
Adding α-amylase to the dough (via diastatic malt powder) does indeed increase starch breakdown, especially during baking, and slows down starch retrogradation and staling! Actually, I’m writing an article on this very topic right now, hopefully it would be published in the next few days 🙂
Hello Yuval. I would like to make sure that I understand the table and the recommendations for the proofing times correctly. I understand that the W parameter has no significant effect on the dough’s proofing time (the calculator calculates the amount of yeast for caputi pizzeria and manitoba in the same way). At the same time, to obtain the appropriate dough extensibility parameters, it is better to calculate the fermentation time according to the W index. For example, if I have pizza flour with a W of ~270, I should plan in the calculator for +/- 12 hours at room temperature. If I have caputi manitoba flour with a W of ~370, I should plan in the calculator for +/- 48 hours at room temperature. Or did I misunderstand something?
Hi Karol,
You understood it correctly 🙂
The stronger the flour (i.e. the higher its W rating), the more fermentation it can tolerate, or the more ‘resistant’ it is to over-fermentation. Additionally (and broadly speaking, assuming all else is equal and no dough conditioners are used), stronger flours generally require more fermentation time to reach the same level of extensibility (for example, a 14% protein flour will need more fermentation to reach a given level of extensibility than a 10% protein flour).
Thank you for your reply and confirmation. In this regard, I have two thoughts. Correct me if I am wrong.
The added value of strong flour is the possibility of longer fermentation, it allows for the production of more acids, which are responsible for the taste, before the dough is fermented and the gluten structure breaks down. This is certainly a great added value when making direct dough.
However, I am a fan of poolish. When I make poolish, after 24-28 hours at room temperature the pH level drops from 6.0 to 5.4-5.5. In the second step, when I make a dough with poolish ~15%, the pH level of the dough drops much faster than in the case of direct dough and I am rarely able to exceed 12-16 hours, because otherwise the pH drops < 4.5 and the aroma and taste resembles sourdough too much. Does this mean that when making a dough for poolish it is better to use weaker flour? Because if I use a stronger one (e.g. Manitoba), poolish won't allow for the full maturation time of the strong flour, which requires at least 36 hours of maturation?
1. That is correct
2. Not necessarily. Many factors affect dough extensibility, which I cover in detail in the dedicated article on elasticity and extensibility. Also, keep in mind that the goal isn’t to “exhaust” the flour as much as possible. Even with a direct dough, a 10–12 hour room temperature fermentation will yield plenty of flavor, especially so when using a poolish. (For what it’s worth, 24–48 hours is quite excessive for a poolish.)
In this context, a weaker flour may actually be more appropriate for shorter fermentations than a stronger one, particularly in terms of maturation and workability (e.g. extensibility). That said, many other factors play a role as well: dough formula, mixing method, fermentation temperature, flour type (dough conditioners), etc.
Regarding your comment that a poolish “won’t allow for full maturation” – can you clarify what you mean by that? The poolish itself is already fully fermented, and as such, a portion of your final dough (equal to the percentage of poolish used) is already “matured.”
Lastly, no flour requires 36 hours of room temperature fermentation to “mature”. If yeast quantity is adjusted appropriately, stronger flours might need more time to reach “full” maturation/maturation (which is partially subjective) compared to weaker flours, but we’re usually talking about a difference of a few hours (e.g. 4 vs. 6–8 hours), not 10+ hours. Again, this is a broad generalization and depends heavily on your overall process.
1) 24-48 is indeed a long time for a standard poolish. However, I add <0.02% yeast, so I can safely extend the entire process. The goal is to give as much time LAB to develop. In the end, it's the dough's rise matters most (pick moment), not the planned time, and for me, that happens in over 24 hours.
2) I'm proposing a case study based on your calculator for 6 balls 272g, 60% hydro, 3% salt, RT 20°C, 22 hours.
Case 1) For a direct dough, I need to add 1g (0.1%) of fresh yeast.
Case 2) If I use 30% poolish, your calculator still shows 1g (0.1%) of fresh yeast. There's probably an error here, as the 0.1% should be multiplied by the remaining flour, not all of it, and the result should be 0.7g.
Assuming there's no error in the calculator, your article about poolish indicates that an additional 0.7g of yeast should be added.
In my opinion, this isn't entirely accurate. The yeast in the poolish was at its peak activity stage and had already multiplied significantly during the fermentation of the poolish. This means that an additional 0.7g of yeast will cause the actual fermentation time (rise) to be quicker, and the there will be not enough time to break down the starch, making the pizza less easy to digest.
In my opinion, if we have an extra 700g of flour with 30% poolish, we should add less than 0.7g of yeast in our scenario. Maybe half that or even less.
And I could even assume a thesis that with 30% good-made poolish, additional yeast will not be needed at all 🙂
Hi Karol,
As stated on the calculator’s page, the calculator does not account for the amount of yeast in the preferment. To learn how to properly use the calculator when working with a preferment, see The Complete Guide to Preferment in Pizza Dough, section ‘Calculating Yeast Amount for a Preferment’.
As a side note, fermentation has little to no impact on “digestibility.” The vast majority of starch breakdown in dough actually occurs during baking, not during fermentation. The amount of starch broken down during fermentation is negligible in comparison. There are many factors that affect how ‘digestible’ a pizza is, but fermentation isn’t one of them. The same goes for preferments: using a preferment does not make a dough more digestible or ‘easier’ to digest. I have a detailed article on this topic that I hope to publish soon.