Sicilian Style Pizza Recipe: How to Make an Authentic NY Square Pizza
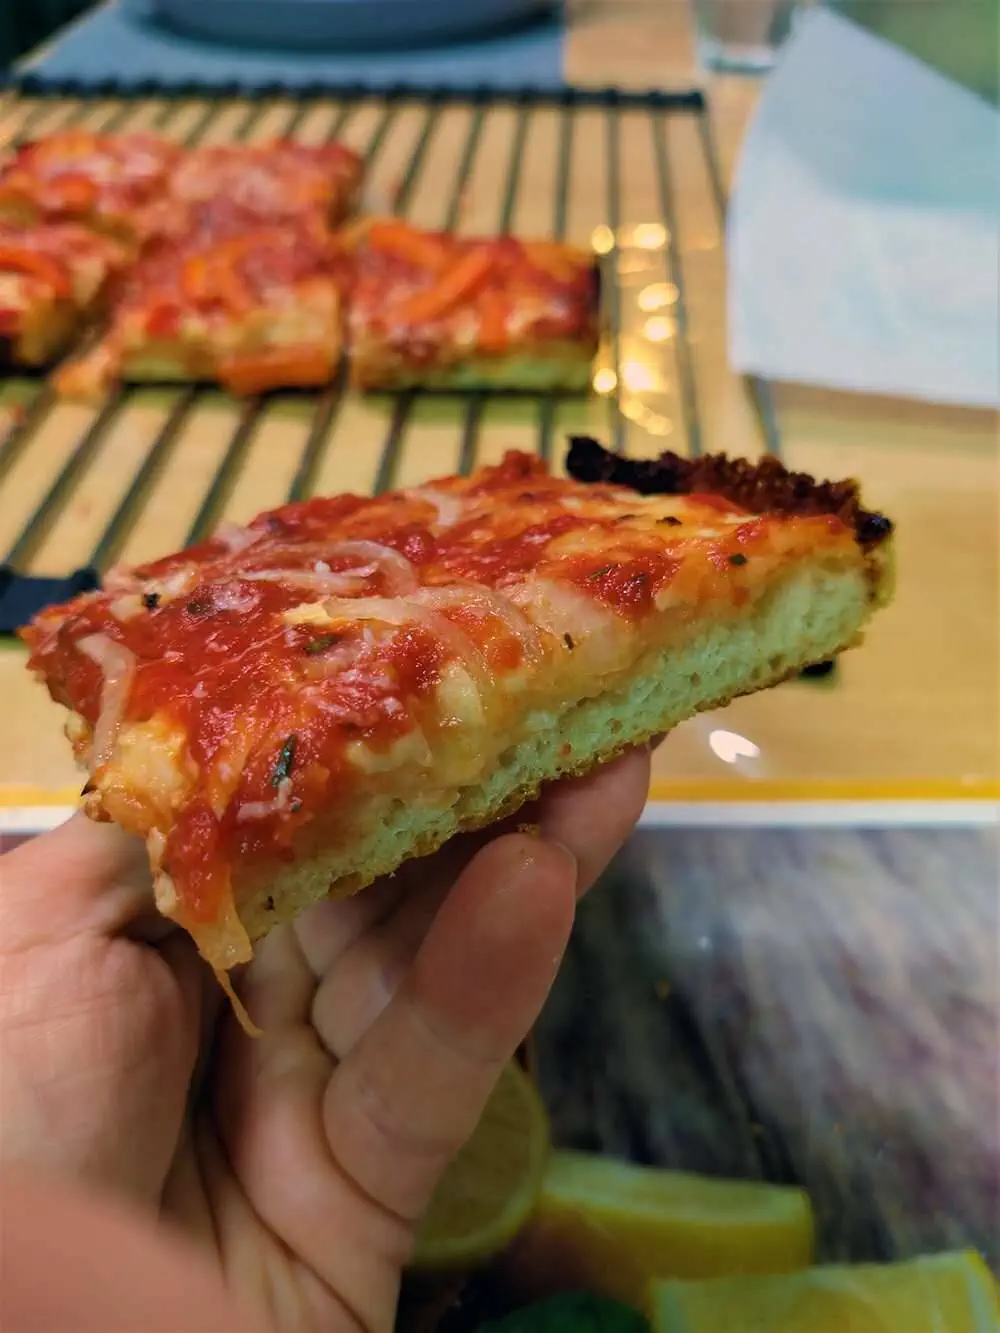
If you’re craving a pizza that’s square, thick, comforting, and satisfying, Sicilian pizza is the answer. With its soft, tender interior and crispy bottom, this pizza is perfect for loading with toppings and surprisingly easy to make. Once you try making Sicilian pizza at home, it’s sure to become a favorite in your pizza rotation
Despite its name, Sicilian pizza is entirely American. Its origins trace back to New York, not Sicily, making it one of the most iconic and beloved American pizzas alongside New York style pizza.
In the U.S., Sicilian pizzas are often called “square pies” or “square pizzas” (yes, “pie” is a common term for pizza in the U.S.), with individual slices referred to as “squares”.
Much like New York pizza, Sicilian pizza is commonly sold by the slice. Any pizza lover visiting New York should try it at least once – and preferably at more than one pizzeria.
Sicilian pizza is baked in a pan, relatively easy to make, and offers a perfect contrast between a tender interior and a crispy exterior. This recipe will guide you in recreating an authentic Sicilian pizza at home.
Note: The preparation instructions in the recipe below are intentionally kept general and concise. Pizza making is a process, and the final result depends far more on using the correct technique and following the right process than on any single recipe. That said, this recipe will still guide you to excellent results – even on your first attempt.
For simplicity, the recipe assumes a default fermentation time of 4 hours. Using the dough calculator provided below, you can adjust the recipe for any fermentation time or method (room temperature or cold fermentation).
All measurements are in grams, so a kitchen scale is essential. Baking by eye or using volumetric measurements is not recommended.
Equipment Needed
Sicilian pizza doesn’t require much special equipment, but one essential item is a baking/sheet pan – ideally, a dedicated Sicilian pizza pan. For the best results, I highly recommend using a Lloyd’s pizza pan (purchase links available on PizzaBlab’s recommended pizza equipment page).
If you don’t have a Sicilian pizza pan, you can use any rectangular pan (including a Detroit style pizza pan which works great). It’s best to use a dark or black pan rather than a light-colored one.
Make sure to set the pan size in the calculator below to determine the correct dough amount.
Making the Dough for Sicilian Pizza
Dough Ingredients and Quantities (Pizza Dough Calculator)
Below is PizzaBlab’s pizza dough calculator, featuring a preset recipe formula and quantities for a 9×13″ (20x30cm) pan, designed for a 4-hour fermentation at 20°C/68°F.
It is highly recommended (and even mandatory) to:
- Adjust fermentation duration and temperature: Tailor these to your preferences so the calculator can provide the correct yeast quantity for your dough. This is crucial for achieving ideal fermentation. You can select any fermentation time and method (room temperature or cold fermentation), ranging from 2 hours to long fermentation.
- Modify the pan size: Set the dimensions according to the pan you’re using to ensure the correct amount of dough.
You can also personalize the recipe by adjusting the dough hydration (recommended between 58% and 70%), the amounts of salt, sugar, and oil, the number of pizzas, or adding a preferment.
The thickness factor (TF) is a number that measures the amount of dough needed for a specific pizza size (it does NOT represent the final thickness of the pizza). Click here to learn more about the thickness factor and how to use it.
For Sicilian pizza, the default thickness factor is 0.14, which yields a classic thickness similar to what you’d find in New York. If you prefer a thicker or thinner pizza, you can adjust the factor accordingly: use 0.16 for a thicker pizza and 0.12 for a thinner one. You can also select any value in between, such as 0.13 or 0.15.
It’s best not to exceed the above range, as doing so may result in a pizza that is either too thick or too thin.
The calculator is based on baker’s percentages. If you are not familiar with this concept, I highly recommend reading about it in the Encyclopizza, as it’s a crucial yet simple concept that will greatly enhance your baking skills.
For further details on using the calculator, you can also refer to the guide on using PizzaBlab’s dough calculator.
| Ingredient | Grams | Tsp | Tbsp |
|---|---|---|---|
| Flour (100%) | 0 | 0 | 0 |
| Water | 0 | 0 | 0 |
| Salt | 0 | 0 | 0 |
| Yeast | 0 | 0 | 0 |
| Total Dough Weight | 0 | 0 | 0 |
| Single Ball | 0 | 0 | 0 |
| Total Flour and Water (including preferment) | Grams | Tsp | Tbsp |
|---|---|---|---|
| Flour | 0 | 0 | 0 |
| Water | 0 | 0 | 0 |
| Yeast | 0 | 0 | 0 |
| Preferment | Grams | Tsp | Tbsp |
|---|---|---|---|
| Flour in Preferment | 0 | 0 | 0 |
| Water in Preferment | 0 | 0 | 0 |
| Final Dough | Grams | Tsp | Tbsp |
|---|---|---|---|
| Flour (remaining) | 0 | 0 | 0 |
| Water (remaining) | 0 | 0 | 0 |
| Salt | 0 | 0 | 0 |
| Yeast | 0 | 0 | 0 |
| Total Dough Weight | 0 | 0 | 0 |
| Single Ball | 0 | 0 | 0 |
Flour for Sicilian Pizza Dough
Any bread flour or pizza flour will work, and even all-purpose flour may be suitable. However, for the best results, it’s recommended to use flour with a high protein content, ideally 11% and higher.
For further reading on selecting pizza flour, refer to the following article: The Ultimate Guide to Pizza Flour: Characteristics, Differences, and Choosing the Ideal Flour.
Sugar and Oil in Sicilian Pizza Dough
Sugar is included to promote browning. While it can be left out, it is not recommended to do so.
Oil is an optional ingredient. Oil is added to the recipe to create a softer, more tender crumb. Any type of oil can be used (EVOO, canola, sunflower etc.).
Mixing & Kneading the Dough
1. Prepare Ingredients: Prepare all the ingredients according to the quantities listed in the calculator.
2. Mix Water, Salt and Sugar: Start by adding the water to a bowl, followed by the salt and sugar. Mix them together until most of the salt and sugar dissolves.
If your recipe includes oil, it’s best to add it only after the flour has fully absorbed the water, as oil can inhibit gluten development. However, it is also possible to add it to the water.
3. Add Flour and Yeast: Add the flour to the bowl and sprinkle the yeast over it. Alternatively, you can dissolve the yeast directly in the water and mix well, which helps distribute it evenly throughout the dough, especially when kneading by hand. It’s ok to add the yeast directly with the salt-water mixture.
If you’re using dry yeast and cold water (below 20°C/70°F), it’s recommended to suspend the yeast in warm water (about 40°C/105°F) for about 10 minutes before adding it to the cold water. Adding dry yeast directly to cold water can damage the yeast cells and impair their ability to ferment the dough.
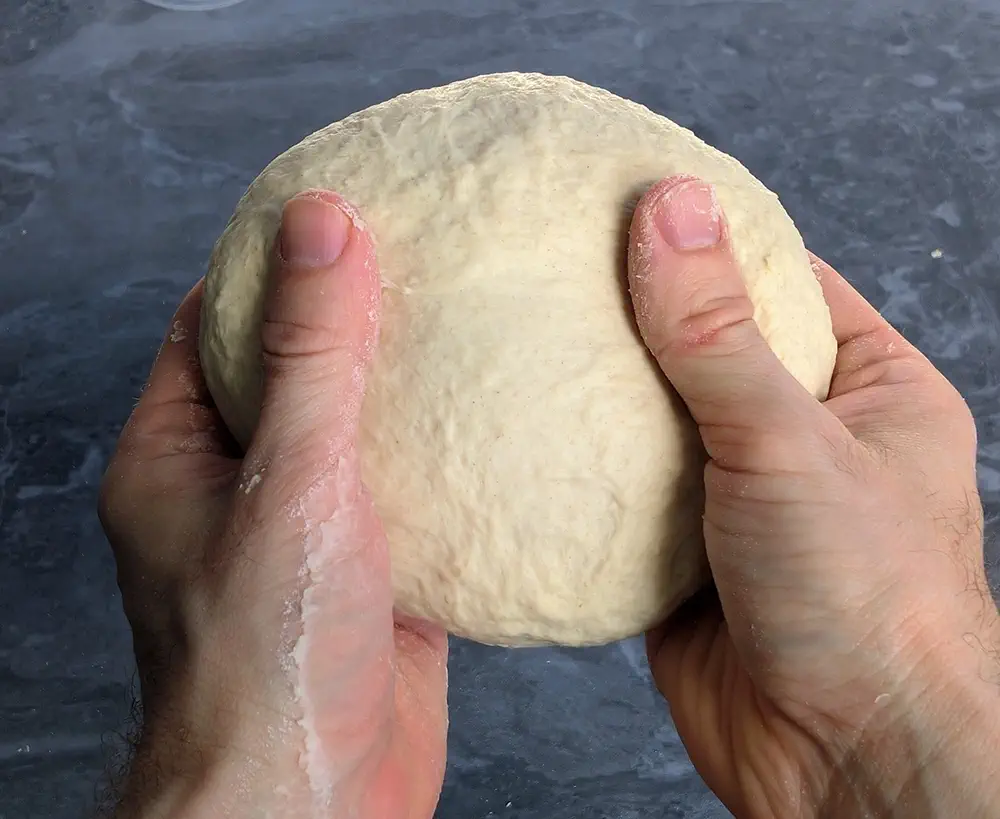
4. Knead the Dough: Begin kneading the dough. If you plan to ferment it for a short period (up to 3-4 hours), aim to full gluten development by the end of the kneading process (i.e., pass the windowpane test).
The longer the fermentation duration, the less kneading is required. For dough to be fermented for more than 4 hours at room temperature or cold fermented for over 24 hours, knead just until the dough becomes uniform and coherent, with a “creamy” texture (see picture below).
- If kneading by hand (recommended), mix all the dough ingredients in a bowl until the flour absorbs most of the water. Transfer the dough to a work surface and knead for approximately 5 minutes.
- If using a stand mixer, mix all the dough ingredients and run the mixer on the lowest speed (1) for 1-2 minutes, or until the water is absorbed. Then, increase to speed 2 (do not go higher!) and continue kneading for around 10 minutes. Monitor the condition of the dough; it should be relatively smooth and uniform when ready.
- If using a spiral mixer, follow the same process as with the stand mixer, kneading for about 5-10 minutes at low speed, depending on the mixer and the dough amount.
5. Final Dough Temperature: It’s recommended to aim for a final dough temperature of 23-27°C/73-80°F. This is regardless of the kneading method used.
7. Stretch and Folds: After kneading, you can do 1-2 series of stretch and folds. Be sure to wait at least 15 minutes after the initial kneading before beginning the first series to allow the gluten to ‘relax’.
8. Bulk Fermentation: Let the dough ferment for about 50% of the total fermentation time. For example, if the total fermentation duration is 6 hours, ferment the dough in bulk for 3 hours. After 3 hours, stretch the dough in the pan for final proofing (see the next section).
Stretching the Dough in the Pan and Final Proofing
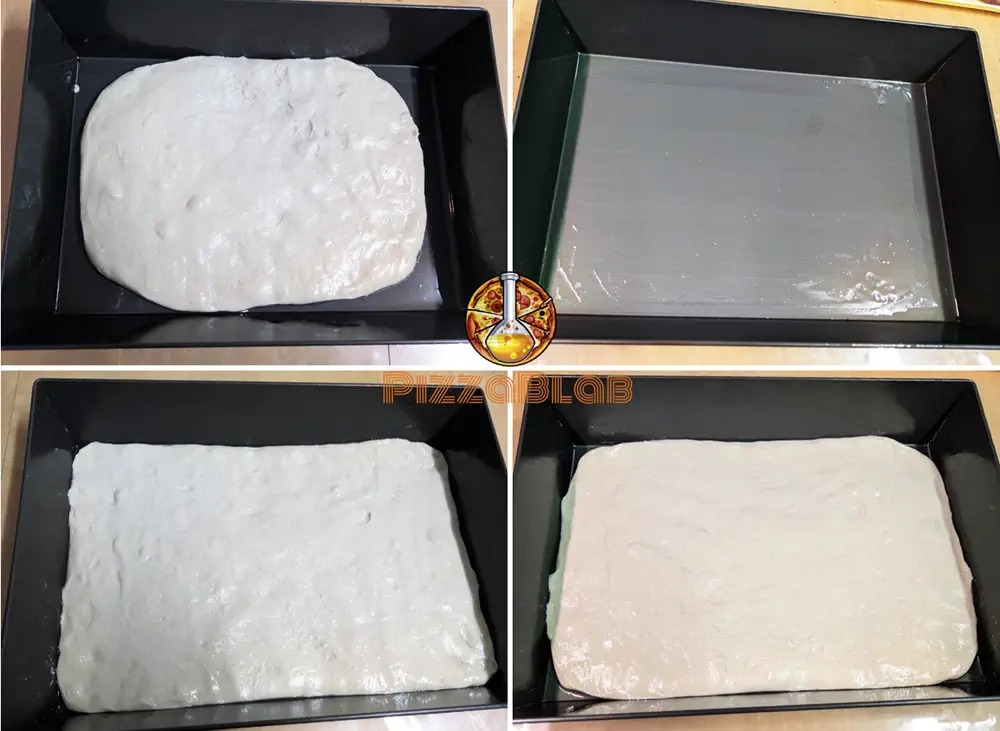
1. Oil the Pan: Apply a thin layer of oil to the entire pan, including the sides. Any oil will work, but canola oil is recommended. This will help “fry” the bottom of the pizza and prevent it from sticking to the pan.
2. Transfer the Dough: Place the dough in the center of the pan. Wet your hands with water or apply a bit of oil to them. Use the palms of your hands to flatten the dough, ensuring it reaches most of the pan’s area as evenly as possible.
3. Stretch the Dough: Initially, the dough may resist and not stretch to cover the entire pan. To properly cover the surface, you will need to stretch the dough two or three times, allowing for a rest in between.
Keep in mind that right after kneading, the dough will be very elastic and resistant. You will need to stretch it inside the pan two or three times, allowing for a wait of about 20 minutes between each stretch. This resting period helps the gluten “relax,” making it easier to stretch the dough to cover the entire pan.
4. Repeat Until Covered: Continue stretching the dough until it covers the entire surface of the pan. Ensure the dough is distributed as evenly as possible without creating thin or thick spots – this is key to achieving a uniform thickness for the crust.
5. Final Proofing: Once the dough covers the entire pan, allow it to proof until baking. Cover the pan to prevent the surface of the dough from forming a dry crust. You can use a towel, plastic wrap, a plastic bag, or any covering that will keep air from reaching the dough – just ensure it doesn’t directly touch the dough.
Pre-Baking Preparations
Ingredients and Quantities
The amounts of sauce and cheese provided below are for a standard Sicilian pizza in a 20×30 cm / 9×13″ pan. If you wish to adjust the quantities of cheese and sauce based on your preferences or different pizza/pan sizes, you can use PizzaBlab’s cheese and sauce calculator.
- 200 grams of crushed tomatoes
- 250 grams of semi-hard cheese (see the following section)
- Parmesan or pecorino cheese (optional)
Cheese for Sicilian Pizza
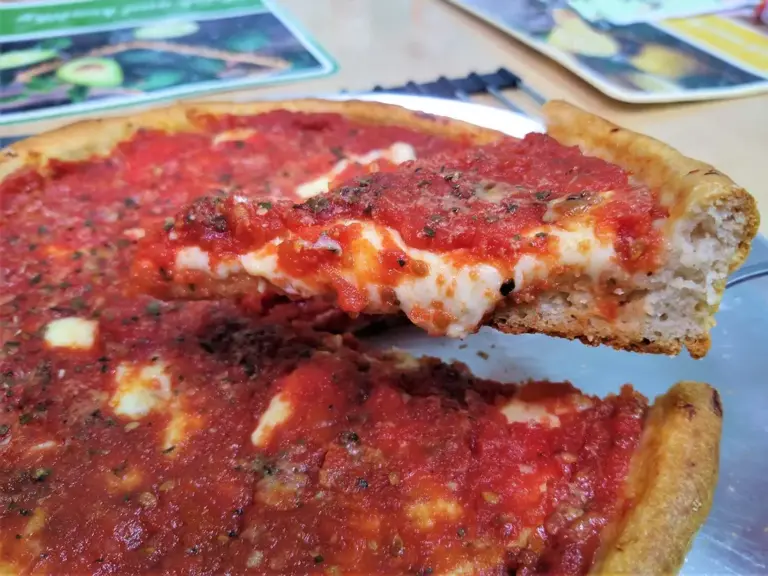
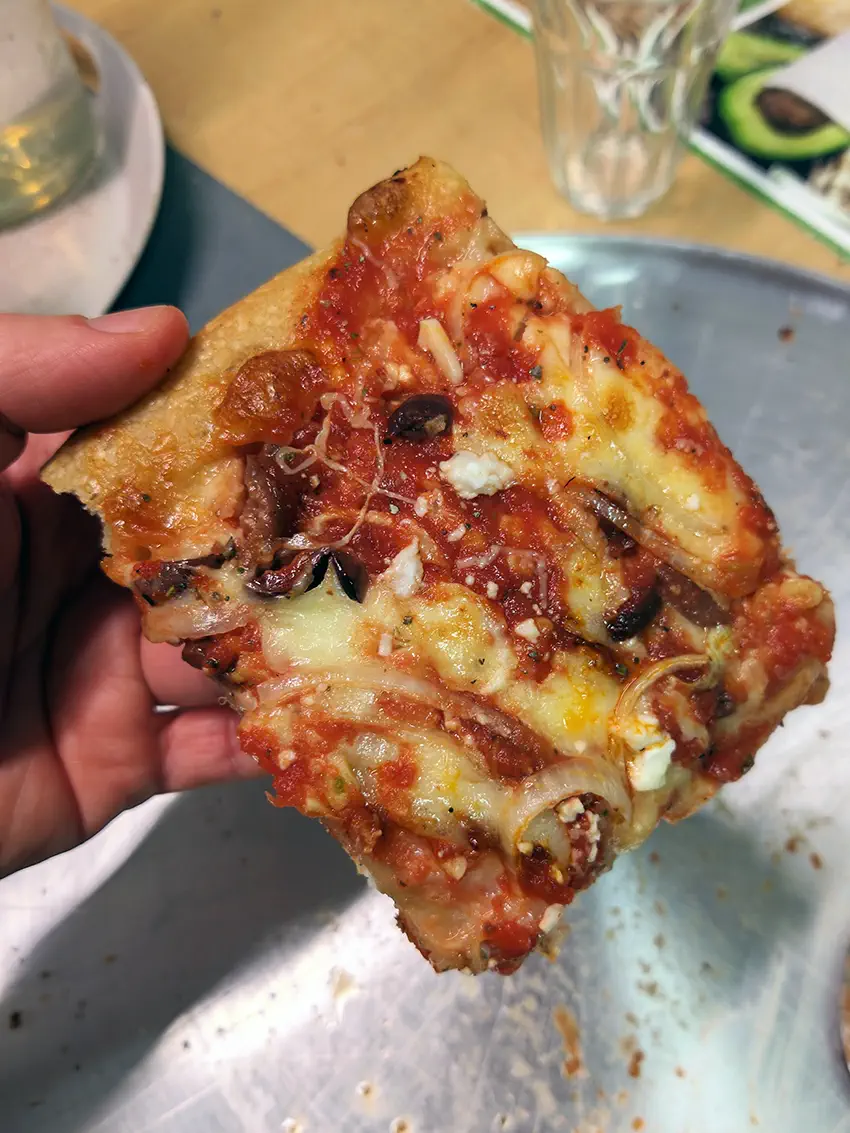
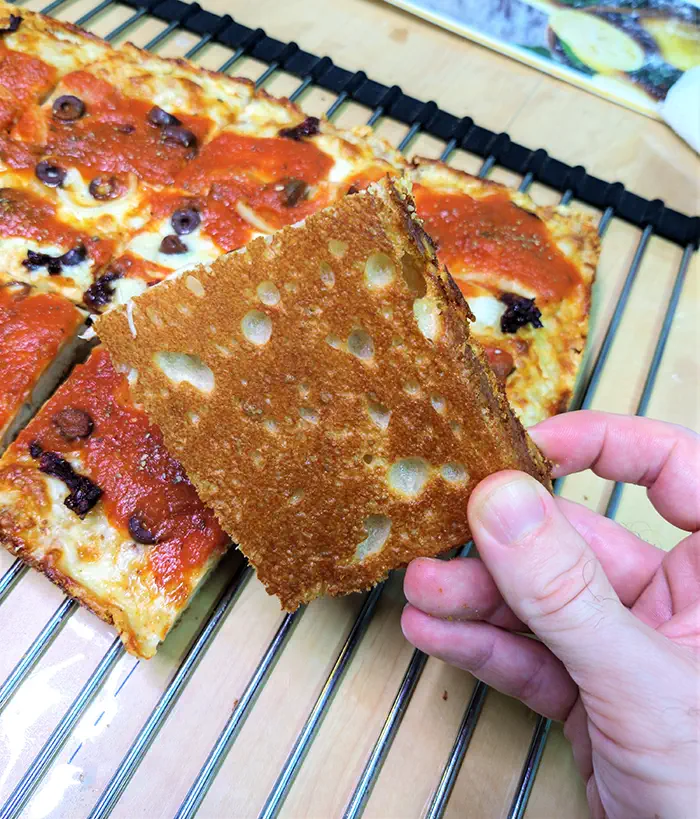
Much like NY style pizza, the best cheese for Sicilian is shredded whole milk (22-26% fat), low-moisture (“block”) mozzarella.
You can also use sliced mozzarella or cut it into strips or cubes, though this will create a different texture that may be better or worse, depending on your preferences.
I don’t recommend using fresh mozzarella as the main cheese, as it doesn’t suit this style of pizza as well. However, you can add fresh mozzarella alongside low-moisture mozzarella if desired.
Since mozzarella has a mild flavor, feel free to replace some of it with any semi-hard cheese of your choice, such as Gouda, Emmental, Provolone, or Cheddar. The same considerations about the form of the cheese – grated, cubed, or sliced – apply to these other cheeses.
Additionally, it is highly recommended to grate hard cheeses like Parmesan or Pecorino over the pizza, either before or after baking, as they add significant flavor.
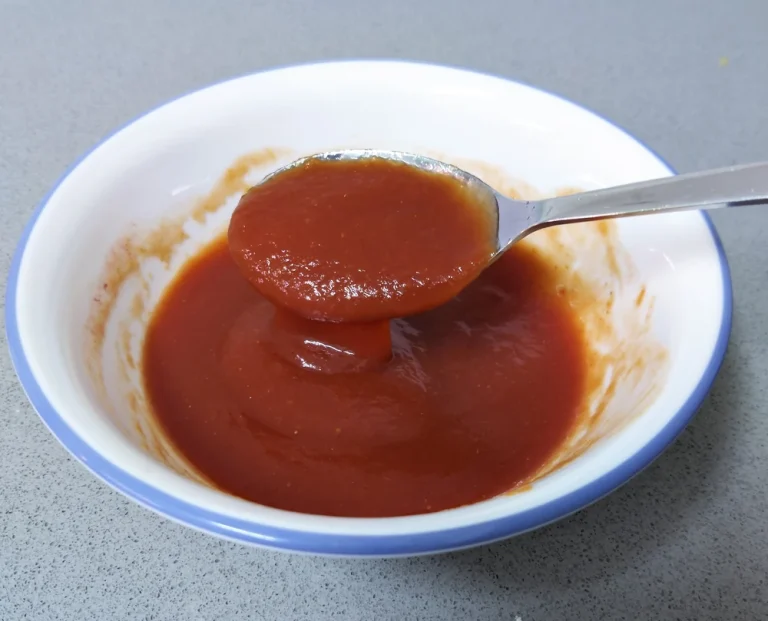
Sauce for Sicilian Pizza
To make the sauce, simply mix crushed tomatoes with oregano and salt, adjusting the seasoning to your taste. For added flavor, consider including 1 tsp of olive oil, one minced garlic clove (or a dash of garlic powder), and a touch of sugar if you find the sauce lacks sweetness.
You can run the tomatoes through a food mill (recommended) or use a (stick) blender to achieve a smoother texture.
You can also adjust the consistency of the sauce by thinning it with a bit of water or thickening it with tomato paste. Alternatively, you can use a mesh strainer to remove any excess water (also thickening it).
That’s it – the sauce is now ready. There’s no need to cook it.
Baking the Pizza
For a comprehensive guide to baking pizza in a home oven – including methods, practical tips, and techniques – check out this article (recommended): How to Bake Pizza in a Home Oven: Everything You Need to Know [A Practical Guide].
General Baking Instructions
First, preheat your oven to 270°C/520°F or to the highest temperature your oven can reach, using the upper and lower heating elements without convection.
If you have a baking surface like a stone or steel, it’s best to preheat it with the oven and bake the pizza directly on it (place the pan on the baking surface). If you don’t have one, you can place the pan on the oven’s grid or shelf, preferably on the middle or bottom shelf (see note below).
There are two methods for baking a Sicilian pizza:
- Direct Baking: The dough is baked ‘regularly’ with the cheese, sauce, and toppings in one single bake.
- Par-Baking: The dough is initially baked “naked,” without any cheese, sauce, or toppings. The cheese, sauce, and toppings are added about halfway through baking, or after the dough has risen sufficiently but before it begins to brown. This is the ‘old-school- method for baking Sicilian pizza.
The key difference between these methods is that direct baking will result in less volume due to the weight of the cheese and toppings pressing down on the dough.
In contrast, par-baking maximizes oven spring and dough volume and allows for better control over the browning of the cheese and toppings. For example, if the cheese is browning too quickly, you can add it a little later, and vice versa.
If you prefer a crust with more volume and a lighter, fluffier texture, I recommend going for par-baking.
In both methods, the total baking time should be between 10-15 minutes, depending on your oven.
The goal is for both the dough and cheese to reach their ideal doneness at the same time. The exact baking time will depend on your specific oven.
If the cheese is baking too slowly or too quickly, try experimenting with different settings, such as par-baking, adjusting the top or bottom heat, or moving the pizza to a different oven rack. While the instructions below should work well, you may need to make adjustments based on your specific setup.
If you choose to par-bake, here are several tips to maximize oven spring:
– Spray a little water on top of the dough.
– Spread a diluted sauce on the dough.
– Create steam in the oven by spraying water inside after placing the dough, or use any other method to introduce steam into the oven.
The purpose of this approach is to introduce moisture into the oven chamber (or directly onto the dough), similar to bread baking. This moisture helps delay crust formation and allows for more oven spring, resulting in a lighter and fluffier texture.
While this step is not mandatory, and excellent results can still be achieved without it, it can significantly improve texture.
Baking Instructions (Step-By-Step)
Direct Baking
1. Preheat the Oven: Ensure the oven is properly preheated.
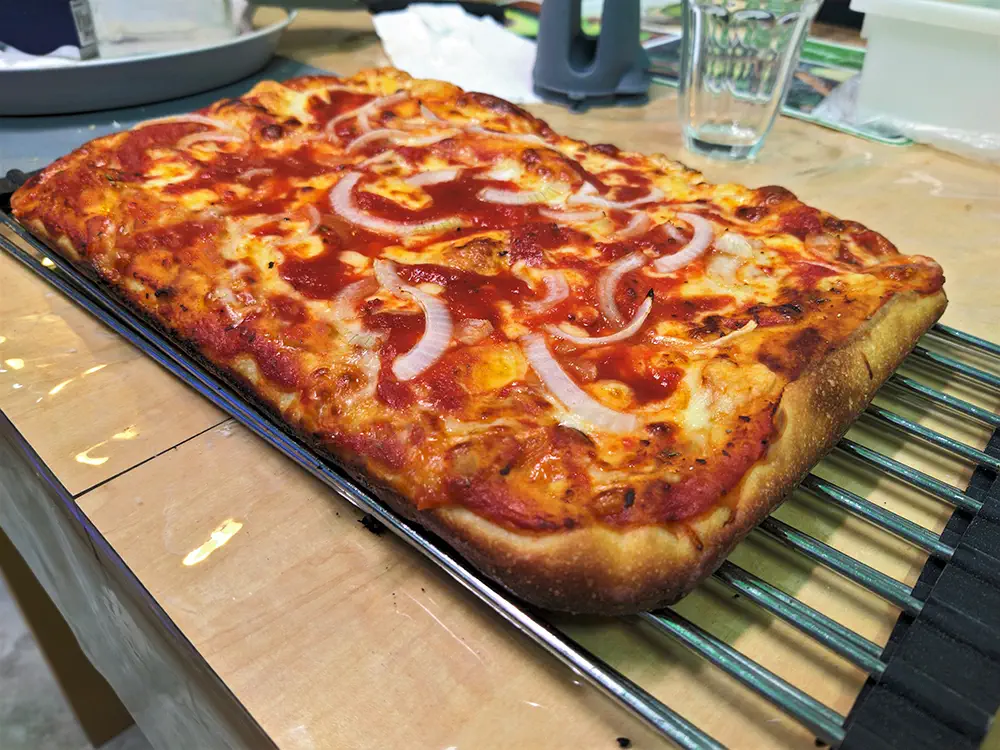
2. Add the Sauce, Cheese, and Toppings. You can also make an “upside-down” Sicilian by adding the sauce on top of the cheese.
3. Bake: Place the pizza in the oven and bake until the cheese and dough reach your desired level of doneness (between 10-15 minutes).
It’s recommended to check the pizza every minute or two during the last 5 minutes.
Par-Baking (Recommended)
1. Preheat the Oven: Ensure the oven is properly preheated.
2. Par-Baking (First Bake): Bake the dough “naked,” without any cheese, sauce, or toppings.
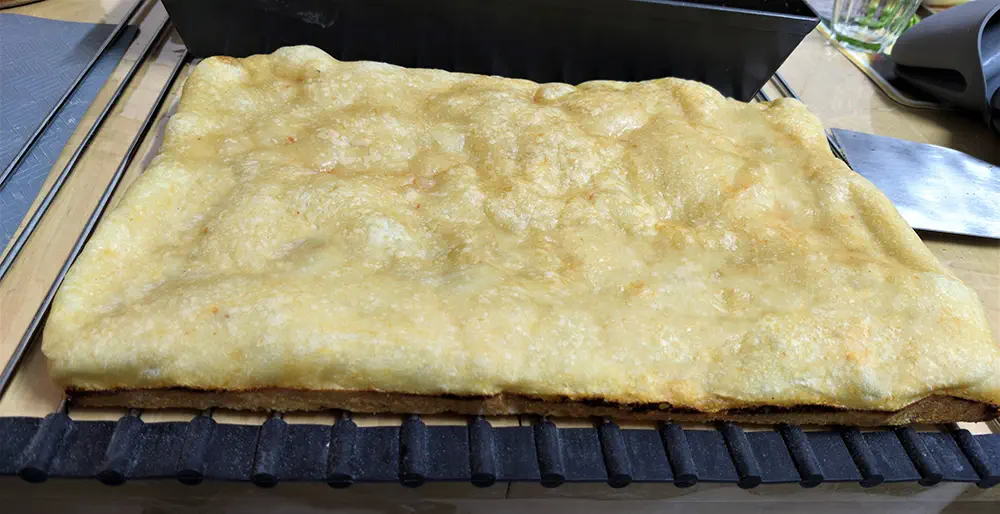
3. Remove from the Oven: After 5-6 minutes, and before the top of the pizza starts to brown, remove it from the oven. The dough should have risen and appear firm, “settled,” and relatively pale (see picture below). At this stage, you can also freeze the dough or set it aside for future use.
4. Add the Sauce, Cheese, and Toppings. You can also make an “upside-down” Sicilian by adding the sauce on top of the cheese.
5. Finish Baking: Place the pizza back into the oven and bake for approximately 5 more minutes, or until the cheese and dough reach your desired level of doneness. It’s recommended to check the pizza every minute or two during this final baking stage.
Post-Bake Instructions
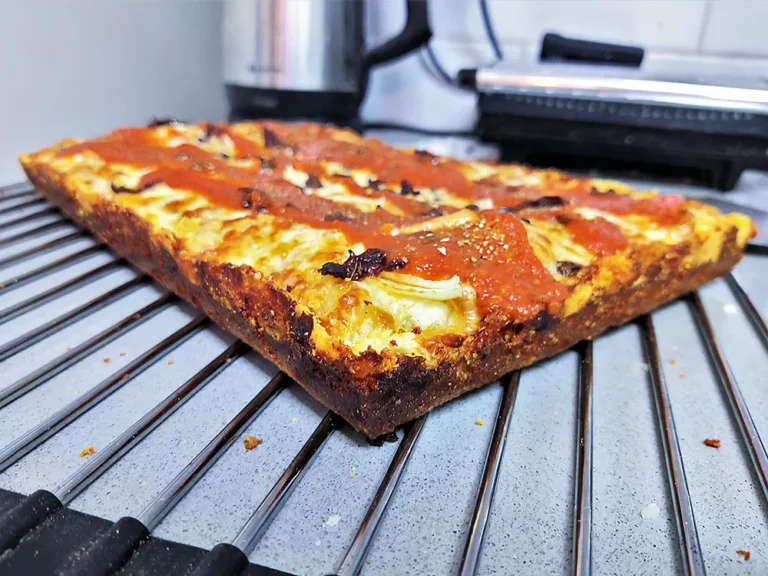
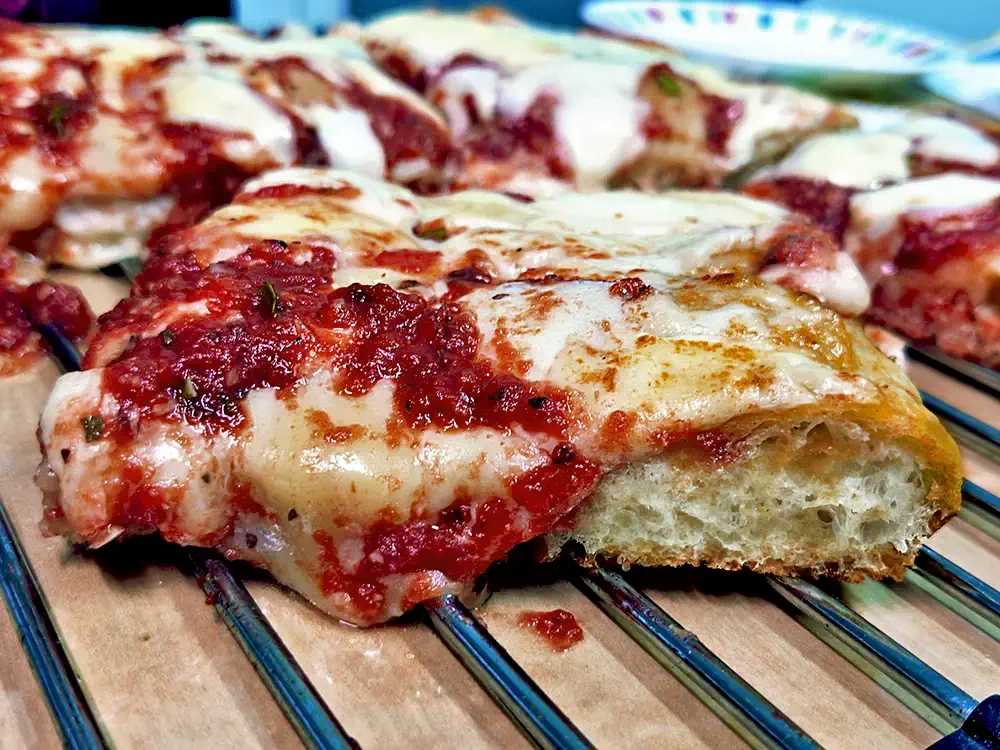
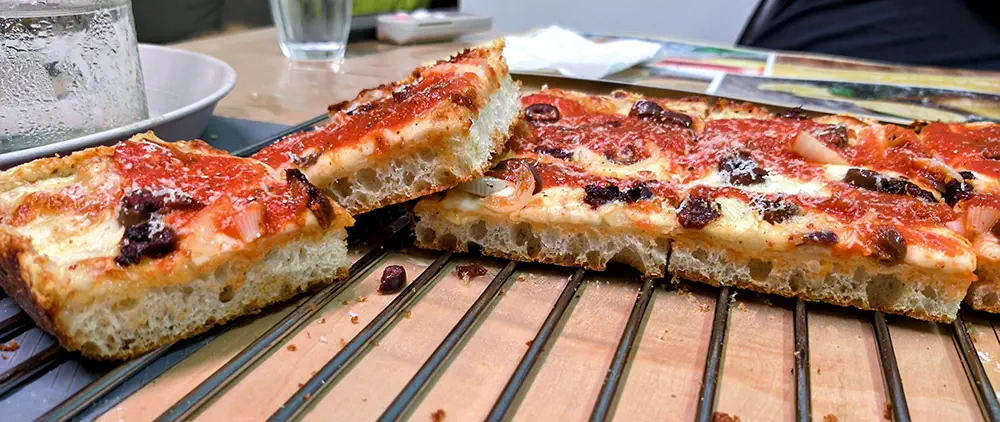
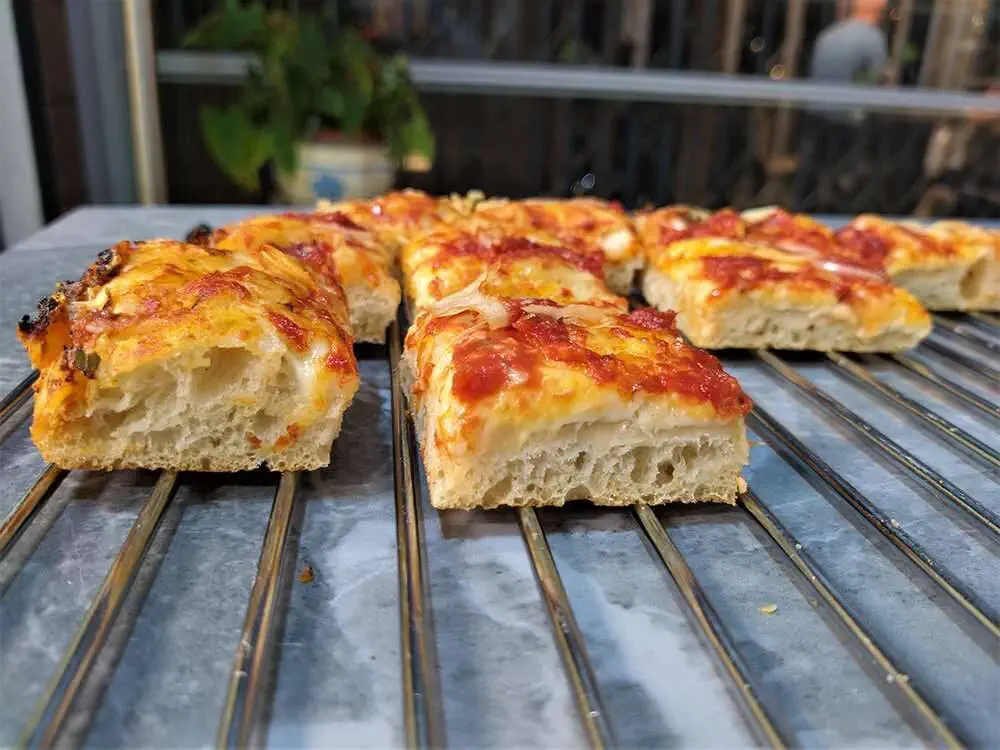
1. Place the Pizza on a Cooling Rack: Once the pizza is ready, carefully remove it from the pan and place it directly onto a cooling rack or any elevated surface that allows steam to escape from the bottom. This step is crucial for maintaining the crispness of the crust.
2. Allow the Pizza to Cool for about 5 minutes.
3. Serve: Transfer the pizza to a serving dish, cut it into equal squares and enjoy!
Recipe Summary & Print Version
Authentic Sicilian Style Pizza Recipe
Equipment
- Mixing Bowl
- Kitchen Scale for accurately measuring the ingredients
- Precision 0.01g Scale optional – for precise measurement of yeast amount
- Baking Pan
- Cooling Rack/Surface
Ingredients
Note: These measurements are for one 9×13" (20x30cm) pan. To scale the recipe or adjust for different pan sizes, use the calculator at the top of the page.
For the Dough:
- 282 grams Flour
- 169 grams Water
- ½ tbsp Salt
- ¼ tbsp Sugar
- ¼ tbsp Oil/Fat any type
- ⅓ tsp Instant Dry Yeast
For the Sauce:
- 200 grams Crushed Tomatoes app. ¾ cups
- ½ tbsp Salt to taste
- 1 tsp Dried Oregano
- 1 tsp Olive Oil
For the Toppings:
- 250 grams Low-Moisture Mozzarella Cheese shredded or sliced
- Pecorino Romano or Parmesan grated
Instructions
Making the Dough
- Prepare Ingredients: Organize all ingredients according to the quantities provided in the calculator.
- Mix Water, Salt, and Sugar: In a bowl, combine water, salt, and sugar. Mix until mostly dissolved. Note: If using oil, add it only after the flour has absorbed the water to ensure proper gluten development.
- Add Flour and Yeast: Add the flour and sprinkle yeast on top. (Alternatively, dissolve yeast in the water first for even distribution).
- Tip: If using dry yeast with water below 20°C (70°F), proof it in 40°C (105°F) water for 10 minutes first to avoid damaging the yeast.
Knead the Dough
- By Hand: Mix in the bowl until most of the water is absorbed, then knead on a work surface for ~5 minutes.
- Stand Mixer: Mix on speed 1 until absorbed, then knead on speed 2 for ~10 minutes until smooth.
- Note: For long fermentations (>4 hrs), knead only until uniform and "creamy." For short fermentations, knead until full gluten development (windowpane test).
Fermentation (Two Options)
- Option A (Bulk Fermentation): Let the dough ferment, covered, until it has roughly doubled in size OR for 50% of your total intended fermentation time. For example, if you plan for a total of 4 hours, leave the dough in bulk for the first 2 hours before moving to the pan.
- Option B (In-Pan Fermentation): Transfer the dough directly to the oiled pan immediately after kneading. Let it rest for 15–20 minutes to relax before attempting the first stretch. Follow the stretching steps below, then allow the dough to ferment for the remainder of the time directly in the pan.
Dough Preparation & Topping
- Oil the Pan: Apply a thin layer of oil (canola recommended) to the bottom and sides of the pan to prevent sticking and "fry" the crust.
- Transfer and Flatten: Place dough in the center. With wet or oiled hands, use your palms to flatten the dough toward the edges as evenly as possible.
- Stretch the Dough: If the dough resists, wait 20 minutes for the gluten to relax. Repeat the stretching 2–3 times until the dough fully covers the pan.
- Final Proofing: Cover the pan (towel or plastic wrap) so the air doesn't dry out the dough. Let it proof until roughly doubled in size.
- Prepare the Sauce: Mix crushed tomatoes with oregano and salt to taste.
Baking
- Preheat: Set oven to 270°C (520°F) or its highest setting (upper/lower heat, no convection). If using a baking stone/steel, preheat it and place the pan directly on it.
- Method 1: Direct Baking: Top the proofed dough with sauce and cheese (or cheese and sauce for "upside-down" style). Bake for 10–15 minutes until the cheese is bubbly and the crust is golden.
- Method 2: Par-Baking (Recommended for Volume): 1. Bake the "naked" dough for 5–6 minutes until risen and firm but still pale.
- Par-Bake Part 2: Remove from oven, add sauce and cheese, and bake for another 5-10 minutes until golden and crispy.
- Check Doneness: Use a spatula to lift the pizza and check the bottom; it should be golden brown and crispy.
- Browning Tip: If the top is done but the bottom needs more time, cover the top with foil or remove the pizza from the pan and place it directly onto the stone/steel to finish baking the bottom.
Post-Bake
- Cooling: Immediately remove the pizza from the pan and place it on a wire cooling rack. This is crucial to keep the bottom crispy and let steam escape.
- Serve: Let cool for 5 minutes, cut into equal squares, and enjoy!
Notes
- Thickness Factor: If you prefer a much thicker crust (thick like a sponge), increase your flour/water amounts by using a 0.16 thickness factor in the PizzaBlab calculator.
- Cheese Tip: Use whole-milk, low-moisture mozzarella for the best melt and flavor. Avoid fresh mozzarella (balls in water) as it releases too much moisture for this style.
Troubleshooting
Having trouble with your dough, baking, or any part of the pizza-making process? PizzaBlab’s Pizza Making Troubleshooting Page will help you diagnose and solve any problem you encounter.
Enjoyed this article? Join the BLAB
Unlock the Key Takeaways above and enjoy a 100% clean, ad-free experience across the entire site.