Pizza Preferment Masterclass: The Science of Poolish, Biga, and Beyond
A preferment is one of the most powerful tools in a baker’s arsenal for enhancing the dough’s flavor, texture, and aroma. This article provides a comprehensive look at the science and mechanics of preferments, along with practical instructions on how to make and use them in your own recipes
Understanding Preferments: An Introduction
If you’re into baking (which is a reasonable assumption since you’re reading this blog), you’ve probably come across the terms “poolish” or “biga” at least once, and maybe you’ve even made a dough that includes one of them. Preferments are wonderful, but they can also be complex and confusing.
So, before you rush to make one, it’s important to understand why and when to use them (if at all), the reasons for using them, their effects on the dough and the final product, and, of course, how to prepare them correctly.
This article will provide you with all the necessary information about preferments, which I believe are an essential tool in the arsenal of every baker.
Before moving forward, a few definitions:
LAB – Lactic Acid Bacteria
Final Dough – This is the dough to which the preferment is added. The final dough consists of the preferment along with the remaining dough ingredients – the rest of the flour and water, salt, yeast (if needed), etc.
Direct Dough – This refers to dough that is prepared without using a preferment.
Usability Window – This is the period of time during which the preferment can be used after it has reached the optimal ripeness and before it becomes over-fermented.
What Exactly Is a Preferment?
A preferment is a dough that is prepared and fermented in advance before being added to the final dough (hence the name preferment). It typically consists of a portion of water and flour from the recipe, along with a small amount of yeast. It is usually left to ferment for 6-24 hours at room temperature before being incorporated into the final dough.
There are two main types of preferments: poolish, which is a “liquid” preferment originating in France, and biga, which is a “stiff” preferment originating in Italy. Both poolish and biga achieve similar results and can be used interchangeably, but their preparation process and effects on the dough differ slightly, which we will discuss in more detail later.
Why Use a Preferment in Your Dough?
Using preferment serves two main purposes or has two main effects:
- Adding flavor to the final dough.
- Affecting the texture of the final product.
Both of these purposes are achieved through the acidity that the preferment introduces to the final dough (more on this will be discussed later on).
The main reason for using a preferment is to enhance the flavor of the baked good. As we will explore later, a properly made preferment provides an ideal environment for the activity of lactic acid bacteria (LAB).
Lactic acid bacteria have a significant impact on the flavor development in preferments, as well as in sourdough or direct doughs that undergo a long fermentation at room temperature, and they are the main contributors to the unique flavor that preferments add to the dough.
This ‘ideal environment’ in preferments (consisting of flour, water, a small amount of yeast, and long room temperature fermentation) allows the lactic acid bacteria to thrive optimally, which is not possible in a short fermented direct dough. As a result, this leads to the development of more complex and pronounced flavors.
Preferments are especially useful when making a final dough that will undergo a relatively short fermentation period. By using preferment, we can achieve a final dough that has undergone a shorter fermentation time but still possesses the deep flavors typically associated with dough that has fermented for a much longer period. Essentially, using preferment allows us to ferment the final dough for a shorter time while still obtaining the rich(er) flavor profile of a long-fermented dough.
The extent and impact of flavor development naturally depends on the type of preferment, its fermentation method, and the amount incorporated into the final dough. Generally, the more preferment used, the more pronounced the flavor effects will be.
However, in the case of a final dough intended for a long fermentation, the preferment’s contribution to the flavor might become less prominent.
In other words, the longer the final dough ferments, the less influence the preferment will have on the flavor, though it will still be present.
Later in this article, we will explore the processes that preferment undergoes and discuss how they affect the flavor and texture of the final product.
The Basics of Making a Preferment
General Rules for a Successful Preferment
The basic principles for the preparation and use of any preferment are as follows:
- A preferment is made up of a portion of the total amount of water and flour in the recipe. The water and flour in the preferment are mixed with yeast and left to ferment. The preferment is then added to the final dough, along with the remaining water and flour in the recipe, as well as the rest of the dough ingredients.
- A preferment consists of only flour, water, and yeast (without sugar/salt – see the next section). The amount of flour and water needed depends on the type and desired amount of preferment. In the following sections, you will find preparation instructions for each type of preferment, as well as guidelines for calculating the necessary quantities.
- The amount of yeast used in a preferment is always minimal, and ideally, it should be adjusted according to the temperature and fermentation duration of the preferment.
- To maximize lactic acid bacteria activity and enhance the preferment’s impact on the final dough’s flavor and texture, fermenting it at room temperature is recommended.
- Preferment should be used when it is fully ripe and at its peak. While using a preferment that has not yet reached its peak will not harm the dough, using one that has passed its peak may negatively impact the final dough. Later, we will discuss how to assess the ‘maturity’ of a preferment.
- The fermentation duration of the preferment is not considered part of the fermentation duration of the final dough. For example, if we have a preferment that was fermented for 10 hours and we add it to a final dough that is fermented for two hours, we would consider the final dough as having been fermented for two hours, not 12 hours. In this context, a preferment is treated as a separate “entity”.
- PizzaBlab’s pizza dough calculator offers an easy and convenient way to calculate the required amounts of preferment in a recipe.
Should You Add Salt or Sugar to a Preferment?
Salt
Salt slows down the activity of yeast and bacteria, as well as the enzymatic activity in dough. Without salt, the yeast and bacteria become more active and produce more organic acids, leading to greater acidification of the dough over the same time period. While there are some specific cases where salt is added to the preferment, such as certain types of sponges, in most cases, salt is not needed.
In conclusion, salt does not belong in a preferment.
Sugar (Any Type of Sugar, Including Honey)
Adding sugar to the preferment will provide the yeast with more food and increase their activity. This increased yeast activity in the preferment will have two main effects:
- It will disrupt the balance between the activity of the bacteria and the yeast. Yeast is much more efficient at consuming sugar than lactic acid bacteria, regardless of temperature, including (and especially) during cold fermentation. Therefore, adding sugar will significantly prioritize yeast activity.
- With increased yeast activity, more protease enzymes will be produced. These enzymes are responsible for breaking down the gluten in the dough. In other words, higher yeast activity will lead to faster gluten breakdown, resulting in shorter fermentation time before over-fermentation occurs.
As you can see, these two effects oppose the desired outcomes in a preferment, making them undesirable.
In summary, in this case as well, sugar does not belong in a preferment.
Honey is composed of 80% different sugars. In the context of dough, honey and sugar are virtually the same, except that one gram of honey contains 0.8 grams of sugar.
Why You Only Need a Small Amount of Yeast
As discussed, the primary goal of a preferment is to maximize the growth and activity of lactic acid bacteria (LAB).
In this environment, yeast serves as a catalyst; it promotes a favorable microbial environment for LAB by generating metabolites, such as ethanol and organic acids, that stimulate bacterial activity.
To allow LAB enough time to contribute meaningful acidification and flavor development, only a small amount of yeast should be used.
Introducing too much yeast disrupts this delicate balance by accelerating the overall fermentation rate. This results in a preferment that either reaches its peak before significant LAB activity has occurred, or achieves that activity only after the dough has already become over-fermented and structurally compromised.
Why Room Temperature Fermentation is Ideal
For a thorough comparison between cold and room-temperature fermentation, see: Why Room Temperature Fermentation Makes a Better Pizza Dough.
Regarding preferments specifically, there are three key technical points to consider:
- Microbial Balance: Lactic acid bacteria are significantly less active than baker’s yeast at low temperatures. Cold fermentation favors yeast activity over LAB, which is the opposite of what a preferment is designed to achieve.
- Acid Ratios: The balance between acetic and lactic acid production is temperature-dependent. At fridge temperatures (around 4°C/40°F), acetic acid production increases relative to lactic acid. This shifts the flavor profile toward a sharper, more vinegar-like acidity.
- Enzymatic Rate: Maturation and fermentation processes occur 4–8 times slower in the fridge than at room temperature. Consequently, both acidification and the creation of complex aromatic compounds take much longer to develop.
In summary, fermenting a preferment in the fridge has two primary effects:
- Delayed Maturation: Because flavor development is significantly slowed down in the fridge, a much longer fermentation is required to reach the same level of acidity and complexity found in preferment fermented at room temperature.
- Different Flavor Profile: The resulting flavor will lean toward acetic acid, producing a “sharper” sourness. While flavor is subjective, this profile differs from the creamy, complex acidity typically sought in a preferment.
Therefore, to maximize the benefits of a preferment in terms of both flavor and texture, room-temperature fermentation is highly recommended. While cold fermentation is possible, it is less effective if your goal is to optimize the preferment’s enzymatic and bacterial potential.
Understanding Preferment Percentages
The amount (or percentage) of preferment in a recipe is determined by the proportion of flour in the preferment compared to the total amount of flour in the recipe. The term ‘percentage of preferment’ describes the relative amount of flour in the preferment, calculated using baker’s percentages. If you are unfamiliar with this term, it is recommended that you read about it in the Encyclopizza in the link above.
There are different ways to calculate the amount (%) of preferment, such as based on total dough weight or water content. However, I find calculating it relative to flour weight to be the easiest, most consistent, and simplest to understand and apply, which is why I prefer this method and use it throughout this article.
Let’s use a recipe that contains a total of 500g of flour as an example.
We want to use 30% preferment.
0.3 * 500 = 150
This means that to use 30% preferment in this recipe, we will make a preferment consisting of 150g of flour, which is 30% of the total flour in the recipe. For the final dough, we add the remaining 350g of flour.
And of course, it also works the other way around. If we have a preferment that contains a certain amount of flour and we want to determine the quantity (percentage) of preferment in the recipe, we calculate the proportionate amount of the preferment’s flour compared to the total amount of flour in the recipe.
Let’s use a recipe that contains 700g of flour and a preferment that contains 100g of flour as an example.
100 / 700 = 0.14
This means that this recipe contains 14% preferment, which is 100 grams of flour. For the final dough, we add the remaining 600g of flour.
What Percentage of Preferment Should I Use?
In general, the typical range for preferment percentage in both pizza and other baked goods is between 10% and 30%. The greater the amount of preferment used, the more pronounced its effects on the final dough will be.
How a Preferment Changes the Final Pizza
During the fermentation process, gases (CO2), alcohol, and organic acids are produced in the dough. In the context of preferments, we are particularly interested in the production of acids, specifically lactic and acetic acid, which are both byproducts of the activity of lactic acid bacteria.
The production of gases during fermentation is not significant or important in preferment because the preferment is not baked; Therefore, preferment does not need to accumulate CO2, unlike the final dough where the CO2 is “trapped” in the gluten network, causing the dough to increase in volume.
During fermentation, the alcohol chemically combines with acids in the dough, resulting in the formation of esters. Esters are organic compounds that contribute to the flavor and aroma of the dough and play a significant role in the flavor profile of the final product.
As we will see, the acids produced during fermentation play the most important role in preferment and have two main effects:
- They directly and indirectly contribute to the flavor profile (“flavor production”).
- They lower the pH of the dough, acidifying it (making it more acidic).
Please note that while the following sections discuss preferments, the information described in them applies to dough fermentation in general and is applicable to any dough that undergoes fermentation.
Acidity and Its Role in the Dough
As previously mentioned, the main objective of preferment is the production of acids. These acids are produced during fermentation, and have two main effects on the dough and the final product:
- Flavor impact – The organic acids, specifically lactic acid and acetic acid produced during fermentation, play a significant role in shaping the flavor profile of the baked product (as we will discuss in the next section).
- Dough strengthening – The acidity of the preferment causes the gluten-forming proteins to tighten, resulting in a dough with higher elasticity and overall strength.
Besides the flavor aspect, it is important to emphasize the significance of strengthening the dough. Using a preferment allows for achieving a stronger dough, which is particularly beneficial when working with relatively weaker flour or aiming to enhance the dough’s strength.
Historically, Italians have used biga (and sourdough) to strengthen their weaker doughs, which result from the use of weak Italian flour. For more information on this topic, please refer to the following article: Is Italian Flour Essential for Making Pizza? Everything You Need to Know about Italian Flour.
In general, the acidity of the preferment (and, consequently, the final dough) is influenced by the hydration level of the preferment. The lower the hydration (or the more “stiff” it is), the less acidic the preferment will be and the less it will acidify the final dough. For example, a biga (45% hydration) will be less acidic compared to a poolish (100% hydration).
Here are some general acidity ranges for each type of preferment (note that the final acidity can vary depending on various factors, such as the fermentation method and duration for both the preferment and the final dough):
- The pH level of a poolish and a dough that contains a poolish is between 4.5 and 5.0.
- The pH level of a biga and a dough that contains a biga is between 5.0 and 5.5.
- The pH level of sourdough and a dough that contains sourdough is between 3.5 and 4.5.
- The pH level of dough without any preferment (direct dough) is between 5.0 and 6.0.
Note that lower pH = higher acidity.
Naturally, the longer we allow the preferment (and the final dough) to ferment, the more acids will be produced, resulting in a higher final acidity.
How a Preferment Improves the Flavor of the Crust
As mentioned previously, the main purpose of using preferment is to enhance the flavor of the baked good. A significant portion of this flavor comes from the byproducts of the lactic acid bacteria found in the preferment.
Acetic acid adds a sharp flavor and aroma, similar to vinegar or lemon, while lactic acid provides a milder flavor and aroma, similar to yogurt.
When using baker’s yeast (i.e., not sourdough), the activity of lactic acid bacteria is much lower compared to the yeast. In fact, in a dough made with baker’s yeast, there are between 10,000-100,000 yeast cells for every lactic acid bacteria.
Therefore, the best way to achieve sufficient lactic acid bacteria activity in the dough is to allow them to work for a longer time by minimizing the amount of yeast and doing long fermentation – and this is exactly what we aim to accomplish with a preferment.
The interaction between the byproducts of lactic acid bacteria and yeast, particularly the chemical interaction between alcohol and acids, leads to the formation of aromatic compounds. These compounds give the preferment its unique flavors, which are then added to the final dough.
It is important to note that the effect of preferment on flavor is primarily relevant to lean doughs, which consist of only flour, water, yeast, salt, and low amounts of sugar or fat. In these doughs, the flavor is derived solely from the byproducts of fermentation.
However, in enriched doughs such as challah, brioche, sweet doughs, danishes, etc., which contain high amounts of fat, sugar, or eggs, the flavor in the dough comes from these “enriching” ingredients; Therefore, using preferment in enriched doughs does not contribute much to flavor, and is mostly unnecessary.
The Effect of Type of Preferment on Flavor Profile (Stiff vs. Liquid)
In general, the production of acetic acid increases as the preferment becomes “stiffer” (i.e., has a lower hydration), while the production of lactic acid increases as the preferment becomes more “liquid” (i.e., has a higher hydration). For instance, a biga, which has a hydration of 45%, will result in a more pronounced sour flavor, whereas a poolish (100% hydration) will yield a milder flavor.
The same principle applies to sourdough starters – a stiff sourdough starter will result in a more sour flavor compared to a liquid sourdough starter.
How a Preferment Affects the Texture of the Pizza
The use of preferment also affects the texture of the final product due to the acidity it adds to the final dough.
In addition to strengthening the gluten, the effect of preferment on texture depends on the type of preferment used.
A liquid preferment, such as poolish, has high enzymatic activity due to its high hydration. Specifically, it has a high activity of protease enzymes, which break down gluten. As a result, a liquid preferment gives a more extensible dough, resulting in:
- A softer dough that stretches more easily
- Bigger volume with a more open, airy crumb structure
- Softer crumb.
On the other hand, a stiff preferment has less protease enzyme activity and therefore undergoes less gluten breakdown. In other words, a stiff preferment produces a dough that is more elastic and strong compared to a liquid preferment. The result is:
- A more resistant dough
- A denser, more compact crumb structure
- A firmer and chewier crumb
(Note that the above is relative. It does not mean that the texture provided by a stiff preferment will be dense; rather, it will be denser compared to a liquid preferment or direct dough. It is possible to achieve an airy, soft crumb with a stiff preferment, but when compared to using a liquid preferment or direct dough, the result will be a more elastic dough with the aforementioned characteristics).
To fully understand the concepts of elasticity and extensibility in dough and their effect on texture, it is highly recommended to read the article on Elasticity and Extensibility in Dough, which provides essential background on these properties.
The Effect of Fermentation Method on Texture (Cold Fermentation vs. Room Temperature Fermentation)
In addition to the type of preferment, the method of fermentation (cold/room temperature fermentation) also affects the texture. Generally, acetic acid tightens the gluten more compared to lactic acid, and creates a more elastic dough, resulting in a harder and chewier crumb compared to lactic acid.
As mentioned earlier, fermenting at lower temperatures (below 20°C/68°F) leads to more acetic acid production, while fermenting at higher temperatures (above 20°C/68°F) leads to more lactic acid production. Therefore, cold fermentation prioritizes the production of acetic acid, resulting in a more elastic dough compared to room temperature fermentation, along with the aforementioned effects.
How Preferments Improve Shelf Life
This is less relevant for pizza, which is consumed immediately out of the oven, but it is most relevant for baking bread and other baked goods.
Higher acidity in the dough inhibits the growth of bacteria, mold, and slow down starch retrogradation, which leads staling in baked products.
Consequently, incorporating a preferment when baking bread extends the shelf life of the bread, due to their higher acidity. This is why sourdough breads – or any baked goods that include any type of preferment – have a longer shelf life compared to direct doughs.
The Trade-offs: Potential Challenges of Using Preferments
Why Using the Preferment at the Right Time is Critical
It is crucial to use the preferment (i.e., add it to the final dough) when it has reached its peak fermentation point and before it becomes over-fermented.
A preferment that has over-fermented and passed its peak may do more harm than good to the final dough:
- Excessive acidity can damage the gluten structure and affect the flavor.
- In the case of a liquid preferment like poolish, where the gluten breaks down during fermentation, too much breakdown of gluten in the preferment will introduce degraded gluten into the final dough.
These factors will have a significant impact on the final dough, making it harder to work with (liquid consistency, sticky, and difficult to handle) and affecting the end product (limited oven spring and a less satisfactory overall outcome).
Therefore, using the preferment at the right time, preferably when it is at its peak, is extremely important and one of the biggest challenges when working with a preferment. In the following sections, we will see how to determine if the preferment is ready to be used.
Adding Steps and Complicating the Dough-Making Process
Using a preferment adds an extra step to the dough-making process and also requires careful timing and monitoring to incorporate it into the final dough when it is ripe and ready.
Since a preferment is ideally fermented at room temperature, it is necessary to plan the schedule ahead so that the preferment reaches its peak when we start making the final dough. This involves determining the time to prepare the preferment, considering its required fermentation duration, and scheduling the start of the final dough accordingly.
As you can see, this process adds extra steps to the dough-making process and involves additional work that typically spans multiple days.
Reduced Browning
What is important to know in the context of browning and preferment is the impact of acidity on the browning process during baking.
The main contributor to browning in dough during baking is the Maillard reaction. In a more acidic environment, the Maillard reaction occurs at a slower rate.
To put it simply, preferments add acidity to the final dough, which slows down the browning process. As a result, achieving the same level of browning as a direct dough would require either a longer baking time or a higher baking temperature.
For example, if we compare two identical doughs that are baked in the same way, the dough made with a preferment will have less browning compared to the dough made without a preferment. This is also why sourdough breads appear lighter in color compared to regular breads when both are baked for the same amount of time and at the same temperature.
To address the issue of reduced browning, it is possible to add 1-2% sugar or diastatic malt powder to the final dough.
The Different Types of Preferments
Poolish (Liquid Preferment)
Poolish is a liquid preferment that contains equal amounts of flour and water, for example, 100g of flour and 100g of water (100% hydration).
Poolish is one of the first types of preferments made with baker’s yeast. As its name suggests, poolish was originally “invented” by Polish bakers in the late 19th century and later adopted in Austria and France. Breads baked with poolish had a less acidic taste compared to sourdough breads of that time and quickly gained popularity. The “poolish method” became widely used by bakers as baker’s yeast became more common and readily available.
Technically, poolish can be seen as something between sourdough and a direct dough made with baker’s yeast. Interestingly, even today in Paris, you can find bakeries with two signs on the front: one reading “Pain Viennois,” meaning bread from Vienna (made with baker’s yeast), and the other reading “Pain Français,” meaning bread from France (made with sourdough).
Poolish is fermented at room temperature for 6-14 hours. As a liquid preferment, poolish is less “forgiving” than biga and requires more precision and attention to timing.
An under-fermented poolish will not provide the desired acidity to the final dough.
In an over-fermented poolish, there will be excessive gluten breakdown, resulting in weak and sticky dough and affecting the final product.
It is highly recommended to avoid over-fermentation with poolish, as it can have significant effects on the final dough, depending on the amount of poolish used and its condition.
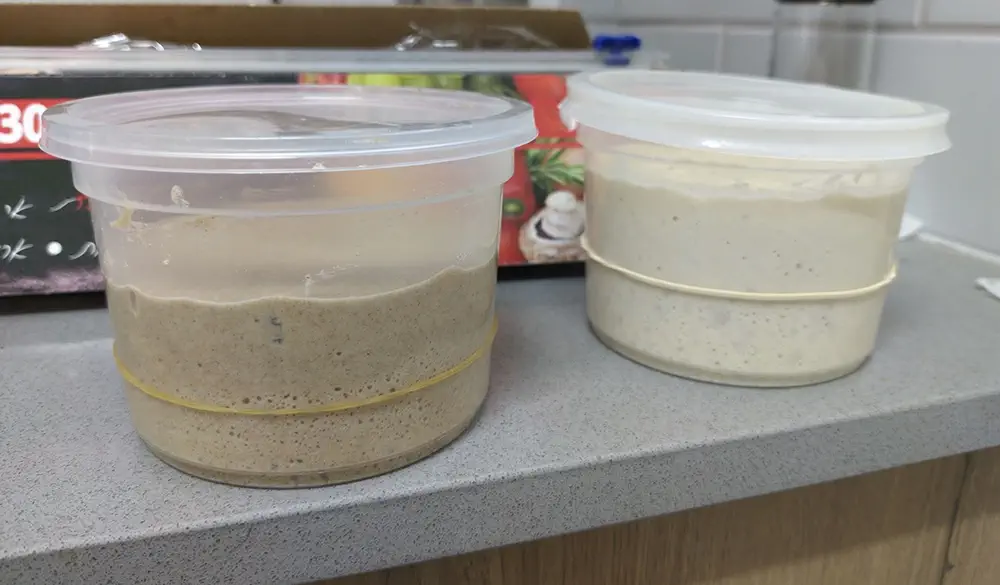
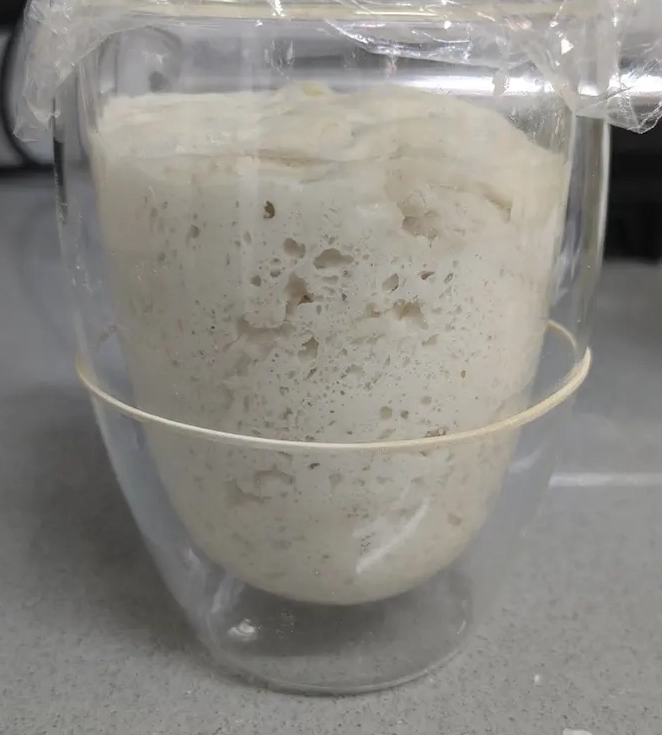
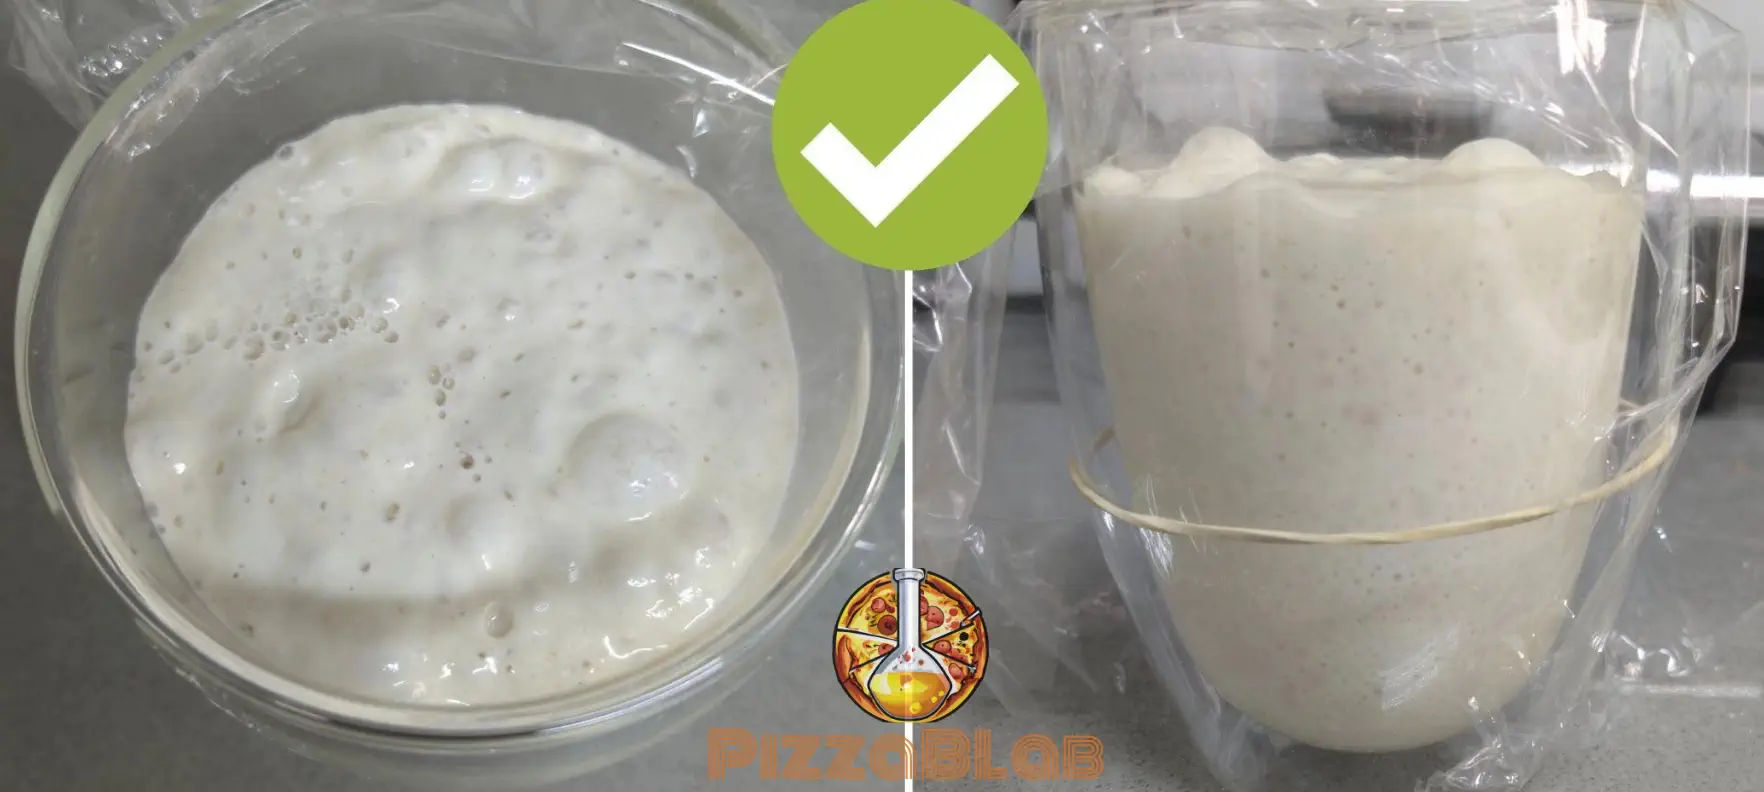
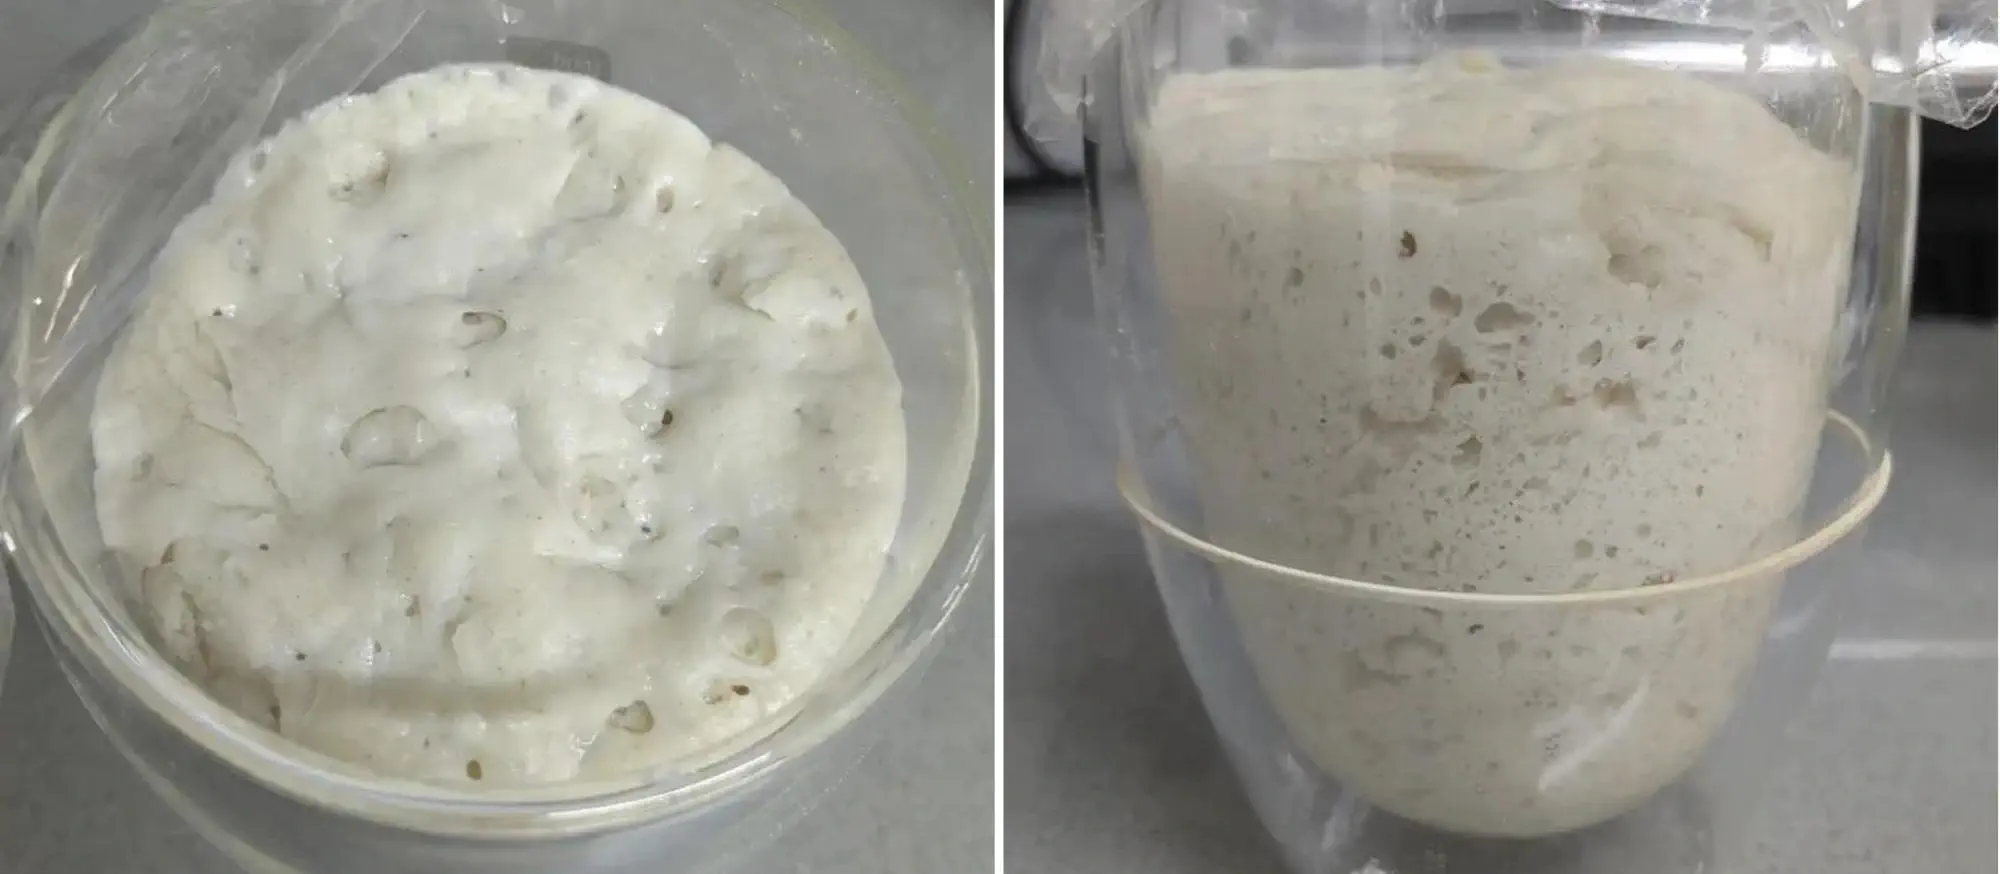
A fully ripe poolish will at least double in volume, forming a “dome” with small air bubbles on the surface. It will have a mild, slightly alcoholic smell, similar to yogurt.
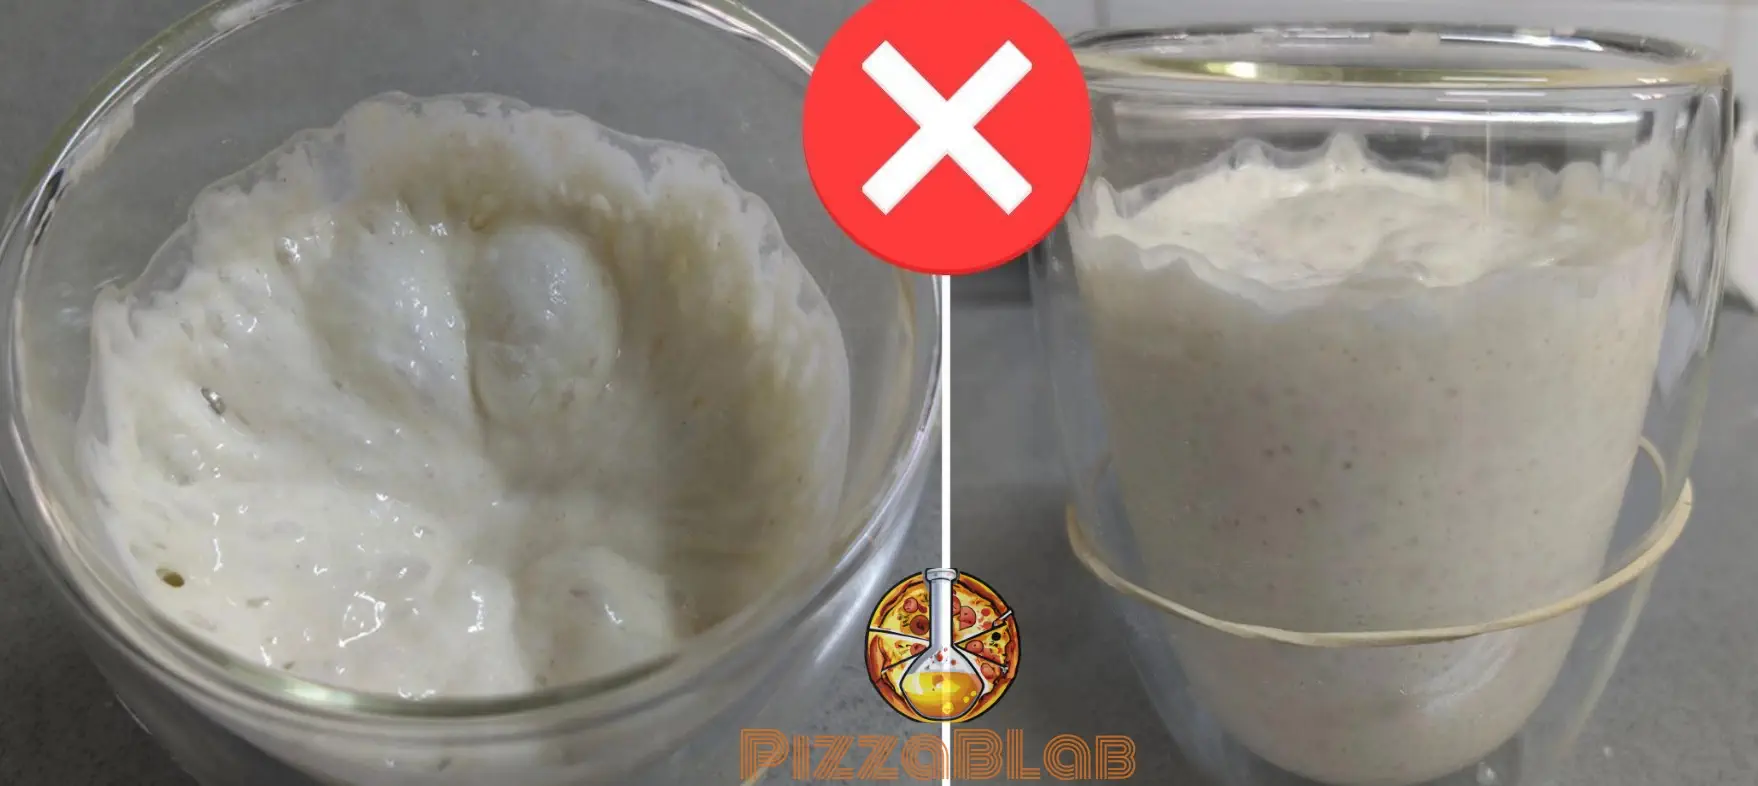
A poolish that is past its peak will collapse in the center, leaving poolish “smear marks” on the sides of the container.
Making a poolish is simple – just mix water, flour, and yeast and let it ferment. Adding it to the final dough is also straightforward – simply add the poolish to the other dough ingredients and continue mixing as usual.
A poolish will impart a mildly acidic and subtly yogurty flavor to the final dough.
Detailed preparation instructions for poolish will be provided later in the article.
Biga (Stiff Preferment)
Biga is a stiff preferment that originated in Italy. In Italian, ‘biga’ literally means “preferment”.
Biga is made with a very low hydration level (traditionally 45% hydration), resulting in a very stiff consistency. It is traditionally fermented at room temperature for 12-24 hours at 16-18°C/60-64°F.
The fermentation conditions and composition of biga are what give it its unique characteristics. These characteristics include slowing down protease enzyme activity to minimize gluten breakdown during fermentation and prioritizing the production of acetic acid. As a result, biga greatly strengthens the final dough, which was its original, historical purpose.
Today, with the availability of stronger flours compared to those used by Italian bakers in the past, it is important to use biga “carefully” to prevent an overly elastic dough with a tough, chewy crumb texture. Biga is particularly effective when used in doughs with high hydration, such as ciabatta, or in modern Neapolitan/Canotto-style pizza.
Compared to poolish, biga is a more forgiving preferment in terms of fermentation, offering a wider window of usability. This is mainly due to its slower fermentation process (including slower acid production) and less gluten breakdown. In other words, biga is less likely to over-ferment compared to poolish.
Nevertheless, using an over-fermented biga is not recommended.
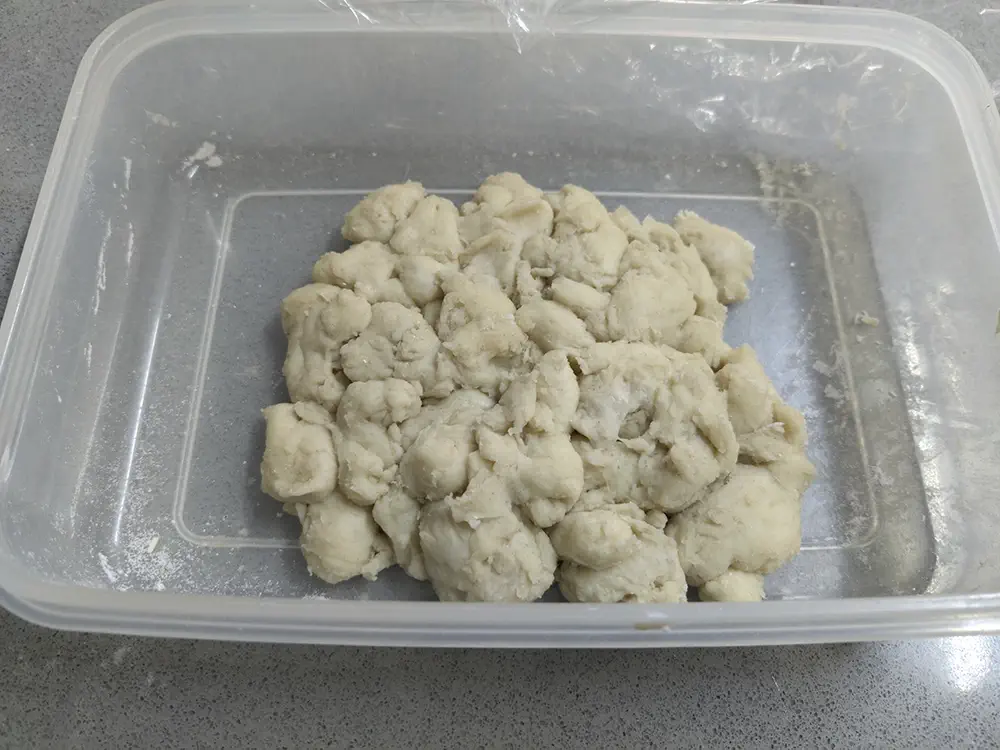
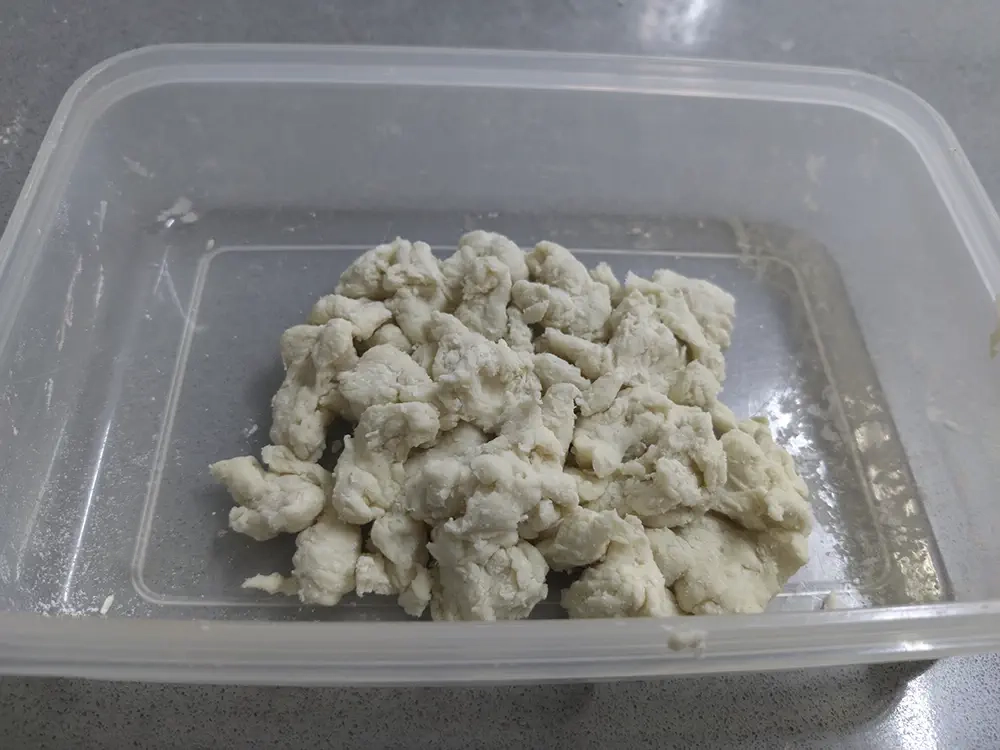
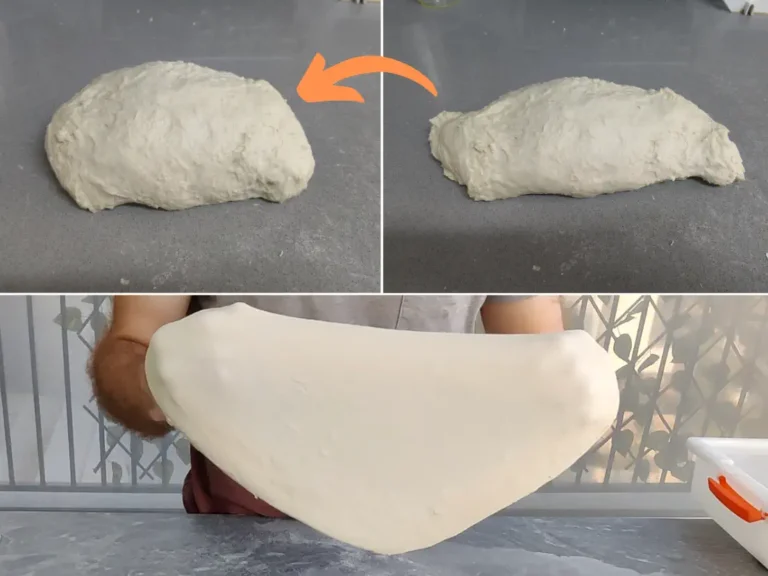
A well-prepared and ready-to-use biga will consist of many biga “chunks” that have slightly expanded during fermentation (depending on the amount of biga and the size of the container, the biga can also form a cohesive “biga block”).
The preparation and incorporation of biga into the final dough are more complex than with poolish, requiring careful mixing to create the desired biga “chunks” (to ensure proper hydration of the flour and prevent excessive gluten development).
Given its stiff consistency, incorporating the biga into the final dough without a mixer can be challenging, so it is less recommended using biga when kneading by hand.
Compared to poolish, a biga will impart a sharper, more acidic, and vinegary flavor to the dough.
Detailed preparation instructions for biga will be provided later in the article.
Sponge
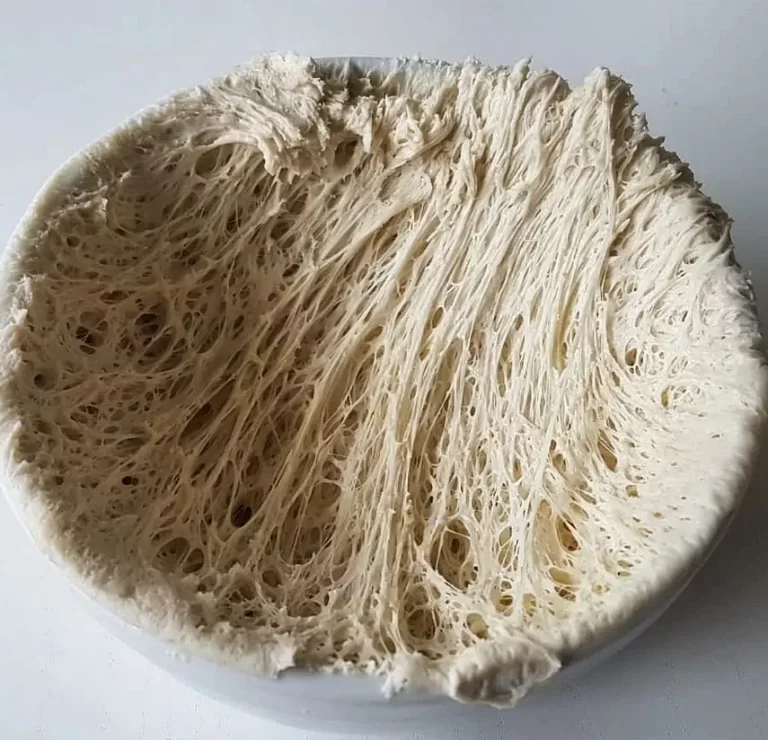
Sponge is a versatile preferment that falls between the stiff biga and the liquid poolish, with a hydration level ranging from 50-80%. The name “sponge” comes from its appearance when cut, resembling a sponge in texture.
Originally, sponge was mainly used in the bread industry in England. Today, (stiff) sponge is primarily used for sweet pastries. The dough for sweet pastries is often weak due to the use of weak pastry flour and other ingredients that weaken the gluten structure, such as fats and sugar; Therefore, using a sponge adds some strength to the final dough (less than a biga but more than a poolish).
Another use of sponge is to create a liquid sponge with a relatively short fermentation time, usually a few hours. This helps to add extensibility to the final dough by breaking down the gluten during the fermentation of the sponge.
The fermentation process for a sponge is similar to that of a poolish or biga, with no “standard” duration – it can be fermented for anywhere from 2 to 24 hours. In terms of characteristics, the sponge falls between a poolish and a biga, adding flavor, texture, and strength to the final dough at a level between them, depending on its composition.
Making a sponge is similar to making a poolish, by mixing flour, water, and yeast until a dough/batter is formed, depending on the hydration of the sponge. Unlike a biga, there is no need to create “chunks” in the sponge since creating strength in the final dough is not the primary goal. The creation of “chunks” in a biga is intended to limit gluten development, which is desirable in a biga, but not necessary in a sponge.
It is also possible to make a “biga sponge” by using a low hydration (45%) with “normal” mixing and without creating “biga chunks.” The result will be slightly different than a traditional biga, obviously.
While sponge is less commonly known and used in pizza dough, it is worth considering. It works great, so feel free to experiment with it.
Old Dough (Pâte Fermentée)
Old dough (Pâte Fermentée) is exactly what it sounds like – it’s “regular” dough that has “aged” and is added to a new dough as a preferment.
Using old dough is highly practical when there are leftovers from a previous batch of dough that you don’t want to waste. Instead of throwing it away, you can incorporate the old dough into the final dough as a type of preferment. This is particularly relevant in a commercial setting where fresh dough is made daily and leftovers are common, but it can also be beneficial for home baking.
The main advantage of utilizing old dough is, naturally, the ability to repurpose leftover dough instead of discarding it. However, there is a disadvantage to using old dough as it may yield inconsistent results. This is because the fermentation process and the timing of its use can vary from day to day and from batch to batch.
Old dough will affect the taste and texture of the final product, but in a different way and to a lesser extent than using poolish or biga. Generally, old dough will contribute less flavor to the dough compared to poolish or biga, and its effect on the texture will also be less noticeable, depending on the condition of the gluten present in the old dough.
Poolish vs. Biga in Pizza Dough
For a thorough comparison of Poolish and Biga, including their distinct characteristics and how they affect the dough, see: Biga vs. Poolish: Choosing the Right Preferment for Your Pizza.
In short:
- Flavor Profiles: Poolish favors lactic acid, producing a creamy, yogurt-like flavor. Biga favors acetic acid, resulting in a sharper, more vinegary-sour profile.
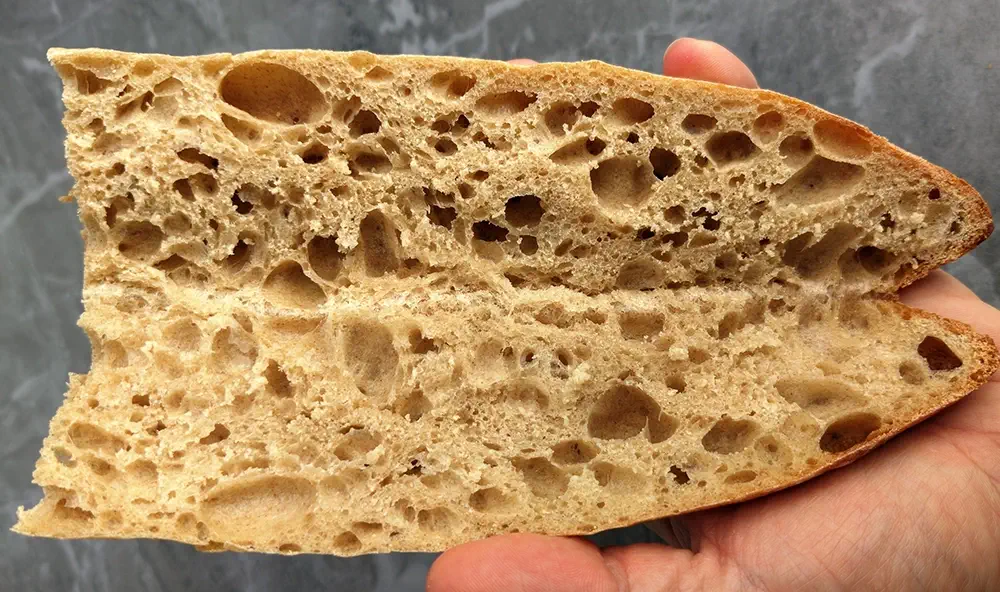
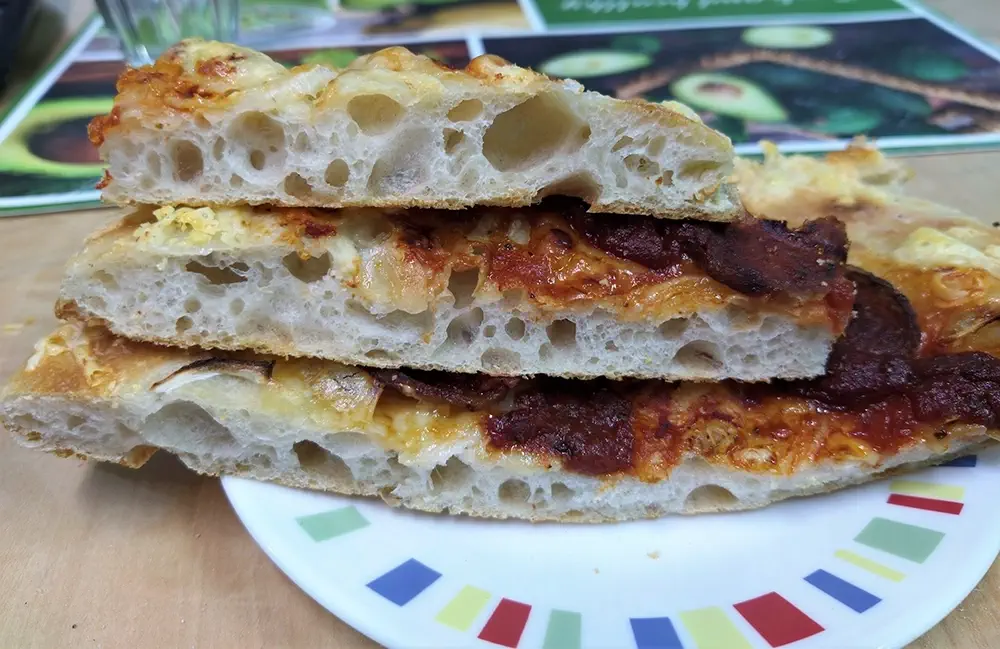
- Texture and Structure: Poolish increases extensibility, resulting in a more uniform crumb structure and a more tender bite; Biga increases elasticity and strength, creating a chewier crust with larger, irregular air pockets.
- Workflow and Handling: Poolish is easier to make, but has a shorter “peak” window. Biga is more challenging to make and incorporate without a mixer, but offers more flexibility in timing.
- The Final Result: While they have distinct scientific profiles, the differences in the final pizza can be subtle. Often, the choice comes down to your equipment and your personal schedule.
General Guidelines for Making a Preferment
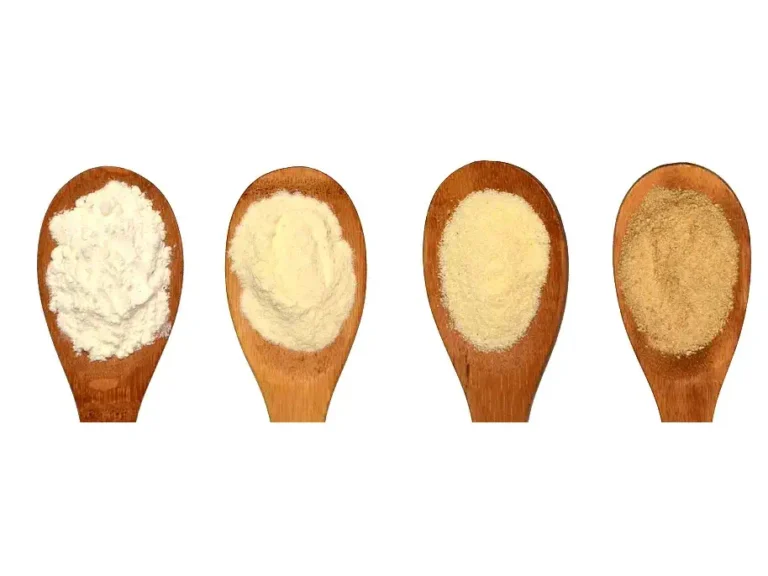
What Flour Should You Use?
In general, it is preferable to use relatively strong flour when making a preferment. Stronger flour can withstand the long fermentation process at room temperature that the preferment undergoes. The strength of the flour determines how long we can ferment the preferment without the gluten breaking down, which has several benefits:
- Allows for a longer overall fermentation of the preferment, resulting in the production of more flavors.
- Increases the usability window, as more gluten remains in the dough during fermentation compared to using weaker flour.
- Reduces the risk of the preferment reaching over-fermentation.
In other words, using strong flour in a preferment provides greater flexibility in preparation – it extends the usability window and reduces the need to precisely time its peak.
However, it is important to note that using strong flour in a preferment is not always necessary. For instance, it is commonly suggested to use strong flour in a biga. It is essential to remember that Italian flours are naturally weaker, so the recommendation to use strong flour (with a W index of 320 or higher) is justified in this context. On the other hand, when using non-Italian flours, a protein content of 11% or higher is generally enough.
For more information about Italian flours, please refer to the following article: Is Italian Flour Essential for Making Pizza? Everything You Need to Know about Italian Flour.
Additionally, it is important to remember that the need for strong flour is specific to fermenting at room temperature. When preferment is fermented in the fridge (which is generally not recommended), the fermentation process is much slower. Therefore, using “strong” flour becomes unnecessary, assuming the preferment will be fermented for up to 24 hours.
My personal recommendation is to use the same flour for the preferment as you do for the final dough. Most pizza flours are naturally strong, so using the same flour in the preferment usually yields good results – and that’s what I personally always do. In most cases, there is no need to complicate the preparation process by using different flours.
The only exception to this is when using Italian flour. As mentioned before, Italian flours are relatively weak by nature, and Italian flours with a W index of less than 300 may struggle to withstand a long room temperature fermentation.
For example, in the test shown below, three poolishes were made using three different flours. They were fermented for 12 hours.
The left poolish was made with Caputo Pizzeria flour, and the other two poolishes were made with American bread flours. Each second in the video represents an hour in real time.
[Credit for this experiment goes to PelletPizzaJoe, a member of pizzamaking.com]
As you can see, the Caputo Pizzeria poolish completely collapsed after approximately 8 hours. On the other hand, the other flours handled the fermentation well and could have easily gone for a few more hours.
This test is an excellent demonstration of how flour affects preferment (and dough in general), and it also explains why, when using Italian flour, it is advisable to use a relatively strong flour in the preferment.
In conclusion:
- If you use a weak Italian flour for the final dough, it is advisable to use a relatively strong flour for the preferment. This could be Italian flour with a W index of 300 or higher, or any non-Italian bread or pizza flour with a protein content of 11% or higher.
- If you use non-Italian flour (bread/pizza) or strong Italian flour with a W index of 300 or higher for the final dough, you can also use the same flour in the preferment.
- If you ferment the preferment in the fridge for up to 24 hours, there is no need for “strong” flour.
How Much Yeast to Add (Using PizzaBlab’s Dough Calculator to Calculate Yeast for the Preferment and Final Dough)
PizzaBlab’s dough calculator is designed to handle the complexities of multi-stage fermentation automatically. When using a preferment, the calculator determines the precise yeast requirements for both the preferment stage and the final dough stage.
How the Calculation Works
- Preferment Yeast: The calculator calculates the yeast needed to ferment the preferment, based on your specified time and temperature.
- Final Dough Yeast: It then calculates the total yeast required for your final dough’s fermentation profile and subtracts the yeast already present in the preferment.
Step 1: Setting up the Preferment
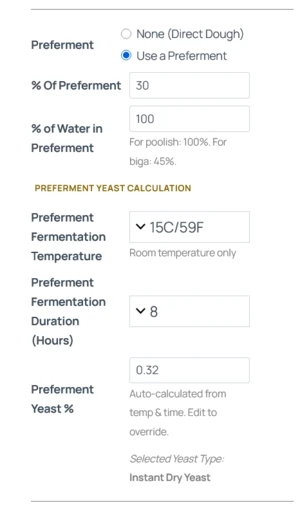
In the Preferment section, select “Use a Preferment.” You will see fields for the percentage of flour used and the hydration (e.g., 100% for Poolish, 45-50% for Biga).
Enter the time and temperature* at which you plan to ferment the preferment. The calculator will automatically determine the yeast amount needed for the preferment.
Important: Preferment Yeast Logic
1. Fermentation Temperature: The preferment calculation is limited to room temperature only. As detailed above, preferments should be fermented at room temperature to properly develop.
2. Yeast Type: The calculator automatically uses the same yeast type for both the preferment and the final dough (the one you chose for the final dough).
Step 2: Defining the Final Dough Fermentation
In the final dough fermentation section, enter the time and temperature for your final dough (the period after you mix the preferment with the remaining ingredients).
The calculator will now:
- Calculate the total yeast needed for the entire recipe.
- Subtract the yeast already added to the preferment.
- Display the remaining yeast you need to add to the final dough.
Understanding the Results

The results table will be split into three sections:
- Totals Table: Shows the total flour, water and yeast (including the preferment).
- Preferment Table: Shows the four, water, and yeast for the preferment.
- Final Dough Table: Shows the remaining flour, water and yeast to add to the final dough, including other ingredients (salt, oil etc.).
Note: When No Extra Yeast is Needed
In certain scenarios, specifically long room-temperature fermentations , the yeast required for the preferment may actually meet or exceed the total yeast needed for the final dough.
If this happens, the calculator will show “-” for the Yeast (Remaining) in the Final Dough table. This simply means the fermentation activity from your preferment is sufficient to ferment the final dough, and you do not need to add any additional yeast during the final mix.
Alternative Methods for Calculating Yeast in a Preferment
Alternatively, you can use the “standard” amounts of yeast for biga and poolish:
- Biga: 0.3% instant dry yeast or 1% fresh yeast, for 16-24 hour fermentation.
- Poolish: 0.1% instant dry yeast or 0.3% fresh yeast, for 8-16 hour fermentation.
Note: These amounts are based on fermentation at approximately 20 °C (68 °F).
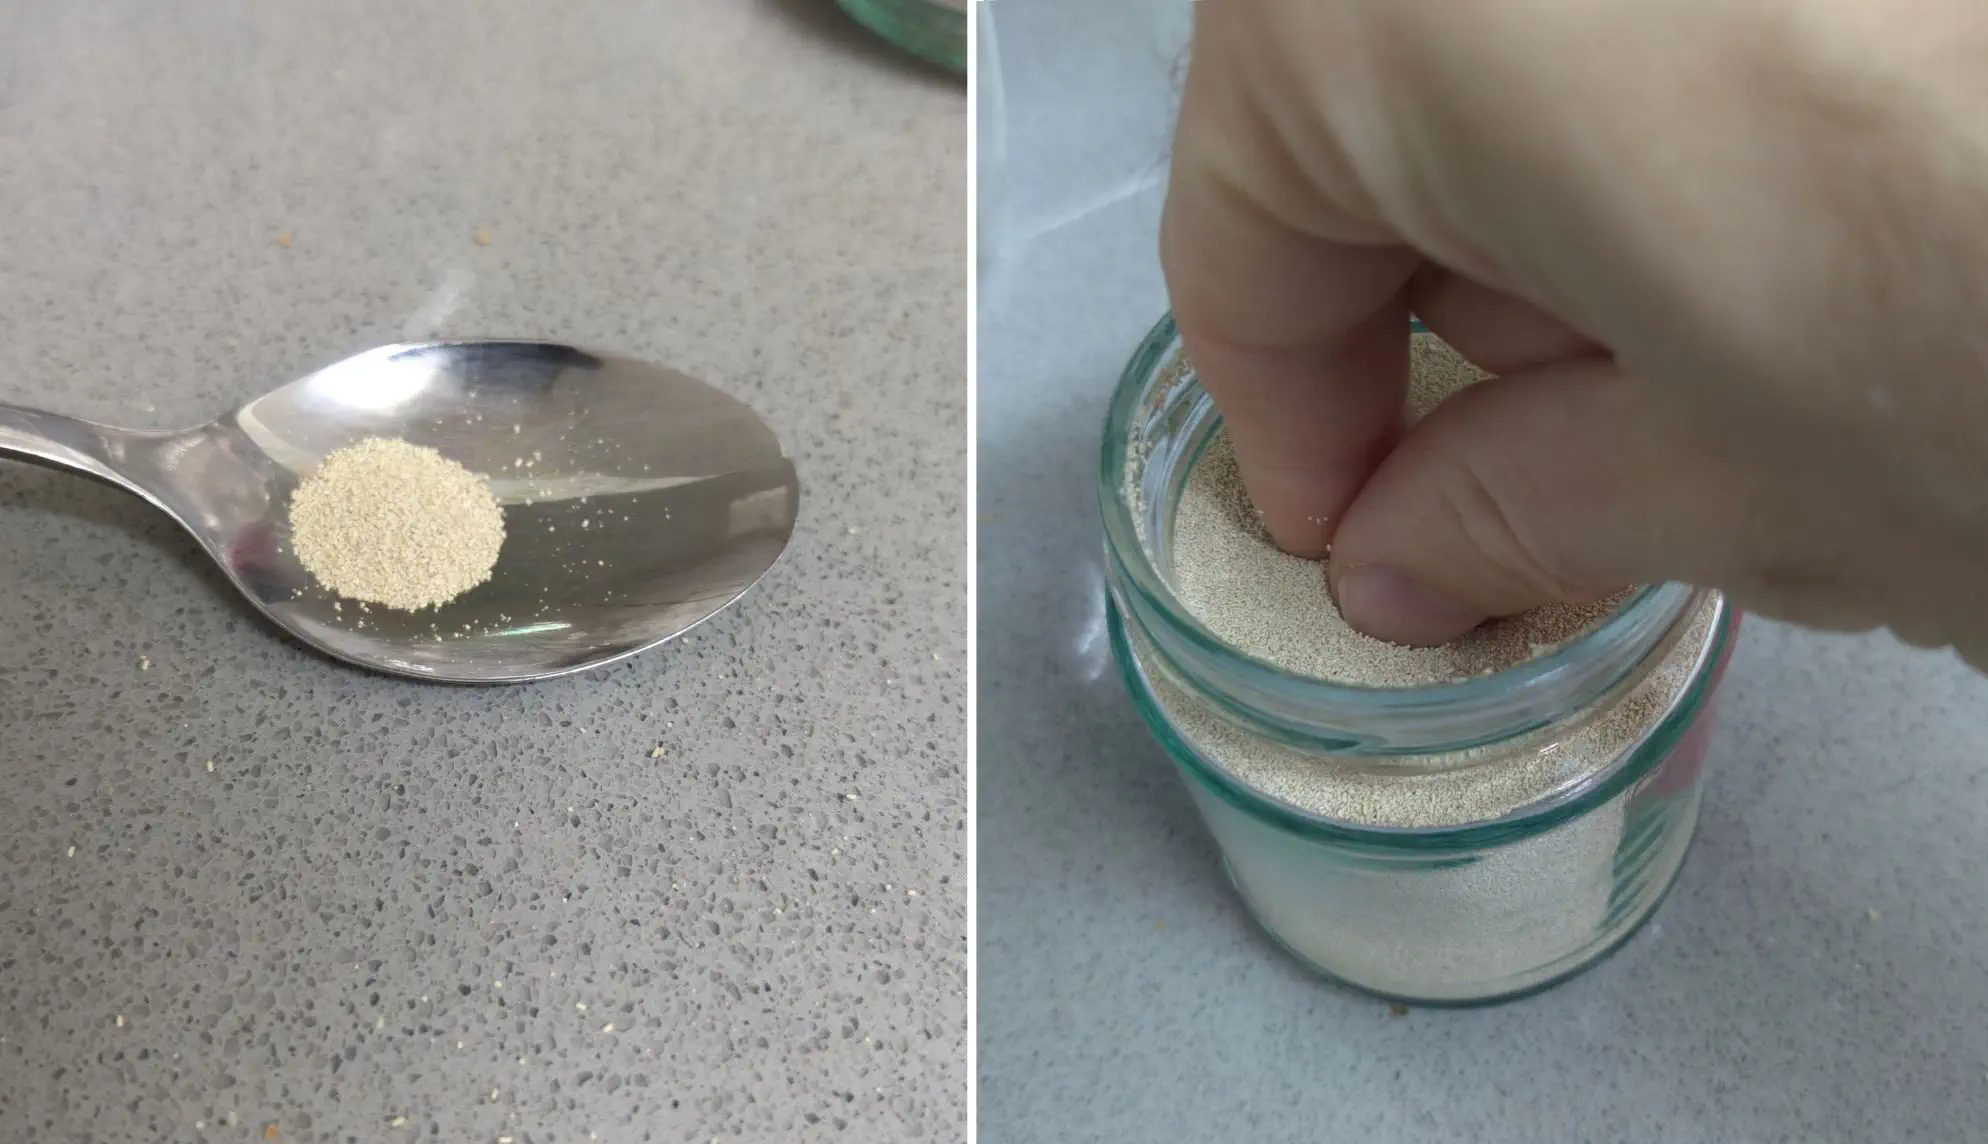
Another method that can be used is to use a “pinch” of yeast. Simply take a small amount of yeast between your fingertips (see the picture below). While not the most precise measurement (approximately 0.1g of yeast is obtained), it works quite well.
How to Make Poolish, Biga, and Sponge
How to Make Poolish (Or Any Liquid Preferment)
Mixing the Poolish
Prepare an equal amount of water and flour (e.g., 50g of water and 50g of flour) and a container that is deep enough to hold at least twice the volume of the water and flour combined (the poolish will at least double in volume). It is highly recommended to use a transparent container so that you can monitor the fermentation progress of the poolish.
Add the water to the container, then add the yeast and mix until the yeast is incorporated. Next, add the flour. Be careful not to use cold water; instead, use water at room temperature (e.g., tap water). Cold water can harm the yeast cells.
Mix everything together (using a spoon, dough whisk, or small silicone spatula) until there is no dry flour left in the container and a smooth and uniform batter is achieved. Be sure to scrape the sides and bottom of the container thoroughly to ensure no dry flour remains unabsorbed.
Cover the container with a lid or cling wrap to prevent the poolish from drying out. There is no need to poke holes in the cling wrap or provide air circulation in the container, as this is unnecessary and serves no purpose.
At this point, I highly recommend marking the “starting” position of the poolish with a rubber band or marker so that you can visually track how much the volume increases during fermentation.
That’s it. The poolish is now ready, and all that remains is to let it ferment.
Fermenting the Poolish
Allow the poolish to ferment at room temperature for 8-12 hours (or according to your needs – just make sure to adjust the amount of yeast to the fermentation time and temperature using PizzaBlab’s dough calculator).
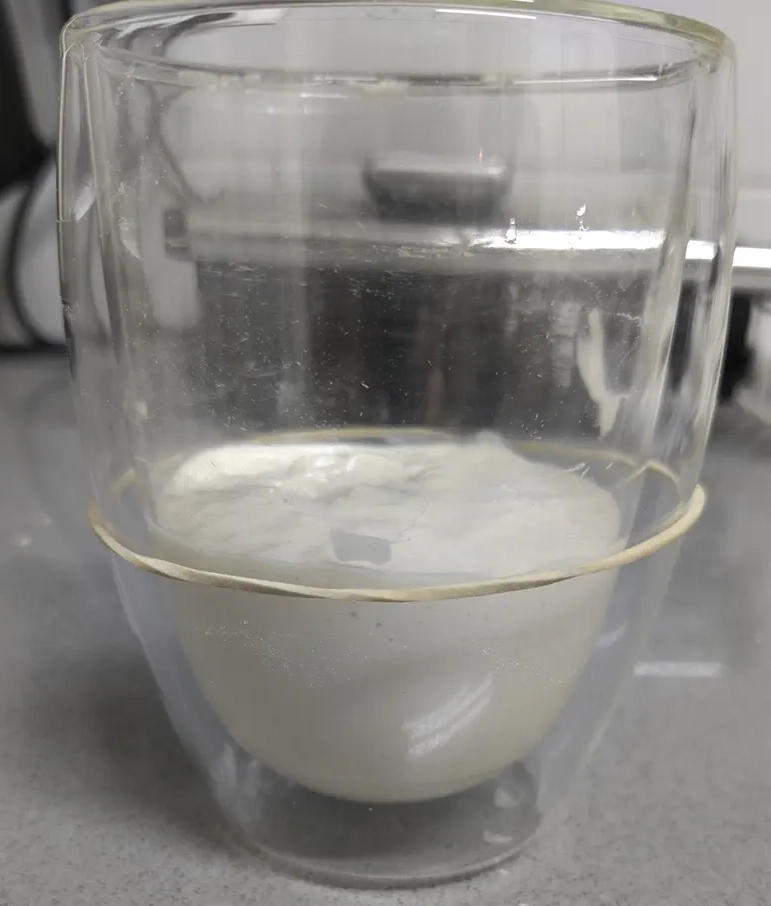
The poolish will be ready for use as soon as it has doubled in volume, and a “dome” with many small bubbles has formed on its surface (the rubber band can help you gauge the volume).
A ripe poolish will have a mildly sour and delicate smell, similar to yogurt.
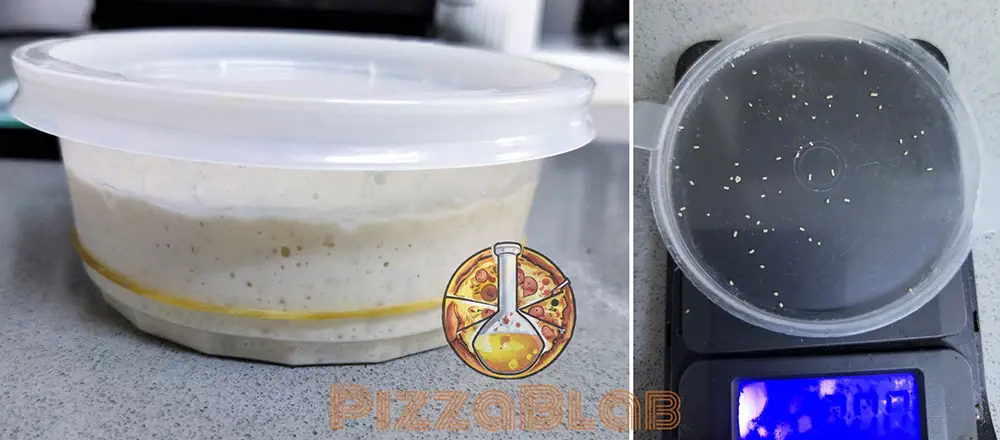
In an over-fermented poolish, you will clearly see a significant collapse inside, with residual marks on the sides of the container that are higher than the current level of the poolish (see picture below). It will also have a very sour/alcoholic smell.
If you notice that your poolish has collapsed significantly, it is best not to use it as it may do more harm than good. If this happens, check what went wrong – either you used too much yeast, let the poolish ferment for too long, or the fermentation temperature was too high. As mentioned, for maximum accuracy, it is recommended to use PizzaBlab’s dough calculator.
In general, once the poolish is ready to use, you can store it in the fridge for a few additional hours to extend its usability window a bit – but not beyond that.
Incorporating the Poolish Into the Final Dough
Transfer the ripe poolish into a bowl where you will mix the final dough. Then, add the remaining water from the recipe and briefly mix the poolish with the water – this will help incorporate the poolish with the rest of the flour more easily.
Don’t worry if the water appears cloudy/opaque at this point, that’s just the starch “separating” from the poolish – it will recombine with the dough during mixing. Mixing the poolish with the water for 10~ seconds will be sufficient.
Once the poolish is incorporated into the water, add the remaining ingredients from the recipe – the salt, yeast, and the rest of the flour. Continue kneading/mixing as you normally would.
How to Make Biga (Or Any Stiff Preferment)
Traditionally, the preparation of biga follows very clear and strict “rules”. These rules include:
- Dough hydration of 44-45%
- Using 1% fresh yeast or 0.3% instant dry yeast
- Fermenting for 12-24 hours at a temperature of 16-18C/61-65F.
Why this specific temperature range? Because this range is ideal for the formation of specific by-products in the biga during fermentation; Specifically, it helps achieve the right ratio between lactic and acetic acid, which gives the biga its unique characteristics.
There is a variation of biga called “biga lunga”, a process that involves cold fermenting the biga in the fridge for 24 hours and then another 24 hours of room temperature fermentation. Honestly, I don’t see any reason to go through all that trouble, and in such cases, it’s better to simply make a direct dough (or a “regular” preferment). Italians and their peculiarities…
Mixing the Biga
Biga should be prepared in a wide and deep container to facilitate mixing. Add the water and yeast to the container and mix thoroughly. Be careful not to use cold water if using dry yeast; instead, use water at room temperature (e.g., tap water). Cold water can harm the yeast cells.
Next, add flour to the water and yeast mixture, and begin mixing, NOT kneading. It’s preferable to use your hands for this step (as mentioned, we want to avoid kneading the biga and developing gluten; instead, we simply want the flour to absorb the water).
The most effective way to mix biga is by forming a claw-like shape with your hand and using your fingertips to circulate and combine the flour and water. Continue mixing the biga until there is no dry flour left in the container, as any remaining dry flour will not participate in the fermentation process.
The final consistency of the biga should resemble small to medium-sized chunks, similar to gnocchi, with minimal gluten development. Avoid kneading the biga or forming a cohesive dough mass that will increase in volume during fermentation. The biga should not expand by more than 20%, and definitely not double in size.
The entire mixing process should take between 3 to 6 minutes. If any large chunks of biga form, you can break them up into smaller pieces with your hands.
Once the biga has been mixed, cover the container with a lid or cling wrap to prevent it from drying out, and allow it to ferment. There’s no need to poke holes in the cling wrap or provide air circulation in the container, as this is unnecessary and serves no purpose.
There is a method for mixing biga called “biga no-stress” that involves “shaking” the container to mix the flour and water (similar to making a shake). However, I do not recommend this method as it often results in an under-mixed biga with a significant amount of dry flour that has not absorbed water.
Fermenting the Biga
The biga is ready once you can observe a slight “puffing up” of the chunks and approximately a 20% increase in volume (refer to the photo below). If the biga has not puffed up at all, it is not yet ready.
A ripe biga will have a moderately sharp alcoholic/sour smell that is relatively mild and not overpowering.
If the biga has significantly doubled in volume, it indicates that it was over-mixed. If the biga has a very strong acidic/alcoholic smell, it suggests that it has over-fermented.
Incorporating the Biga Into the Final Dough
Since biga is a very stiff preferment, incorporating it into the final dough can be challenging. To make it easier, it is highly recommended to crumble or cut the biga into smaller pieces before incorporating it into the final dough.
To further facilitate the incorporation of the biga, you can optionally soak it in water prior to mixing. Simply add the remaining water from the recipe to a bowl, add the biga chunks, and let them sit in the water for a few minutes before mixing.
However, be careful not to mix the biga too much in water alone, as this can cause the starch to separate from the biga chunks, resulting in hard and sticky gluten lumps that are difficult to incorporate into the dough (this is different from mixing poolish with water, which is possible due to its liquid texture).
Once the biga and water are ready, add the flour and other dough ingredients, and continue kneading as usual, ensuring that all the biga is fully incorporated into the dough.
Please note that the above process is for using a mixer. Hand kneading a dough made with biga is possible, but it is labor-intensive and requires a lot of force and elbow grease to properly incorporate all the biga into the final dough. If you choose to knead by hand, it is recommended to cut the biga into small pieces to facilitate its incorporation into the dough.
Another option for hand kneading is to put the biga in a food processor along with all the flour from the recipe and grind everything together until you achieve “biga crumbs”, which can then be added to the remaining water.
How to Make a Sponge
As mentioned earlier, the preparation process for a sponge is not specific or defined. This gives you the opportunity to be creative and experiment with different variations, such as fermenting for two hours or 24 hours, using 50% hydration or 80% hydration, and so on. By preparing different types of sponges, you can discover what works best for you and what you prefer.
The preparation of a sponge is similar to that of a biga or poolish, depending on its hydration level and consistency. For more details, please refer to the previous sections. The only difference is when dealing with a stiff sponge that has low hydration. In this case, you don’t need to create “chunks” like you would with a biga; Instead, you can mix/knead the sponge until it forms an actual “dough”, which is then allowed to ferment.
Just like a poolish, a sponge is ready to be used when it has doubled in volume and a “dome” has formed on its surface. A ripe sponge will have a mild smell, not overly alcoholic. The specific smell may vary depending on the composition of the sponge and the fermentation conditions.
How to Add a Preferment to Any Pizza Recipe
Working Out the Flour and Water for the Preferment
Preferments can be used in any type of dough and any dough recipe.
First, let’s understand how to calculate the amount of preferment in a recipe.
When we talk about the percentage of preferment in a recipe, we are referring to the proportion of flour in the preferment compared to the total amount of flour in the recipe.
For example:
Let’s say we have a recipe that calls for 1000g of flour, and we want to use 10% preferment.
To calculate 10% of 1000g, we multiply 1000g by 0.1, which equals 100g. So, our preferment will contain 100g of flour.
Now, what about the amount of water (hydration) in the preferment? This depends on the type of preferment. For a poolish, we use an equal ratio of flour and water, which means 100% hydration. For a biga, we use 45% water in relation to the total amount of flour in the biga.
Obviously, other hydration levels within this range can be used as well.
Let’s continue with the example:
We have decided on a 10% preferment, which means 100g of flour.
For a poolish, we add 100g of water to the flour (100% hydration, or a 1:1 ratio between water and flour).
For a biga, we add 45g of water to the flour (45% hydration).
To summarize:
- Decide on the amount (percentage) of preferment you want to use (in this example: 10%).
- Multiply the percentage of preferment by the total amount of flour in the recipe to get the amount of flour in the preferment (in this example: 1000 * 0.1 = 100).
- To find the amount of water in the preferment, multiply the amount of flour in the preferment by the desired hydration of the preferment (in this example: 0.45 * 100 = 45 [biga], or 1 * 100 = 100 [poolish]).
- Therefore, for a 10% preferment, we have a preferment that contains 100g of flour, and 45g of water for a biga, or 100g of water for a poolish.
Adjusting the Ingredients for the Final Dough
So we have a ripe preferment that is ready to be incorporated into the final dough, and now we need to determine the amount of flour and water that should be added to the final dough, along with the remaining dough ingredients.
Using the previous example:
Let’s assume that the total quantities for the recipe are 1000g of flour and 600g of water (60% final hydration).
We have 10% preferment (let’s say poolish), which consists of 100g of water and 100g of flour.
Now, let’s make the final dough: we combine the preferment (which already contains 100g of flour and 100g of water), with the remaining amounts of flour and water in the recipe – an additional 900g of flour (bringing the total to 1,000g) and an additional 500g of water (bringing the total to 600g).
And that’s it, that’s the whole process. It may appear complex or complicated, but thankfully, you can use PizzaBlab’s dough calculator to simplify the entire calculation process. Simply select the “Use a Preferment” option, enter the desired percentage of preferment and the hydration level of the preferment – and the calculator will handle the calculation for you, providing you with the final quantities for the entire recipe, the preferment, and the additional ingredients in the final dough.
Summary and Final Tips
Preferments are an exceptional tool that can enhance the flavor and texture of our baked goods, while also expanding our culinary expertise. Although the process of preparing and using preferments may initially seem intimidating, once you understand the concept, it becomes second nature. It is a crucial and powerful technique that every baker should have in their repertoire.
Generally, a properly fermented preferment will always enhance the flavor and texture of the baked product. However, these effects, particularly in terms of flavor, become less noticeable the longer the final dough is fermented. It is important to remember that flavor is subjective, and the impact of preferment on flavor may not be the same (or positive) for everyone.
Personally, I enjoy the flavor that preferments add to the dough; however, I know many people who do not notice a significant difference, or find it strong enough to justify using a preferment.
The best way to determine if a preferment is right for you, and which type to use, is to try it yourself and see what you prefer.
Key Takeaways
- What’s a Preferment:
A preferment is a mixture of a small portion of the recipe’s flour and water with a tiny amount of yeast, fermented for 6-24 hours. It is used to add complex flavor and improved texture, particularly in doughs with a short final fermentation. - Bacterial Activity (LAB):
The primary purpose of a preferment is to encourage the growth and activity of Lactic Acid Bacteria (LAB). This bacterial activity is what defines a preferment, producing the organic acids responsible for the distinct flavor and texture in the final dough. - pH and Dough Strength:
Preferments lower the dough’s pH through LAB activity. This acidification tightens gluten bonds and makes the dough stronger, which contributes to an airier crust and larger volume. - No Salt & Sugar, Minimal Yeast:
Preferments consist only of flour, water, and a small amount of yeast. Using too much yeast or adding salt or sugar/honey to a preferment will interfere with the specific fermentation goals of the preferment (LAB activity). - Temperature Matters:
To maximize the production of lactic acid bacteria (the source of flavor and texture), it is recommended to ferment your preferment at room temperature rather than in the fridge. - Flavor & Texture Profiles:
- Biga (Stiff): Produces a stronger, more elastic dough with a sharper, vinegary/acidic flavor profile.
- Poolish (Liquid): Produces a more extensible (stretchy) dough with a creamy, yogurt-like flavor.
- Amounts & Math:
Preferments are typically calculated as a percentage of the total flour weight. While the typical range is 10%–50%, some advanced styles (like 100% Biga) use the entire flour amount in the preferment. - Flavor Complexity:
Preferments allow for a build-up of organic acids (lactic and acetic) and esters, producing flavors that a short, direct fermentation cannot replicate. - Experience Level:
Preferments are an advanced technique. It is highly recommended that beginners master “direct dough” (no preferment) before experimenting with a preferment. - Peak Ripeness:
Timing is critical. A preferment must be used at its peak maturity; using one that has passed its peak and “collapsed” can negatively impact the strength and structure of your dough. - Universal Use:
Preferments are versatile and can be incorporated into any dough recipe to improve the final result. - Easy Calculation:
Use PizzaBlab Dough Calculator to easily determine the exact flour and water subtractions needed when using a preferment.
Enjoyed this article? Join the BLAB
Unlock the Key Takeaways above, Get an ad-free experience on the entire site and direct, personal help with your dough or baking questions by becoming a member.

Nice article thank you!
Thank you! I’m glad you enjoyed it 🙂
Thank you for all the valuable information! What are your thoughts on using LDMP for browning and flavor, as well using a poolish?
Thanks you!
My pleasure Vince 🙂
I’m a big fan of diastatic malt powder, and it works great for both direct and indirect doughs, especially when used with a preferment, as it helps balance the effects of preferments on browning.
Very useful and well written article!
It connects so many topics regarding preferments and makes all so easy to understand and use.
Thank you very much!
Thank you Milan! My pleasure 🙂
Hi, So most likely, a dough made with both poolish and LDMP, with a 72 hour CF will not have as much flavor as as the same dough with a 24 hour CF period? Regarding hydration for the poolish, its usually 50% water and 50% flour. have you ever tried a higher hydration poolish? something like 60/40?
Thank you, much appreciated!
That’s correct, the longer the fermentation time, the more flavor the dough will develop.
Regarding poolish, the hydration of a poolish is based on the weight of the flour (in baker’s percentages), so a poolish will always have the same amount/ratio of flour to water, meaning 100% hydration (I guess that’s what you meant by 50/50?). A higher hydration poolish (say 120%) may promote enzymatic and LAB activity to some extent, but I’m not sure it will significantly affect the final dough. But you can definitely try it 🙂
This is the most relevant article I’ve seen on this topic. Can you justify the use of 70%-80%-100% biga? How significant is the impact on the flavor and what are the potential risks?
Thank you Malcolm!
It’s really a matter of preference. A high amount of biga can result in a very elastic dough, which could lead to a tougher, chewier texture, but if done right, it may also produce more volume with larger, irregular alveoli. If you’re aiming for a canotto-style Neapolitan, a higher amount of biga can be beneficial. Otherwise, there’s not much point to it 🙂 But as always, it comes down to personal preference!
hello. i’m loving all this information but i have a question:
you wrote above that the stiffer the preferment, the less acidic it is. makes sense. But a few pages down you also wrote:
In general, the production of acetic acid increases as the preferment becomes “stiffer” (i.e., has a lower hydration), while the production of lactic acid increases as the preferment becomes more “liquid”
meaning it will taste more acidic the stiffer it is? isnt that opposing what you wrote above it, where a stiffer starter is less acidic? or does the PH of a starter and its acetic acid aren’t linked? Would love if you could clarify this for me 🙂
Hi David,
‘or does the PH of a starter and its acetic acid aren’t linked?’ – That’s correct 🙂
While there’s a connection between flavor and acidity, it’s not always straightforward or directly tied to pH. Two starters can have the same pH, yet differ significantly in flavor due to varying concentrations of lactic and acetic acid. For instance, acetic acid contributes more to a ‘sour’ flavor profile – this is why stiffer preferments (e.g. biga) tend to taste more sour, even though they don’t necessarily have a lower pH.
Additionally, certain factors, such as added milk or flours with higher ash content, can buffer acidity, which means a dough might taste more sour without a corresponding decrease in pH.
I hope that answered your question!
wow. I’ve been baking for 20 years and always assumed that when a recipe calls for 20% preferment (of whichever type) the weight of that 20% is the total of the preferment. but according to what you wrote above, the weight of the 20% only relates to the amount of flour in the preferment?? this is the first time i read/noticed this!!
Hi Mike,
There’s no right or wrong way to calculate the amount of preferment; It can be based on total dough weight (as you mentioned), total water content, or flour weight. I find calculating it relative to flour weight to be the easiest, most consistent, and simplest for newcomers to understand, which is why I prefer it 🙂
This is also how I’ve always calculated it. There does seem to be variance in how people define the percent of preferment since it is itself flour and water. Even when measured as a percent of flour (bakers percent) it can be confusing. One would divide the preferment by the flour but may not account for the flour in the preferment.
Very interesting material. As of now, after many different tests of long and short / cold and room temperature of dough maturation, I am starting to measure Ph simultaneously. For example, poolish in your range is 4.5 to 5.0 and biga 5.0 to 5.5. I understand that the given Ph ranges are the moment at which we should bake the dough, right? Do you know / recommend any material / data on how to track the dough maturation process in relation to the Ph parameter (for poolish and biga)? For example, I found a material where the recommended ranges are the opposite of those given in your material (10:45): https://www.youtube.com/watch?v=d_T-6D6p1cA
Hi Karol,
First, note these are broad ranges – as you correctly understand, actual pH depends on many factors (fermentation duration, temperatures, even flour used). While you can use a pH meter (avoid cheap ones under $100 – they’re unreliable), I don’t recommend relying on it to judge dough readiness unless purely for educational purposes. Too many variables matter beyond just pH.
About that video – he’s wrong, and I’ve no clue where he got those numbers. It’s irresponsible to spread such misinformation. A poolish is inherently more acidic (lower pH) than a biga, due to its higher hydration, which drives greater bacterial and enzymatic activity, meaning more acid production. His poolish pH values only make sense if referring to a severely under-fermented, or an improperly made one (like a fridge-fermented poolish).
Hi Yuval (greetings from Gdansk) Thank you for your answer. Until reading this material I was convinced of long (2-4 days) cold fermentation. Now I am testing making pizza on poolish at an ambient temperature of 21 (0.02-0.05% yeast) which leads to a fermentation peak even after 30 hours. I use (apera ph60-s) with 3-point calibration. I estimate the accuracy of my measurements at home at +/- 0.05. The first conclusion is that my tap water is quite alkaline 7.4 and the goal is Neapolitan pizza, where it is recommended to go below 7, so I lower the Ph by adding apple vinegar slightly (but if I care about lactic acid, it would probably be better to lower the pH with buttermilk instead of vinegar). Currently I am looking for the optimum, between the Ph level and the peak of the increase in the fermentation volume. I use caputo red flour (W300/320) and it turns out that the increase can be not 2x (+100%) but even 3.5. And since the margin is important in poolish, i have a question. Will the quality of the influence of poolish on the dough be best slightly before the peak, at the moment of the biggest peak, or slightly after the peak?
Hi again Karol,
I admire your dedication!
Regarding your question: The longer you ferment the poolish, the more flavor it develops (up to a point – extreme over-fermentation can make it overly acidic). However, extended fermentation also breaks down more gluten, which then affects the final dough’s properties.
Generally, it’s best to use the poolish at or just before its peak. Once it starts collapsing, it’s typically a sign that the gluten breakdown is more than desired. That said, the ideal timing depends on your dough type, poolish percentage, and other factors.
Hi
Very interesting read.
I have been making pizza at home for years and now I’m thinking I would try combining (24h) poolish and (24h) biga, mixing it together and adding salt and extra water til I reach the desirede final hydration of lets say 70%, and a dough temperature of 24 to 25 celsius. Then let it rest 20 minute before making the balls and putting them in the fridge for 48 hours.
The reason for the biga is that I want to make sure the flour absorbs as much of the water as possible.
Maybe my logic is not logicing? ;-D but I like to experiment.
Any thoughts or comments would be greatly appreciated .
Best regards
Henrik
Hi Henrik,
Can’t say I’ve ever heard of a poolish–biga hybrid, nor do I really see the benefit of such a process, as each has its own purpose, as outlined in the article. If your goal is to ensure full water absorption, a short autolyse (around 20 minutes) will do the job just fine.
That said – there’s only one way to know if it works and whether you like it!
Hello again from Poland. I’ve been recording and testing poolish recently, including pH testing (I use 00 ~ W310 flour). In your photo, “This is what an over-fermented poolish looks like,” you write that when the poolish drops slightly, it’s too late. At the same time, poolish often has several peaks, resulting from enzymes unevenly supplying sugars to the yeast. Between peaks pH stand still :). Only after some time (I assume when the sugar from the starch is depleted and protein is consumed) level begin to drop, which is also reflected in the pH meter readings. And finally, a question: Do you think the poolish activity window ends when the first peak drops, or when the last peak drops? Or is there any pH reference like in sourdough?
Hi Karol,
The “ripeness” test isn’t about pH or yeast/LAB activity – it’s simply a practical way to assess gluten structure. Once the poolish starts to recede (there’s a visible gap between its current level and the “smear marks” higher up on the container – as shown in the article’s video), that’s usually a sign the gluten has begun to degrade too much. Using the poolish at that stage (especially at higher percentages) can introduce too much degraded gluten into the final dough, resulting in a weak, slack dough.
Exactly when this happens depends on many factors: how the poolish was made, how long it fermented, and the type of flour used (this is why a stronger flour is often preferred for preferments – just like in final doughs, it holds up better to longer fermentation before breaking down too much).
Theoretically, and in real practice, two poolishes or doughs can have the same pH, but vastly different gluten strength. That’s why pH isn’t a reliable indicator of fermentation progress. It can be interesting for learning or tracking sourdough starter behavior, but not as a sole measure for judging poolish ripeness or dough readiness.
Perhaps it’ll be easier if I show it with data. Below is one of my tests, using 0.3% fresh yeast. 19 points, each showing the percentage increase hour by hour:
Time Growth
Start 0%
1h 5%
2h 12%
3h 45%
4h 75%
5h 100% Double size
6h 125%
7h 130% First, Max peak
8h 109% “If you don`t know the future” this is recede moment
9h 114%
10h 123%
11h 98%
12h 127% Last Peak
13h 114%
14h 121%
15h 97%
16h 80%
17h 83%
18h 78%
19h 64%
My question is, up to what time do you think poolish is safe to use? My tests and experiments point more to 12h (or even 14h) rather than 8h where the first moment of recede is noticeable. I’m simplifying this by saying that between 8 and 14 hours there’s a window of active poolish that can be used to make dough. Before 8 hours is too early. After 14 hours, the sugar from the starch is gone, and the protein (which forms the gluten network) begins to be consumed.
Hi Karol,
Thanks for the detailed data, very interesting!
Based on this, I’d say the ideal window is somewhere between 8-12 hours. If the fermentation was done at 20C, that lines up well with what the calculator suggests (around 10 hours).
That said, I wouldn’t stress too much about hitting the ‘exact’ moment to use the poolish. As long as there has been sufficient LAB activity (here a pH meter can actually be useful), and the gluten structure is still stable and not excessively degraded (no dramatic collapse), it should be fine to use.
Even an under-fermented poolish is OK to use – it might not contribute all the expected flavor and acidity, but it won’t ruin/harm the dough. An over-fermented poolish, on the other hand, can easily ruin the dough by introducing too much degraded gluten and excessive acidity (which accelerates further gluten breakdown in the final dough).
Another simple and practical way to assess ripeness is by smell: as mentioned in the article, a ripe poolish should have a yogurt-like, slightly sour aroma (for a poolish fermented at room temperature) – this is a strong indicator that there has been sufficient LAB activity.
I’m currently working on a short YouTube video about poolish at a basic level – after all, it’s most likely a Polish invention, so it’s worth knowing :P. But I also have continuous pH results connected to the Advance level (next part). I’ve also encountered the floating method. In this range of 8-12 :), the sample should float on water due to the healthy gluten network and not dissolve quickly. Before 8 and after 12, the sample will sink. Which works quite well without a complicated laboratory setup. Best regards, Karol.
Thanks for all the great information!
Does it make sense, as in the result of a delicious pizza, to 1) make the poolish, fermenting for six to eight hours, 2)combine into final dough and ball, and then 3) refrigerate for 24 to 72 hours?
Hi Wight,
It absolutely does. As explained in the article, a poolish will impart a distinctive flavor to the dough. That said, whether it’s worth the extra effort when combined with a long cold fermentation is up to you – experiment and see for yourself 🙂
Hello and happy new year.. for poolish in room temperature around 20-21 degrees celsius should i warm a bit the water that i am going to use or is not necessary ?
Hi Xaris,
Assuming your flour and water are also at 20-21°C, there’s no need to warm the water – just mix everything together. Warming the water is useful when the flour and/or water are quite cold (below ~15°C / 60°F), as too low post-mix temperature can slow fermentation (this applies to poolish in much the same way it does to a regular dough mass).
That said, a poolish is usually smaller in volume, and due to its consistency and “shape”, more “sensitive” to ambient temperature – so it equilibrates with the ambient temperature more quickly, making the final “dough” temperature somewhat less critical.
Hi Yuval
Using a poolish as an example — 0.3% fresh yeast, 100% hydration, fermented for 10 hours at 20 °C — how should I adjust it if my room temperature is 16 °C?
Which would be closer to the original result:
1. Increase the fermentation time to ~18 hours while keeping 0.3% yeast, or
2. Keep it at 10 hours and increase the yeast to 0.6%?
Hi Sem,
The best approach is to treat the poolish exactly like a regular dough and calculate the yeast amount based on fermentation time and temperature using PizzaBlab’s calculator.
A 10 hour fermentation at 16C corresponds to 0.6% fresh yeast, so that’s the “correct” answer. This method allows you to adjust the yeast amount in the poolish for any fermentation time & temperature combination.