How to Properly Use Yeast in Pizza Dough (Dry and Fresh)
Using yeast properly is key to consistently achieving perfectly fermented dough. While working with yeast – especially dry yeast – is straightforward, it does require following certain best practices. In this article, we’ll cover the correct way to use yeast, so you can get excellent and consistent results every time you make dough
Note that this article provides a practical guide on best practices for using yeast, specifically dry yeast. For more information on yeast in general and the differences between fresh and dry yeast, see A Complete Guide to Baker’s Yeast for Pizza Dough: Types, Characteristics, Differences, and More.
How to Use Dry Yeast (Active/Instant)
In the following sections, you’ll learn how to properly use dry yeast for the best dough results – and why it even matters.
Working with Dry Yeast: Introduction
Before discussing the proper use of dry yeast (both active and instant), it’s important to first understand the concept of cell rehydration in dry yeast – a process that directly impacts yeast activity, fermentation, and the overall properties of the dough.
Rehydration and Glutathione Release in Dry Yeast
During the drying process, dry yeast’s cell membrane becomes more porous, allowing substances to pass in and out more easily. When rehydrated with water, the membrane absorbs moisture and returns to its original state, but it is not fully functional at this stage. As a result, some essential components leak into the dough:
- Cofactors: Necessary for enzyme activity in yeast cells.
- Glutathione: An antioxidant important for yeast cells that also affects dough properties when it leaks into the dough.
The optimal temperature for rehydration and membrane recovery is 40°C/104°F.
All the information provided above and in this section applies only to dry yeast (both active and instant), as fresh yeast does not undergo a rehydration process. For an official reference on the topics discussed here, see this information sheet from Lallemand, a global leader in yeast production.
While cofactors are crucial for yeast activity, yeast cells can resynthesize them, so their impact is mainly significant at the start of fermentation, though the amount released can still have a noticeable effect. The issue with glutathione, however, is different.
When glutathione is released into the dough, it acts as a dough softener/reducer by breaking down gluten bonds (specifically disulfide bonds), essentially weakening the dough and making it more “slack.” Excessive release of glutathione can make the dough too extensible, soft, and sticky, which can make it difficult to handle, and also affect the final product.
Certain dough enhancers (dough reducers) include glutathione (in the form of “dead” or “deactivated” yeast) in controlled amounts. These dough enhancers are used to soften the dough, making it more extensible and easier to work with.
When using instant dry yeast, glutathione release is inevitable, even under optimal conditions. However, minimizing this release is highly desirable. This can be achieved by providing the yeast with optimal rehydration conditions, specifically by suspending it in warm water.
Suspending dry yeast in water at temperatures between 37-43°C/98-110°F ensures ideal cell membrane recovery, reducing the release of glutathione and cofactors into the dough.
If the yeast comes into contact with water outside this optimal range, different effects occur:
- At temperatures between 21-37°C/70-98°F, the release of glutathione and cofactors is less significant, but still present.
- If the water temperature is below 20°C/68°F, membrane recovery slows down significantly, leading to increased release of essential components from the yeast cells. In this scenario, up to half of the cell’s soluble components may be lost. The lower the temperature and the longer the yeast is exposed to it, the greater the effect.
If yeast comes into direct contact with cold water, a significant number of yeast cells may be killed/damaged, depending on the temperature and duration of exposure. This can slow down fermentation and alter the dough’s properties, leading to increased glutathione release and a more extensible, sticky, and “wet” dough. If your dough hasn’t risen after adding yeast directly to cold water, this is likely the cause.
While less common, it is also important to avoid adding yeast directly to hot water (over 46°C/115°F).
Therefore, when working with dry yeast, it is crucial to avoid direct contact with cold water. This is especially true for instant dry yeast, as its manufacturing process makes it more “sensitive” during the rehydration process.
All major yeast manufacturers explicitly advise against adding dry yeast (whether instant or active) to cold water (an example from Lessafre – see the ‘usage’ section), and recommend using the yeast in one of the methods outlined in the next sections.
In summary, for optimal results, both instant and active dry yeast should be suspended in warm water to ensure proper rehydration and effective yeast activity, as well as optimal dough properties.
Four Methods for Using Dry Yeast Properly
Below are four effective methods for using dry yeast (and also what to avoid):
- Mixing the yeast with flour [simplest, most practical method].
- Adding the yeast mid-mixing (only applicable when using a mixer).
- Adding the yeast directly to water at a temperature higher than 21°C/70°F (not ideal, but works).
- Suspending the yeast in warm water and then adding it to the rest of the recipe’s water [recommended method].
These methods mainly apply to instant dry yeast (IDY). Active dry yeast (ADY) must be suspended in warm water, as described in method #4 below.
1. Mixing the Yeast With Flour [Simplest Method]
This is probably the simplest method for using instant dry yeast, and it’s usually the one most yeast producers recommend. By mixing the yeast with the flour (or sprinkling it over the flour), we create a ‘buffer’ that prevents direct contact between the yeast and the water.
To use this method, thoroughly mix the yeast with the flour before adding it to the water (even if the water is cold).
Alternatively, you can sprinkle the yeast on top of the flour after adding the flour to the bowl (i.e.: add water to the bowl → add flour to the water → sprinkle yeast on top).
If using ice water, it is recommended to mix the yeast with the flour and let the yeast-flour mixture sit for at least 10 minutes. This allows the yeast to absorb some moisture from the flour (flour contains about 14% moisture), starting the rehydration process and improving the yeast’s “durability” when it eventually contacts the cold water.
2. Adding the Yeast Mid-Mixing (Delayed Yeast Addition)
This method is not the most convenient, but it is effective. Begin by mixing all the dough ingredients except the yeast. After 2-3 minutes, when most of the water has been absorbed by the flour, sprinkle the yeast over the dough and continue mixing. This method is best used with a mixer, as kneading by hand would make it challenging to evenly incorporate the yeast into the dough.
By adding the yeast only after all the water has been absorbed by the flour, you prevent it from coming into direct contact with cold water. At the end of mixing, ensure there are no remaining “free” yeast granules that haven’t been fully incorporated into the dough.
3. Adding the Yeast Directly to Water (Over 21°C/70°F)
This method is not ideal because some glutathione will still be released into the dough; However, it can be effective, especially in warmer weather when tap water temperatures are higher, or when achieving a more extensible dough is desired. Simply sprinkle the yeast into the water, mix well, and then add the remaining dough ingredients.
4. Suspending Yeast in Warm Water [Recommended Method]
This is the most effective method for using any type of dry yeast, as it ensures optimal rehydration of the yeast cells – and it’s the one I personally recommend.
To use this method, suspend the yeast in warm water at 37–43°C (98–110°F), and let it sit for about 10 minutes.
The yeast should be mixed with water only, without any added sugar, flour, or other ingredients. Once rehydrated, add the yeast-water mixture to the rest of the recipe water, even if the remaining water is cold.
This method is especially recommended when hand-kneading, as it helps distribute the yeast evenly throughout the dough.
In the next section, you’ll find detailed instructions on how to properly rehydrate yeast in warm water.
How to Properly Suspend Dry Yeast in Warm Water
Suspend the yeast in a separate container, using a small amount of warm water. You can either heat the water in the microwave or mix hot water with cold water until it reaches a temperature of 37-43°C/98-110°F – whichever method you find more convenient.
To measure the water temperature, use an infrared thermometer or a probe thermometer. Alternatively, test the water with your finger; it should feel warm, but not too hot. If you can’t keep your finger in the water for more than 5 seconds, the water is too hot.
Be sure to account for the water used to suspend the yeast as part of the total amount of water in the recipe. For example, if the recipe calls for 100 grams of water and you used 20 grams to suspend the yeast, add the yeast water (20 grams) to 80 grams of water to reach a total of 100 grams. Be aware not to add the yeast water to an additional 100 grams of water, as this would result in a total of 120 grams of water.
My recommendation is to prepare the total amount of water required by the recipe in advance; Next, transfer a portion of this prepared water to a separate container to suspend the yeast. This way, you can safely add the yeast-water mixture to the remaining water and avoid confusion.
After heating the water, add the yeast (without any sugar or flour), mix well, and let the solution sit for about 10 minutes. Then, add the yeast water to the rest of the recipe’s water and mix well.
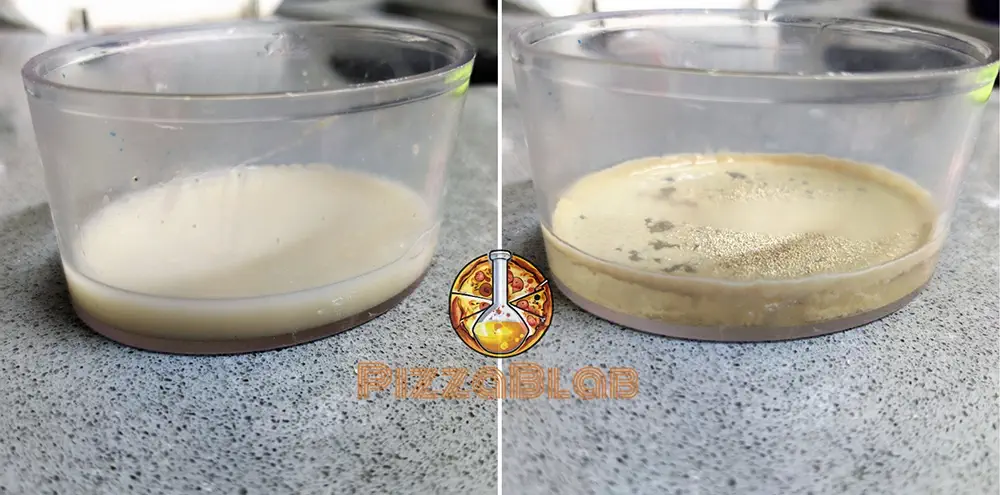
On the Left: The yeast after mixing and suspending for 10 minutes
How to NOT Use Dry Yeast
As mentioned in the previous section, and since it’s worth emphasizing again due to its importance – avoid adding dry yeast, whether instant or active, directly to cold water (below 20°C / 68°F).
Doing so can result in a slack, sticky, overly extensible dough, and impair the yeast’s ability to properly ferment the dough.
How to Use Fresh Yeast
Fresh yeast is the easiest type of yeast to use. You can simply crumble it over the flour, or dissolve it in the recipe’s water – no need for rehydration or any special steps (other than making sure it’s still active).
Fresh yeast, unlike dry yeast, can be added directly to cold/ice water, as it does not undergo a rehydration process.
When hand kneading, it is recommended to crumble fresh yeast into the recipe’s water, and mix well until it is mostly dissolved. This ensures that the yeast is evenly distributed throughout the dough.
This is less of an issue when using a mixer, as a mixer incorporates the yeast into the dough much more efficiently than hand kneading.
Additional Practical Tips for Yeast Use
Can You Add Salt and Yeast Together?
The short answer is yes, there is no problem adding yeast directly with salt.
In more detail, while salt has the potential to draw moisture from yeast cells and impair their functionality, this would require a very high salt concentration and a long exposure time – conditions not typically present when making dough.
To explore this further, a study was conducted to assess the effect of salt on yeast activity and fermentation. The study involved suspending yeast in a saltwater solution with a concentration of 7% for 20 and 40 minutes before incorporating it into the remaining dough ingredients. The aim was to evaluate the impact on fermentation and the final product, including volume, taste, and overall quality.
Surprisingly, the study found that dough in which yeast had been suspended for 40 minutes in the saltwater solution had the largest volume and ranked highest in taste, aroma, and overall quality. The study concluded that the “stress” induced by the salt did not harm the yeast, but actually enhanced its functionality, resulting in improved bread quality.
Of course, this does not mean that it is advisable or recommended to suspend yeast in saltwater before adding it to the dough, and the results of the study can be further interpreted and analyzed. However, this study proves, at the very least, that yeast does not die or sustain significant damage in the presence of salt.
Therefore, as long as salt and yeast are not left together for an extended period, adding salt directly with yeast should not be an issue.
How Much Yeast Should You Add to the Dough?
A detailed answer to this question can be found in the following article: How Much Yeast to Use in Pizza Dough: Factors Affecting Fermentation Rate.
Until you have a chance to read the full article, know that PizzaBlab’s Dough Calculator allows you to calculate the amount of yeast needed based on fermentation duration and temperature – two key factors that affect yeast requirements – to achieve perfectly fermented dough and avoid both under and over-fermentation.
The calculator works for all types of yeast and yeast-leavened dough, not just pizza dough. For enriched or sweet doughs with a high sugar content (over 5% of the flour weight in baker’s percentages), it is recommended to increase the yeast amount provided by the calculator by 1.5. This adjustment accounts for the osmotic pressure caused by the high sugar content.
How to Check if Your Yeast is Still Good
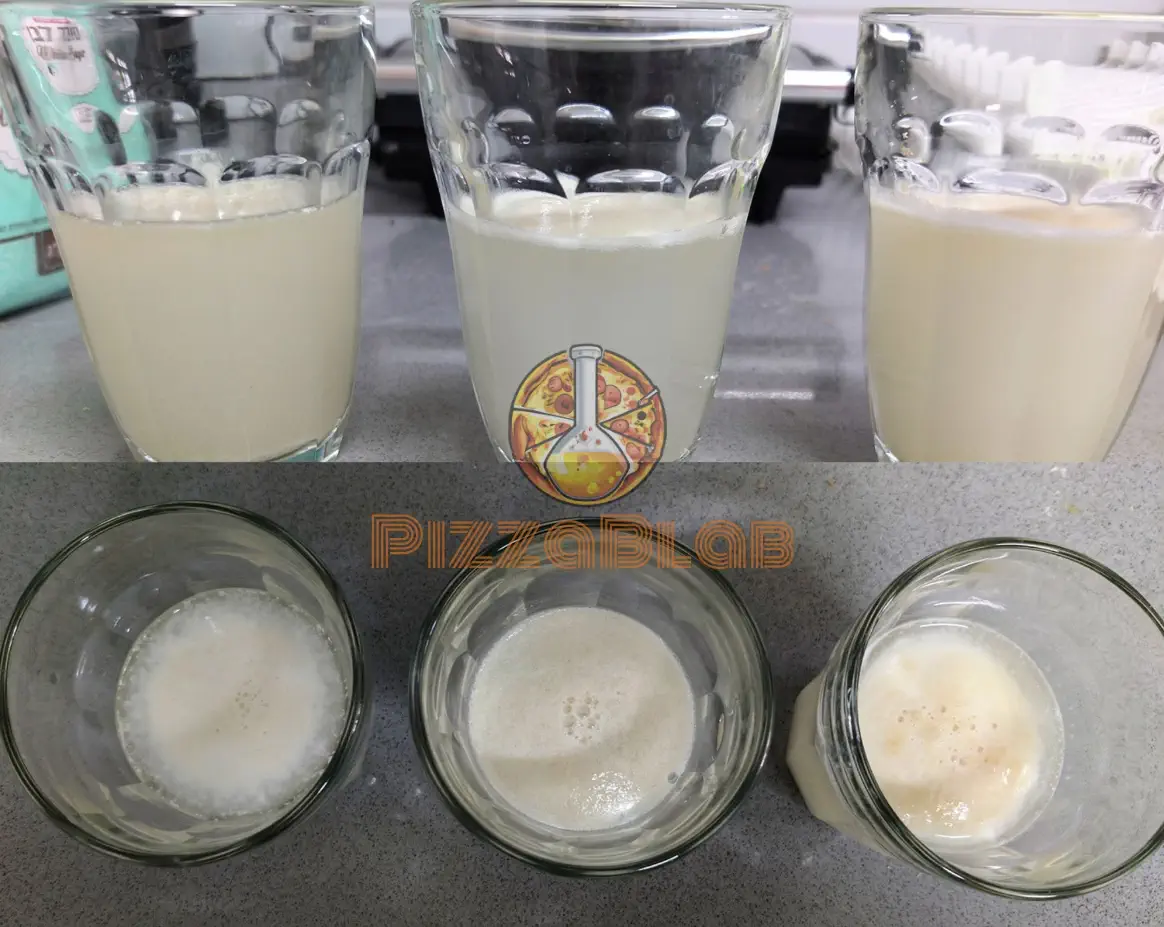
To ensure your yeast is still viable, perform this simple test:
- Fill a glass with warm water. Test the temperature by dipping your finger in; it should feel warm but not too hot.
- Add a teaspoon of sugar to the glass and stir until most of the sugar dissolves.
- Add about half a teaspoon of yeast (dry or fresh) to the glass and mix until it dissolves.
- Wait for approximately 15-30 minutes. A layer of foam or bubbles should form on the surface (see picture below). If foam or bubbles appear, your yeast is still good and can be used. If no significant foam forms, it’s time to purchase a new package of yeast.
How to Properly Store Yeast
How to Store Fresh Yeast
Due to its high moisture content, fresh yeast has a very short shelf life. It typically lasts about two weeks at room temperature (approximately 23°C/73°F) and up to two months when refrigerated (0-5°C/32-40°F), from the date of production.
Fresh yeast loses its potency quickly. Even under optimal storage conditions in an unopened package, it can lose around 10% of its leavening power within the first month. Afterward, its potency decreases significantly each week, and it generally loses its leavening power completely after about two months.
Therefore, it is recommended to keep fresh yeast in the refrigerator, well-packed in its original packaging, and use it within two months of the production date (not the purchase date). As time passes, the leavening power of fresh yeast gradually decreases, so using the same amount of yeast after four weeks may not yield the same fermentation results as in the first week.
Avoid storing fresh yeast in the freezer, as the freezing process damages the yeast cells. The high moisture content causes ice crystals to form, which physically harms the cells and reduces their viability.
How to Store Dry Yeast (Instant/Active)
Dry yeast has a very long shelf life. According to manufacturer guidelines, instant dry yeast can last up to two years, while active dry yeast can last up to one year. However, with proper storage, dry yeast can maintain its leavening power for even longer than two years, with minimal loss of leavening power.
For unopened packages, dry yeast can be stored at room temperature, ideally not exceeding 27°C/80°F. Once opened, it’s best to store the yeast in a completely sealed container to minimize exposure to air and moisture, which can degrade its potency.
The best places to store dry yeast are in the fridge (especially in colder areas like the back or inside) or in the freezer, which is recommended for optimal shelf life.
It is important not to keep dry yeast at room temperature after it has been opened, as this can significantly shorten its shelf life and potency.
One efficient method for storing dry yeast is to keep it in its original packaging, which is typically made of aluminum. After opening, roll and fold down the top of the packaging until it touches the yeast to minimize the air inside, effectively resealing it (see picture below). Alternatively, transferring the yeast to another airtight container also works well.
Moisture is the main factor that affects the shelf life of dry yeast. It is crucial to avoid introducing any moisture or “wetting” the inside of the container or package where the yeast is stored.
Specifically, it’s important to avoid drastic temperature changes inside the container or package. For example, when a cold container is taken out of the fridge or freezer and exposed to room temperature, condensation can form inside. This occurs when warm air meets the inside of the cold container, resulting in water droplets that the yeast can absorb, shortening its shelf life.
To avoid this, you can use one of the following methods:
- Remove the container or package of yeast from the freezer or refrigerator, take out the required amount, reseal it, and immediately return it to the cold storage. This minimizes the risk of condensation inside the container, and is the recommended method.
- Alternatively, allow the container to reach room temperature before opening it. This way, you balance the temperatures, preventing condensation from forming inside.
By following these methods, you can easily extend the shelf life of your dry yeast to at least one year, and in practice much longer. Personally, I have a package of instant dry yeast that is three years old and still very much active.
Enjoy the content on PizzaBlab? Help me keep the oven running!