How to Fix Lumpy Pizza Dough [Causes & Solutions]
If you’re finding stubborn lumps, pockets of dry flour, or small, tough pieces throughout your dough, it’s a clear sign your ingredients didn’t incorporate correctly. This page breaks down the common causes for lumpy dough and provides immediate, actionable steps to ensure you achieve a uniform, smooth texture right from the start
This page is part of PizzaBlab’s Pizza Making Troubleshooting Guide. It provides a practical overview of the most common causes for this problem, each with a brief explanation, actionable solution, and links to related articles for deeper understanding.
The sections are listed from most to least likely, meaning the first cause typically represents the most common reason for this issue, with likelihood decreasing as you move down the list. That said, several causes can often overlap or share similar likelihoods – it’s ultimately up to your process to identify which factors are at play.
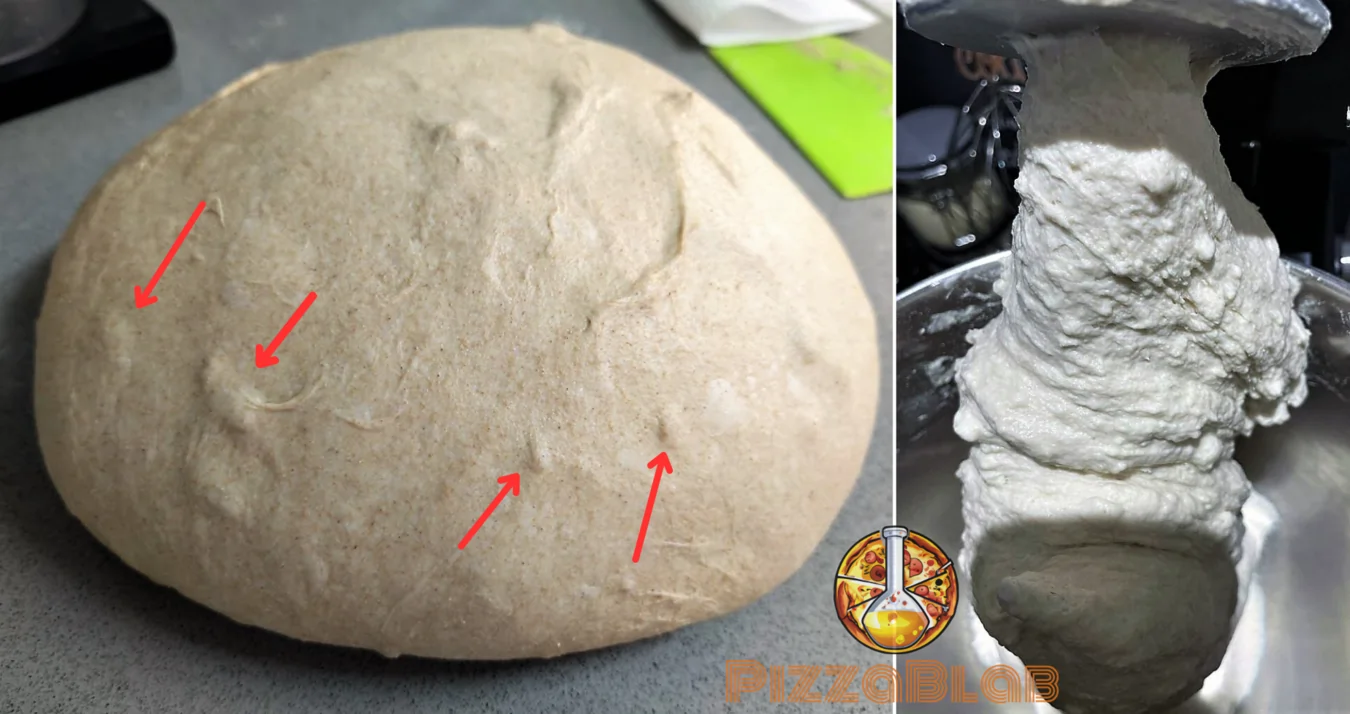
Note: this page refers to rough, non-homogeneous, dense-to-the-touch lumps or chunks of dough – unlike when the dough has a uniform texture but wasn’t smooth (which is a different problem).
These lumps have a distinct appearance and rough texture, and when touched or pressed, you can feel that they consist of semi-dry flour that was not fully hydrated or incorporated into the dough.
Cause 1: Improper Mixing
Explanation:
The dough was not mixed evenly, leaving clumps of flour that were not fully hydrated. These remain in the dough as rough, dense lumps.
Solution:
Ensure all flour is evenly hydrated and that the dough is mixed thoroughly until no dry flour particles or chunks remain.
Read More:
Cause 2: When Using a Biga – The Biga Was Not Fully/Properly Incorporated Into the Final Dough
Explanation:
The biga preferment was not fully incorporated into the final dough, leaving large, dense “biga chunks.”
Solution:
Make sure the biga is fully incorporated into the final dough. Cutting the biga into small pieces beforehand helps achieve better incorporation.
Note that when kneading a dough that contains biga by hand, this issue is more common due to the difficulty of fully incorporating the biga into the final dough (mixers handle this much better).
Read More:
Cause 3: The Flour Contained Lumps That Did Not Properly Hydrate
Explanation:
When flour contains lumps that don’t fully absorb water during mixing, the dough can develop uneven texture, small dry pockets, or rough spots. These flour lumps prevent proper gluten development in the affected areas.
Solution:
Sift the flour before mixing, or break up any visible lumps. During kneading, ensure all flour is fully incorporated and hydrated.
Read More:
Additional Notes / Information
Doughs containing biga are notoriously prone to developing such lumps during mixing. When using biga, make sure it is fully incorporated into the dough – cutting it into small pieces and mixing thoroughly is the best practice.
Another common cause is uneven or insufficient mixing, especially when making an autolyse or a no-knead dough. If you’re mixing without kneading (for an autolyse, a no-knead dough, or before a later kneading stage), ensure all flour is evenly hydrated, leaving no dry flour that could later form these lumps.
These lumps may continue to hydrate and soften during fermentation, but they can still persist afterward, especially if they were large or numerous. While they aren’t detrimental to the dough, they can negatively affect baking, since these lumps are essentially compacted, partially-hydrated flour, with limited gluten development.
The best approach is to prevent them from forming in the first place. If they do form, you can try “squeezing” or pressing them to break them apart and allow the flour to incorporate more evenly, though this can be time-consuming and tedious if there are many.
← Back to PizzaBlab’s Troubleshooting Index
Enjoy the content on PizzaBlab? Help me keep the oven running!