
Biga (Preferment): Characteristics, Benefits, and Preparation
Biga is a stiff Italian preferment characterized by its low hydration level, traditionally around 45%, which results in a firm, dough-like consistency. Unlike the liquid poolish, biga is used to significantly strengthen the dough and impart a sharper, more complex aromatic profile. This article explores the unique properties of biga and provides general guidelines for properly making and using it
Introduction: The Science and Purpose of Biga
Biga is a stiff preferment that originated in Italy. In Italian, ‘biga’ literally means “preferment”.
Biga is made with a very low hydration level (traditionally 45% hydration), resulting in a very stiff consistency. It is traditionally fermented at room temperature for 12-24 hours at 16-18°C/60-64°F.
The fermentation conditions and composition of biga are what give it its unique characteristics. These characteristics include slowing down protease enzyme activity to minimize gluten breakdown during fermentation and prioritizing the production of acetic acid. As a result, biga greatly strengthens the final dough, which was its original, historical purpose.
Today, with the availability of stronger flours compared to those used by Italian bakers in the past, it is important to use biga “carefully” to prevent an overly elastic dough with a tough, chewy crumb texture. Biga is particularly effective when used in doughs with high hydration, such as ciabatta, or in modern Neapolitan/Canotto-style pizza.
Compared to poolish, biga is a more forgiving preferment in terms of fermentation, offering a wider window of usability. This is mainly due to its slower fermentation process (including slower acid production) and less gluten breakdown. In other words, biga is less likely to over-ferment compared to poolish.
Nevertheless, using an over-fermented biga is not recommended.
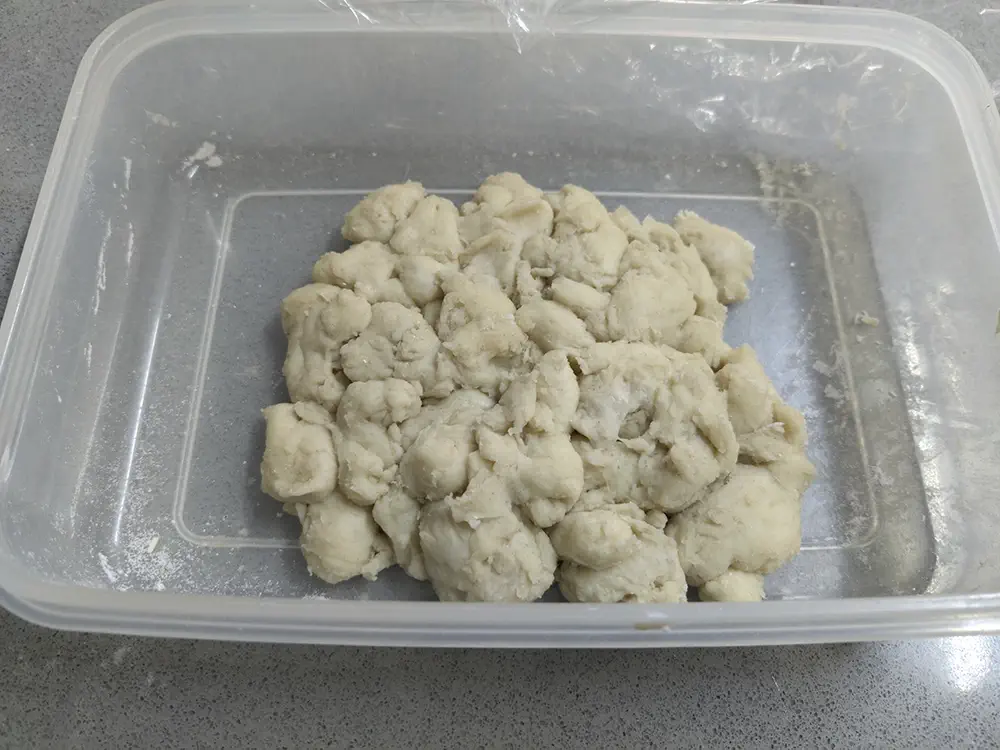
A well-prepared and ready-to-use biga will consist of many biga “chunks” that have slightly expanded during fermentation (depending on the amount of biga and the size of the container, the biga can also form a cohesive “biga block”).
The preparation and incorporation of biga into the final dough are more complex than with poolish, requiring careful mixing to create the desired biga “chunks” (to ensure proper hydration of the flour and prevent excessive gluten development). Given its stiff consistency, incorporating the biga into the final dough without a mixer can be challenging, so it is less recommended using biga when kneading by hand.
Compared to poolish, a biga will impart a sharper, more acidic, and vinegary flavor to the dough.
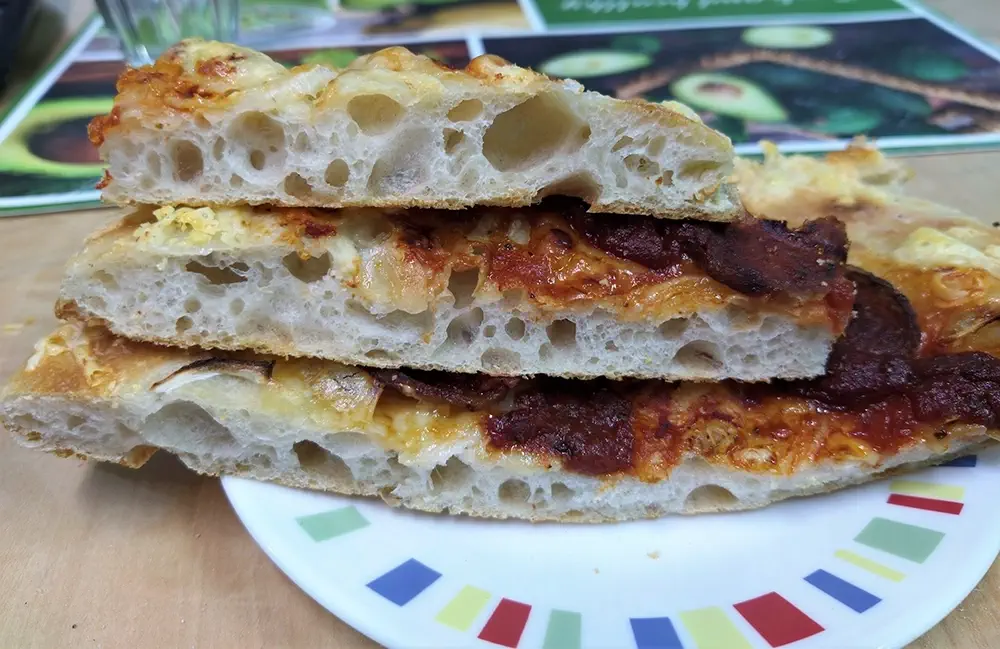
Preparation: General Guidelines for Making Biga
For detailed information on how to make a preferment in general, refer to the article linked at the top of this article.
Traditionally, the preparation of biga follows very clear and strict “rules”. These rules include:
- Dough hydration of 44-45%
- Using 1% fresh yeast or 0.3% instant dry yeast
- Fermenting for 12-24 hours at a temperature of 16-18C/61-65F.
Why this specific temperature range? Because this range is ideal for the formation of specific by-products in the biga during fermentation; Specifically, it helps achieve the right ratio between lactic and acetic acid, which gives the biga its unique characteristics.
There is a variation of biga called “biga lunga”, a process that involves cold fermenting the biga in the fridge for 24 hours and then another 24 hours of room temperature fermentation. Honestly, I don’t see any reason to go through all that trouble, and in such cases, it’s better to simply make a direct dough (or a “regular” preferment). Italians and their peculiarities…
How Much Yeast Should You Use?
The amount of yeast used in a biga is always minimal. Ideally, it should be adjusted according to your ambient room temperature and the intended fermentation duration.
- Temperature is the main driver: The warmer your kitchen, the less yeast you will need to reach peak maturity in the same timeframe.
- Duration: If you want a longer fermentation (closer to 24 hours), you must further reduce the yeast quantity.
Because calculating these tiny amounts manually is difficult, it is highly recommended to use the PizzaBlab Dough Calculator to get the precise amount for your specific conditions.
For a deeper understanding on how to calculate yeast amount for a poolish, refer to: Using PizzaBlab’s Dough Calculator to Determine Yeast for the Preferment and Final Dough.
If you aren’t using a calculator, you can follow these standard ratios for a 8–16 hour fermentation at a room temperature of approximately 20°C (68°F):
- Instant Dry Yeast (IDY): 0.3% (relative to the weight of the flour in the poolish)
- Fresh Yeast: 1% (relative to the weight of the flour in the poolish)
Note: These amounts are baseline estimates. If your kitchen is significantly warmer than 20°C, the poolish will mature much faster, and you may need to reduce the yeast further or shorten the fermentation time, and vice-versa.
Phase 1: Mixing the Biga
Biga should be prepared in a wide and deep container to facilitate mixing. Add the water and yeast to the container and mix thoroughly. Be careful not to use cold water; instead, use water at room temperature (e.g., tap water). Cold water can harm the yeast cells.
Next, add flour to the water and yeast mixture, and begin mixing, NOT kneading. It’s preferable to use your hands for this step (as mentioned, we want to avoid kneading the biga and developing gluten; instead, we simply want the flour to absorb the water).
The most effective way to mix biga is by forming a claw-like shape with your hand and using your fingertips to circulate and combine the flour and water. Continue mixing the biga until there is no dry flour left in the container, as any remaining dry flour will not participate in the fermentation process.
The final consistency of the biga should resemble small to medium-sized chunks, similar to gnocchi, with minimal gluten development. Avoid kneading the biga or forming a cohesive dough mass that will increase in volume during fermentation. The biga should not expand by more than 20%, and certainly should not double in size.
The entire mixing process should take between 3 to 6 minutes. If any large chunks of biga form, you can break them up into smaller pieces with your hands.
Once the biga has been mixed, cover the container with a lid or cling wrap to prevent it from drying out, and allow it to ferment. There’s no need to poke holes in the cling wrap or provide air circulation in the container, as this is unnecessary and serves no purpose.
There is a method for mixing biga called “biga no-stress” that involves “shaking” the container to mix the flour and water (similar to making a shake). However, I do not recommend this method as it often results in an under-mixed biga with a significant amount of dry flour that has not absorbed water.
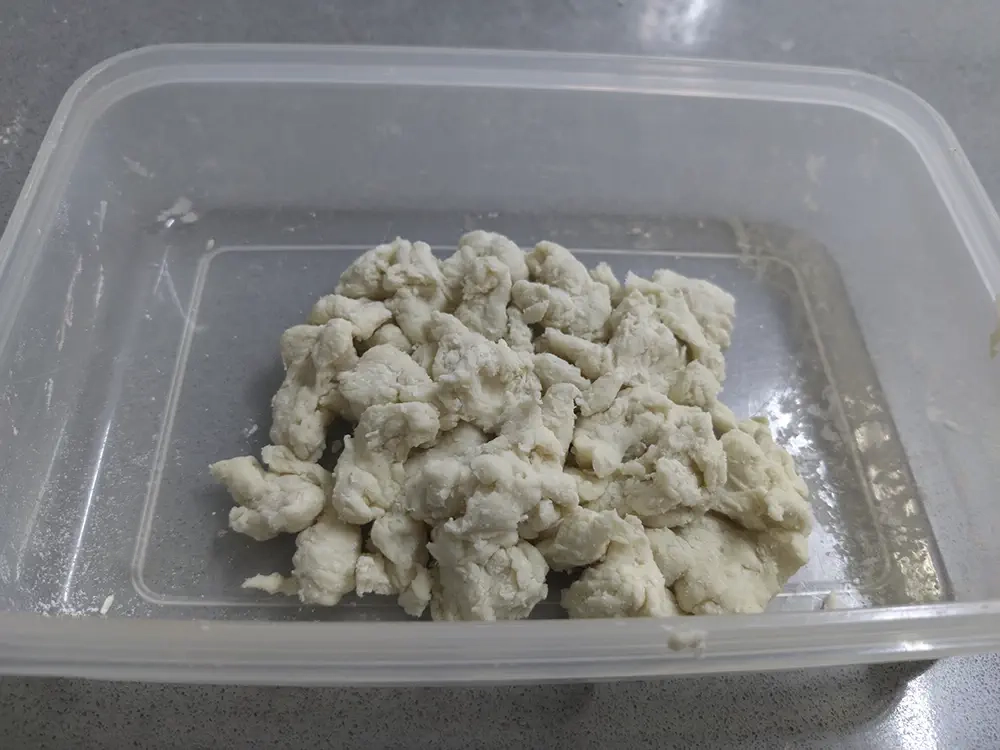
Phase 2: Fermentation and Identifying Ripeness
The biga is ready once you can observe a slight “puffing up” of the chunks and approximately a 20% increase in volume (refer to the photo below). If the biga has not puffed up at all, it is not yet ready.
A ripe biga will have a moderately sharp alcoholic/sour smell that is relatively mild and not overpowering.
If the biga has significantly doubled in volume, it indicates that it was over-mixed. If the biga has a very strong acidic/alcoholic smell, it suggests that it has over-fermented.
Phase 3: Incorporation Into the Final Dough
Since biga is a very stiff preferment, incorporating it into the final dough can be challenging. To make it easier, it is highly recommended to crumble or cut the biga into smaller pieces before incorporating it into the final dough.
To further facilitate the incorporation of the biga, you can optionally soak it in water prior to mixing. Simply add the remaining water from the recipe to a bowl, add the biga chunks, and let them sit in the water for a few minutes before mixing.
However, be cautious not to mix the biga too much in water alone, as this can cause the starch to separate from the biga chunks, resulting in hard and sticky gluten lumps that are difficult to incorporate into the dough (this is different from mixing poolish with water, which is possible due to its liquid texture).
Once the biga and water are ready, add the flour and other dough ingredients, and continue kneading as usual, ensuring that all the biga is fully incorporated into the dough.
Note that the above process is for using a mixer. Hand kneading a dough made with biga is possible, but it is labor-intensive and requires a lot of force and elbow grease to properly incorporate all the biga into the final dough. If you choose to knead by hand, it is recommended to cut the biga into small pieces to facilitate its incorporation into the dough.
Another option for hand kneading is to put the biga in a food processor along with all the flour from the recipe and grind everything together until you achieve “biga crumbs”, which can then be added to the remaining water.
Key Takeaways
- The Composition:
Biga is a stiff preferment traditionally made with a hydration level of 44–45% and a small amount of yeast. - The Goal:
Its primary purpose is to strengthen the dough and provide a sharper, vinegary-sour flavor profile (favoring acetic acid). It increases the elasticity of the final dough, making it ideal for high-hydration styles like Ciabatta or “Canotto” pizza. - Fermentation Environment:
Traditionally, biga is fermented at 16–18°C (61–65°F) for 12–24 hours. While it can be made at other room temperatures, this specific range is ideal for balancing lactic and acetic acid production. - Identifying Ripeness:
A ripe biga will not double in size; instead, the chunks should appear “puffed up” with an increase in volume of about 20%. If it significantly doubles or has an overpowering alcoholic smell, it is likely over-fermented or over-mixed. - Preparation Technique:
You should mix, not knead biga. The goal is to ensure the flour absorbs the water without developing a significant gluten network. It should look like small, gnocchi-sized chunks rather than a cohesive mass. - Incorporation:
Because it is stiff, biga is difficult to incorporate by hand. It is highly recommended to use a mixer, crumbling the biga into small pieces or “soaking” them briefly in the recipe water before adding the remaining ingredients. - Preferment Masterclass:
If you want to learn more about preferments in general, including their scientific impact and detailed instructions, see: Pizza Preferment Masterclass: The Science of Poolish, Biga, and Beyond.

Enjoyed this article? Join the BLAB
Unlock the Key Takeaways above and enjoy a 100% clean, ad-free experience across the entire site.